🧶 Beautiful ✨ Detailed 💝 Adorable

Layla the Llama Amigurumi Pattern

Layla the Llama Amigurumi Pattern
4.1★ Rating
5-7 Hours Time Needed
1.2K Made This
✂️

Advanced Level

Designed for experienced crocheters, these patterns involve intricate designs and complex techniques to challenge and inspire.

⏱️

Weekend Treat

Takes 5-7 hours, making it an enjoyable project to finish over a couple of days.

🧸

Cute Companion

An adorable friend to cherish, handcrafted with love to bring comfort and joy for years to come.

About This Layla the Llama Amigurumi Pattern

This pattern creates Layla the Llama, a plush amigurumi made with super-bulky plush yarn for an irresistibly soft texture. The design features a tall neck, rounded head, four stout legs, and a removable saddle blanket with tassels. The pattern uses basic amigurumi shaping plus a small waistcoat stitch panel for the saddle.

Layla the Llama Amigurumi Pattern crochet pattern - detailed view of completed project

Clear step-by-step rounds and assembly instructions with photos are included to help you place eyes, sew parts, and add finishing touches. Recommended for crocheters comfortable with continuous spiral rounds and small sewing details.

Why You'll Love This Layla the Llama Amigurumi Pattern

I absolutely love this pattern because the super-bulky plush yarn gives Layla the softest, squishiest texture that is impossible not to hug. I adore the tall neck silhouette — it gives Layla a unique personality compared to typical amigurumi shapes. The saddle blanket adds a playful pop of color and lets you practice the waistcoat stitch for a pretty finish. Sewing the legs and strap together is very satisfying and makes a secure, sturdy toy that holds up to cuddles.

Layla the Llama Amigurumi Pattern step 1 - construction progress Layla the Llama Amigurumi Pattern step 2 - assembly progress Layla the Llama Amigurumi Pattern step 3 - details and accessories Layla the Llama Amigurumi Pattern step 4 - final assembly and finishing

Switch Things Up

I love how versatile this pattern is for customization — change the saddle colors to match any decor or season.

I often use pastel shades for a softer look or bright contrasting colors for a playful finish to the saddle blanket and tassels.

Want a mini or jumbo version? Change yarn weight and hook size: thinner yarn and smaller hooks make adorable keychain minis, while bulkier yarn makes a chunky cuddle toy.

I sometimes swap safety eyes for embroidered eyes for a baby-safe version; embroidery also lets you change expressions easily.

I like adding tiny felt or crocheted accessories like a tiny flower or scarf to personalize Layla for gifts or themed displays.

To make Layla posable, I add thin craft wire inside the legs or neck before stuffing; this gives adjustable posing while keeping it sturdy.

Try different stitch textures on the saddle — simple dc rows or shell stitches add unique patterns instead of the waistcoat stitch.

I recommend experimenting with blush placement and mouth styles; small changes in eye spacing and mouth shape change Layla's personality dramatically.

If you prefer a more pared-back look, skip the tassels and use a single-color blanket, or embroider geometric patterns on the blanket instead.

I also enjoy making a set of llamas in graduated sizes with matching blankets to create a coordinated collection for gifting or display.

Common Mistakes & How to Fix Them

✗ Skipping stitch markers during spiral rounds leads to losing the beginning of the round; place a stitch marker at the start of every new round and move it as instructed. ✗ Not stuffing evenly causes lumpy necks or heads; stuff gradually, especially around the head and neck, adding small bits of stuffing and shaping as you go. ✗ Pulling yarn too tight when sewing pieces can distort your shaping and leave puckers; use gentle, even tension and adjust stuffing while you sew for smooth joins. ✗ Forgetting to leave long tails when finishing panels or accessories makes sewing difficult; always leave a long yarn tail for sewing the belly strap, ears, nose, and tail securely. ✗ Changing yarn color for the saddle without securing ends neatly can create messy backs; weave in ends and hide tails inside the saddle or blanket before sewing it to the llama.

Layla the Llama Amigurumi Pattern

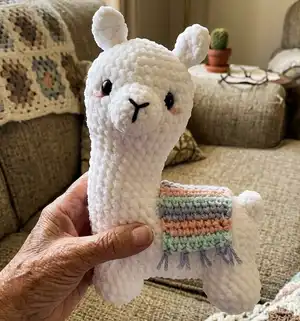
Make Layla the Llama, an adorable plush amigurumi with a tall neck and a colorful saddle blanket. This pattern guides you through each piece — head, body, legs, ears, tail, and accessories — with clear photos and tips. Perfect for crafters who enjoy textured plush yarn and small-assembly projects. Create a charming handmade gift or a cute shelf companion with this step-by-step pattern.

Advanced 5-7 Hours

Materials Needed for Layla the Llama Amigurumi Pattern

— Main Fabric

  • 01
    Super bulky (weight 6) plush yarn - Premier Parfait Chunky in white (used for body) - approx one skein (or enough to complete 11in llama)
  • 02
    Worsted weight yarn (weight 4) in three colors for saddle blanket - small amounts of pink, lavender, and blue (to make a 10-ch by ~9-row saddle)
  • 03
    White worsted yarn (weight 4) - small amount for sewing the blanket to the llama
  • 04
    Light pink yarn - small amount for blush detailing
  • 05
    Black embroidery thread - small amount for mouth embroidery

— Tools Required

  • 01
    Crochet hook size 5.5 mm
  • 02
    Crochet hook size 3.5 mm (optional, for tassels and detail)
  • 03
    Small crochet hook 3.5 mm for pulling tassels
  • 04
    Super bulky plush yarn (weight 6) in white
  • 05
    Worsted weight yarn (weight 4) in three colors for saddle blanket
  • 06
    12 mm black safety eyes (2 pieces)
  • 07
    Stitch markers (8 or more)
  • 08
    Scissors
  • 09
    Yarn needle for sewing
  • 10
    Sewing pins
  • 11
    Polyester stuffing
  • 12
    Black embroidery thread

Progress Tracker

0% Complete

— Technical Notes and Gauge :

Info :

A. Crochet in continuous spiral rounds, unless specified otherwise. Use a stitch marker or a piece of yarn to keep track of the last stitch in each round. B. When filling with polyester stuffing, pull apart each large chunk into many smaller chunks. This ensures an even distribution of firmness within the amigurumi. C. Use sewing pins to secure the nose, ears, and tail before you sew them to the llama. D. Gauge: 4 rows of 4 sc = 4" x 4"

Infos :

Waistcoat Stitch (Ws) Explanation Worked in repeating rows: R1: ch10. R2: sc across, ch1. R3: insert your hook into the middle post of the sc stitch (it looks like an upside down "v"), Yarn over, pull up a loop and pull through both stitches on your hook (repeat across the remaining stitches on the row - except the very last stitch) sc into the last stitch, ch1 and turn. Repeat R3 for remaining rows.

— Nose :

Round 1 :

sc6 in MR (6 sts)

Round 2 :

inc x6 (12 sts)

Round 3-4 :

sc around (12 sts)

Info :

Cut yarn, leaving a long tail for sewing. FO. Stuff with Polyester stuffing.

— Head & Body :

Round 1 :

sc6 in MR (6 sts)

Round 2 :

inc x6 (12 sts)

Round 3 :

(sc, inc) x6 (18 sts)

Round 4 :

(sc2, inc) x6 (24 sts)

Round 5 :

(sc3, inc) x6 (30 sts)

Round 6 :

(sc4, inc) x6 (36 sts)

Round 7-12 :

(6 rds): sc around (36 sts)

Round 13 :

(sc4, dec) x6 (30 sts)

Round 14 :

(sc3, dec) x6 (24 sts)

Round 15-18 :

(4 rds): sc around (24 sts)

Info :

Place a stitch marker at the front of the head between rounds 9-10 (this will help with eye placement later on) (picture 1).

Round 19-20 :

(Counts as 2 rds in total) sc22, (there should be 2 un-worked sc), ch10. Turn and work sc9 down the chain, sl st into the base sc. Move the stitch marker to the end of the ch (marks the beginning/end of new rounds). (picture 2)

Info :

Video: https://youtu.be/TDcy_0r_4us

Info :

*Starting at the 2 un-worked sc sts, Sc around the neck and the back of the ch. (43 sts)

Round 21 :

inc, sc20, inc, sc20, inc (46 sts)

Round 22 :

inc, sc43, inc2 (49 sts)

Round 23 :

inc, sc47, inc (51 sts)

Round 24-27 :

(4 rds): sc around (51 sts) (picture 3)

Info :

Move your stitch marker 1 stitch to the left and sc1. Stuff the head and neck. Do not FO

Info :

At this point, sew on the nose between rounds 8-13. Place the safety eyes between rounds 9-10, about 7 stitches apart. (picture 4) You can sew on a mouth using black embroidery thread (picture 5) Add blush to the llama using pink yarn right below the eyes.

— Legs :

Info :

(continued in white plush yarn and 5.5mm hook) Before you begin crocheting the legs, section the areas using stitch markers. Each leg will be 9 stitches across with 6 stitch-spaces between the front and back legs. Arrange the stitch markers so there is a 1 stitch-space between the front legs, and a 2 stitch-space between the back legs. It should look something like this (picture 6) *note: for the 9-st spaces, I placed the stitch markers in sts 1 and 9. Video: https://youtu.be/r6I0PTmUQvY

Round 1 :

sc9, ch9, sl st into the first sc with the stitch marker (18 sts) (picture 7)

Round 2-4 :

(3 rds): sc around (18 sts)

Round 5 :

sc2, (sc2, dec) x4 (14 sts)

Round 6 :

sc2 (sc, dec) x4 (10 sts)

Info :

Sl st, FO, close the leg with the yarn tail. Hide the tail inside the llama’s leg. (picture 8) Repeat this step for the other three legs.

Info :

*For the last three legs, make a slip knot on your crochet hook and then insert your hook into the sc to crochet the leg. (picture 9)

— Belly Strap :

Info :

(in white plush yarn with 5.5mm hook) worked in repeating rows. In the 6-stitch space between the front and back legs (front of the llama only) (picture 10)

Round 1 :

inc, sc4, inc, ch1 & turn work

Round 2-10 :

sc8, ch1 & turn work (9 rows)

Info :

FO, leaving a very long tail for sewing (long enough to sew the belly and all four legs.)

— Ears :

Round 1 :

sc4 in MR (4 sts)

Round 2 :

(sc, inc) x2 (6 sts)

Round 3 :

(sc2, inc) x2 (8 sts)

Round 4-5 :

(2 rds): sc around (8 sts)

Info :

FO, leaving a long tail for sewing. Weave the yarn through the bottom of the ear to close it. Make another one identically. (picture 11)

— Tail :

Round 1 :

sc6 in MR (6 sts)

Round 2 :

(sc, inc) x3 (9 sts)

Round 3 :

sc around (9 sts) (picture 12)

Info :

FO, leaving a long tail for sewing. Stuff with polyester stuffing.

— Assemble the Body :

Item Name (P1) :

1. Sew up the belly: https://youtu.be/Oza6r2IG2WQ

Info :

Fold the belly strap across the llama to create the belly. Whip stitch in each stitch across the 6-st space between the front and back legs (pictures 13, 14, and 15).

Info :

Connect the first leg to the strap by sewing halfway down the shorter side of the rectangle. (picture 16) Sew the two legs together and then sew the second leg to the strap. (picture 17) Thread the yarn to the other side of the llama.

Info :

Stuff the llama’s neck and legs. To finish, sew the second pair of legs to the belly strap as before, FO and hide the yarn ends. (pictures 18 & 19)

Info :

2. Sew the ears to the llama’s head between rds 3-5 about 11 sts apart. Secure the ends and hide them inside the head. (picture 20)

Info :

3. Sew the tail on the back of the llama. Secure and hide the yarn ends. (picture 21)

— Saddle blanket :

Info :

(worsted medium weight yarn in any 3 colors of choice, 5.5mm hook) worked in repeating rows. *Alter the number of ch & rows as needed to fit your llama

Round 1 :

Ch10

Round 2-22 :

Ws (waistcoat st) across, ch1, turn (change yarn color every 2 rows) (picture 22) (add more/less rows depending on yarn weight and the size of your llama)

Info :

FO, hide yarn tails. Add tassels.

— Tassels :

Info :

Cut ten 3-inch pieces of yarn. Use a small crochet hook (3.5 mm) to pull the yarn through the blanket. Make a loop and pull the yarn through with the hook. (picture 23) (Repeat the step every other stitch - 5 tassels on each end of the blanket) Trim the tassels to the same length. (picture 24)

Info :

Sew the saddle blanket to the back of the llama using white worsted yarn (picture 25). *ensure that it is even by pinning it in place prior to sewing.

Assembly Instructions

  • Fold the belly strap across the llama to create the belly and whip stitch in each stitch across the 6-st space between the front and back legs (pictures 13, 14, and 15).
  • Connect the first leg to the belly strap by sewing halfway down the shorter side of the rectangle, sew the two legs together and then sew the second leg to the strap; repeat on the other side and hide ends (pictures 16-19).
  • Sew the ears to the head between rounds 3-5 about 11 stitches apart, secure and hide yarn ends inside the head (picture 20).
  • Sew the tail onto the back of the llama, secure firmly and hide yarn ends inside the body (picture 21).
  • Pin the saddle blanket even on the back, then sew it in place using white worsted yarn; add tassels to both ends before sewing and trim tassels to even length (pictures 22-25).

Important Notes

  • 💡Use stitch markers to keep track of rounds and special sections such as the start of the neck and leg spaces.
  • 💡Stuff gradually and pull polyester stuffing apart into small pieces for even shaping in narrow areas like the neck.
  • 💡Leave long yarn tails when finishing panels and accessories so you have enough length to sew pieces securely.

This sweet Layla the Llama pattern makes a cuddly, shelf-ready companion with a soft plush feel and a colorful saddle blanket. Perfect as a handmade gift or playful decor, it brings whimsical charm and tactile comfort to any space. Happy crocheting and enjoy every stitch! 🧶🦙

You ask,

we answer.

FAQs

What size will the finished piece be?

The finished amigurumi measures approximately 11 inches tall (29 cm) when using the recommended super-bulky plush yarn and a 5.5 mm hook; size may vary with different yarn or hook.

Can I use different yarn weights for this pattern?

Yes, you can use different yarn weights but this will change the final size and texture; if using thinner yarn, choose a smaller hook and expect a smaller llama, and for chunkier yarn increase your hook size.

Do I need prior crochet experience for this pattern?

This pattern is rated advanced (intermediate-advanced), so experience crocheting in continuous spiral rounds and basic shaping (increases and decreases) is recommended for best results.

How long does this project typically take to complete?

Most crocheters complete this project in 5-7 hours, depending on experience level, yarn familiarity, and how much time is spent on sewing and finishing details.

What stitch is used for the saddle blanket?

The saddle blanket is worked in the Waistcoat Stitch (Ws) in repeating rows; instructions and a brief explanation are included in the pattern for working the Ws across rows.