🧢 Beautiful ✨ Detailed πŸ’ Adorable

Wall hanging decor 'Lama' Pattern

Wall hanging decor 'Lama' Pattern
4.4β˜… Rating
5-7 Hours Time Needed
4.2K Made This
βœ‚οΈ

Intermediate Level

Ideal for those with basic crochet experience, featuring slightly more advanced stitches and techniques to expand your skills.

⏱️

Weekend Treat

Takes 5-7 hours, making it an enjoyable project to finish over a couple of days.

🏑

Cozy Accent

A warm touch for your space that transforms ordinary corners into inviting nooks filled with handmade charm.

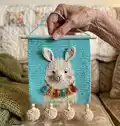
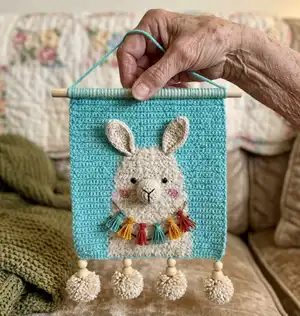
About This Wall hanging decor 'Lama' Pattern

This pattern teaches you how to crochet a 46x53-row tapestry canvas with a cuddly llama motif and attach small amigurumi details for dimension. You will make the canvas using two strands of cotton for a sturdy background and add a boucle texture for the llama body. The finished piece includes ears, a muzzle, tassel decor and pom-poms for a playful, boho look.

Wall hanging decor 'Lama' Pattern crochet pattern - detailed view of completed project

Includes step-by-step instructions for the canvas, ear and muzzle pieces, cheek appliques and assembly. Photos and a full canvas chart are provided to guide your color changes and placement.

Why You'll Love This Wall hanging decor 'Lama' Pattern

I absolutely love this pattern because it combines tapestry crochet and small amigurumi elements for a unique textured wall hanging that feels handmade and modern. I enjoy how the boucle yarn gives the llama a fluffy, tactile body while the clean background keeps the design contemporary. Creating the tassel garland and large pom-poms is one of my favorite finishing touches β€” it really brings the piece to life. I also appreciate that the canvas chart gives you full control over color placement, so you can customize the llama to suit your space.

Wall hanging decor 'Lama' Pattern step 1 - construction progress Wall hanging decor 'Lama' Pattern step 2 - assembly progress Wall hanging decor 'Lama' Pattern step 3 - details and accessories Wall hanging decor 'Lama' Pattern step 4 - final assembly and finishing

Switch Things Up

I love how easy it is to customize this design β€” you can change the background and llama colors to fit any room or season.

Try pastel shades for a nursery or bold, contrasting colors for a striking living room piece.

To make a smaller or larger hanging, adjust the yarn weight and hook size β€” bulky yarn with a larger hook gives a chunkier result, while fine yarn gives a delicate mini version.

I often swap the boucle yarn for a faux fur or another textured yarn to create different fur effects on the llama body.

Try replacing the tassel garland with small crocheted flowers or tiny hearts for a different theme and personality.

I sometimes add metallic or variegated yarn for a few tassels to give a bit of sparkle and visual interest.

If you want a child-safe version, embroider the eyes and secure all decorations very tightly, avoiding beads and small parts.

Consider making a set of smaller canvases in the same style to create a gallery wall β€” mix animal motifs for a whimsical display.

Make the pom-poms in contrasting colors or ombre shades to draw attention to the bottom edge and match your room accents.

I recommend experimenting with different stick materials (driftwood, painted dowel, or a copper rod) to change the overall look β€” each gives a very different finish.

Common Mistakes & How to Fix Them

βœ— Skipping the two turning chains at the beginning of each row will shift your stitch count and misalign the canvas pattern; always start rows with 2 turning chains and count them as the first sc. βœ— Not using two strands for the mint background when recommended can make the canvas too loose and change final size; use two strands of Alize Cotton Gold for an even dense canvas. βœ— Changing color by stretching yarn across the wrong side without securing ends can create long floats that catch later; take separate skeins for color blocks and weave in ends at the wrong side as you go. βœ— Stuffing the muzzle too firmly before sewing can distort its shape on the canvas; add only a small amount of fiberfill to make the muzzle slightly protruding and adjust while sewing. βœ— Placing safety eyes without confirming row placement may result in uneven spacing; always count down from the top of the head and secure eyes between the specified rows before final closing.
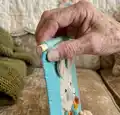
 βœ— Failing to leave long tails when fastening off reduces ease of sewing and attaching decorations; leave tails for sewing the muzzle, ears, cheeks and for attaching the canvas to the wooden stick.

Wall hanging decor 'Lama' Pattern

Create a charming llama wall hanging to brighten any nursery or living space. This pattern combines simple tapestry crochet with small amigurumi details for a playful textured finish. Follow clear step-by-step instructions, photos, and a canvas chart to make a delightful handmade decoration you can personalize.

Intermediate 5-7 Hours

Materials Needed for Wall hanging decor 'Lama' Pattern

β€” Main Fabric

  • 01
    Alize Cotton Gold (100g/330m) mint color (No522) - background: use two strands for crochet canvas
  • 02
    Alize Naturale Boucle (100g/200m) milk color (No62) - llama body: 1 strand
  • 03
    Alize Cotton Gold (100g/330m) beige color (No67) - llama body & muzzle/ears: 1 strand
  • 04
    Drops Safran (50g/160m) pink color (No01) - cheeks, small amounts
  • 05
    Small amount of dark brown yarn or embroidery floss for nose embroidery

β€” Tools Required

  • 01
    Crochet hook 3.5 mm (US E) for canvas
  • 02
    Crochet hook 1.75 mm for muzzle and ears
  • 03
    Toy stuffing: polyester fiberfill (small amount)
  • 04
    Yarn needle for sewing details
  • 05
    8 mm safety eyes (optional, eyes can be embroidered)
  • 06
    Round wooden stick (about 6 cm longer than the canvas) or any similar dowel
  • 07
    8 wooden beads (optional) for pom-pom decoration
  • 08
    Pom-pom maker (or alternative method) for four pom-poms
  • 09
    Scissors for trimming pom-poms and yarn

Progress Tracker

0% Complete

β€” Canvas :

Info :

Size: 46 sc X 53 rounds - 26 cm X 26,5 cm

Info :

1. You need to turn the work after every row and crochet always from right to left, but the odd rows on canvas pattern should be calculate from right to left, even rows (wrong rows) - from left to right.

Info :

2. The yarn is not cut or stretched under a different color. For each colored part, we take a separate skein.

Info :

3. Every row starts with 2 turning chains, they are counted as the first sc.

Instruction :

Take the yarn of mint color Alize Cotton Gold No522 and 3.5 crochet hook (US E). Make 47 ch, work sc into the 3th ch, work 8 more sc and change yarn to Alize Naturale Boucle No62 and Alize Cotton Gold No67, crochet 26 sc and change to mint color again. For this color changing take the second skein and work the last 10 sc.

Info :

Every row starts with 2 turning chains; these chains are counted as the first sc. The last sc of the row is worked into the point marked with an arrow on the chart.

Instruction :

Follow the provided canvas chart for color placement across all 53 rows and 46 stitches per row. Turn the work after every row and crochet in single crochet throughout, managing colors as shown in the chart.

Instruction :

When changing yarn at the wrong side, pick up the new color in the last yarn over of the previous stitch and continue to avoid visible joins on the right side.

Instruction :

Continue crocheting according to the canvas pattern till the end, fasten off the last stitch, leaving a thread tail with 2.5 m in length (we will use this thread for attaching the canvas to a wooden stick), weave in all unnecessary threads at the wrong side and iron the canvas.

β€” Ears :

Info :

Use yarn Alize Cotton Gold beige color No67, in one strand, hook 1.75mm. Make 2 pieces.

Rd 1 :

6 sc in MR (6 sts)

Rd 2 :

(inc)*6 (12 sts)

Rd 3-4 :

12 sc (12 sts)

Rd 5 :

(1 sc, inc)*6 (18 sts)

Rd 6-10 :

18 sc (18 sts)

Rd 11 :

(5 sc, inc)*3 (21 sts)

Rd 12-13 :

21 sc (21 sts)

Rd 14 :

(5 sc, dec)*3 (18 sts)

Rd 15-18 :

18 sc (18 sts)

Instruction :

Fold the ear in half and crochet 8 sc through two layers.

Instruction :

Fasten off and leaving a long tail for sewing.

β€” Muzzle :

Info :

Use yarn Alize Cotton Gold beige color No67, in one strand, hook 1.75mm.

Rd 1 :

6 sc in MR (6 sts)

Rd 2 :

(inc)*6 (12 sts)

Rd 3 :

(1 sc, inc)*6 (18 sts)

Rd 4 :

(2 sc, inc)*6 (24 sts)

Rd 5 :

(5 sc, inc)*4 (28 sts)

Rd 6-11 :

28 sc (28 sts)

Instruction :

Fasten off and leaving a long tail for sewing.

β€” Nose :

Instruction :

Take brown yarn, secure it at the wrong side of the muzzle and embroider the nose contour to create the face; use embroidery floss or Iris as needed.

β€” Cheeks :

Info :

Make 2 pieces using Drops Safran pink color No01.

Rd 1 :

6 sc in MR (6 sts)

Rd 2 :

(inc)*6, sl st (12 sts)

Instruction :

Fasten off and leaving a long tail for sewing.

β€” Decor on the neck :

The first chain :

Make 50 ch and on this chain attach with a loop tassels of different colors. Take the yarn for the tassels, about 10 cm long.

The second chain :

(16 ch, sl st in 6th ch)*4, 10 ch

β€” Assembling all the parts :

Instruction :

Sew the nose between rows 11 and 17 (count down from the head top) and stuff with fiberfill a little to make it protruding.

Instruction :

Now secure the eyes between the rows 11 and 12 (count down from the top of the head). Use safety eyes or embroider the eyes as preferred.

Instruction :

We fold the ears as shown in the photo and sew them to the canvas at the top of the head where indicated by the chart and photos.

Instruction :

Sew cheeks to the sides of the muzzle using the long tail left when fastening off.

Instruction :

Sew decorative chains and tassel garland on the neck as shown in the photos, spacing tassels evenly along the first chain.

Instruction :

Take a long round wooden stick, which is 6 cm longer than the crochet canvas and attach the top of the canvas to it using the 2.5 m tail left earlier or by wrapping the top edge around the stick.

Instruction :

Make ch 60 and tie its ends to the ends of wooden stick forming a loop for hanging to the wall.

Instruction :

Make four pompoms with 5.5 cm in diameter approximately, using a special pompoms maker or any other convenient way.

Instruction :

Leave long tail on each pompom; these tails will be used to attach the pom-poms to the canvas.

Instruction :

Trim the pompoms to make them even and neat, then add wooden beads to the pompom threads and attach the pompoms to the bottom edge of the canvas, spacing them evenly as shown in the photo.

Info :

Weave in all unnecessary threads at the wrong side and iron the canvas gently for a neat finish.

Assembly Instructions

  • Sew the muzzle (nose) to the canvas between rows 11 and 17 (count down from the top of the head), stuff lightly with fiberfill so it protrudes slightly, and secure with a yarn needle.
  • Position and secure eyes between rows 11 and 12 (count down from the top of the head); use safety eyes or embroider them and hide knots at the wrong side.
  • Fold each ear and sew them to the top of the head using the long tail left after finishing, matching the placement shown in the photo for symmetry.
  • Sew the two pink cheeks to each side of the muzzle using the long tail left after fastening off; stitch through the canvas to secure and hide ends on the wrong side.
  • Attach the decorative tassel chains across the neck by sewing the chain ends to the canvas and arranging tassels evenly; secure knots at the wrong side.
  • Wrap the top edge of the canvas around a wooden stick and secure with the long 2.5 m tail or by stitching; tie a ch-60 cord to the stick ends to form a hanging loop.
  • Thread wooden beads onto pompom tails and sew the four trimmed pompoms to the bottom edge of the canvas, spacing evenly and securing knots at the wrong side.

Important Notes

  • πŸ’‘Use two strands of the mint Alize Cotton Gold for the canvas if using thin yarn to achieve the correct density and size.
  • πŸ’‘Start each row with 2 turning chains and count them as the first single crochet to keep the stitch pattern aligned.
  • πŸ’‘Keep color changes tidy by using separate skeins for large colored areas and weave in or secure yarn tails on the wrong side as you go.
  • πŸ’‘Leave long tails when fastening off the muzzle, ears, cheeks and canvas top to make sewing and attaching the pieces to the canvas easy.

This sweet Lama wall hanging makes a lovely handmade accent that adds texture and charm to any room. It mixes tapestry crochet, boucle texture and playful pom-poms for a modern boho look. Display it in a nursery, hallway or craft space to brighten your home with a cozy, handmade touch. 🧢✨

You ask,

we answer.

FAQs

What size will the finished piece be?

The finished canvas measures approximately 26 cm x 26.5 cm (46 sc x 53 rounds) before adding the wooden stick and pom-poms.

Can I use different yarn weights for this pattern?

Yes, you can use different yarn weights, but the final size and density will change; if your yarn is thin, use two strands for the canvas as recommended.

Do I need prior crochet experience for this pattern?

This pattern is rated intermediate: basic single crochet, color changes for tapestry, and simple amigurumi shaping are required.

How long does this project typically take to complete?

Most crocheters complete this project in 5-7 hours depending on experience, color changes and finishing details.

Are safety eyes necessary for the design?

Safety eyes are optional; you can embroider the eyes instead if making this for a child or to avoid small parts.