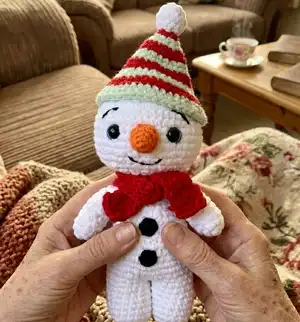
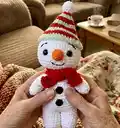
Make a charming handmade snowman amigurumi that is perfect for holiday gifts and cozy winter decor. This pattern guides you through every step — from crocheting the head and body to assembling the hat, scarf, and tiny details. You will enjoy clear round-by-round instructions and helpful assembly photos to get the best finished result. Ideal for a thoughtful, personalized handmade present.
Progress Tracker
0% Complete
— Beginning :
Info :
All pieces are worked in a spiral continuously. This means that you do not end the rnd with a slip stitch and do not start a rnd with a chain.
Info :
I start working every piece from a magic ring but you can ch2 and work the necessary number of sc in the second st from the hook.
Info :
You should crochet tight enough to prevent stuffing from sticking out.
— Head :
Info :
With plush white yarn and hook G/6 (4 mm) make a magic ring.
Round 1 :
6 sc in magic ring = 6 sts
Round 2 :
2 sc in each st around = 12 sts
Round 3 :
(sc in next st, 2 sc in next st)*6 times = 18 sts
Round 4 :
(sc in next 2 sts, 2 sc in next st)*6 times = 24 sts
Round 5 :
(sc in next 3 sts, 2 sc in next st)*6 times = 30 sts
Round 6 :
(sc in next 4 sts, 2 sc in next st)*6 times = 36 sts
Round 7 :
(sc in next 5 sts, 2 sc in next st)*6 times = 42 sts
Round 8 :
(sc in next 6 sts, 2 sc in next st)*6 times = 48 sts
Round 9-15 :
sc in each st around = 48 sts
Info :
Important!!!! If you use safety eyes (16 mm) insert them now between rounds 11 and 12 with 9 sts in between.
Round 16 :
(sc in next 6 sts, sc dec)*6 times = 42 sts
Round 17 :
(sc in next 5 sts, sc dec)*6 times = 36 sts
Round 18 :
(sc in next 4 sts, sc dec)*6 times = 30 sts
Round 19 :
(sc in next 3 sts, sc dec)*6 times = 24 sts
Round 20 :
(sc in next 2 sts, sc dec)*6 times = 18 sts
Round 21 :
(sc in next st, sc dec)*6 times = 12 sts
Round 22 :
sc dec*6 times = 6 sts
— Legs & Body :
Info :
With plush white and hook G/6 (4 mm) make a magic ring.
Round 1 :
6 sc in magic ring = 6 sts
Round 2 :
2 sc in each st around = 12 sts
Round 3 :
(sc in next st, 2 sc in next st)*6 times = 18 sts
Round 4-10 :
sc in each st around = 18 sts
Info :
Fasten off, leave the tail about 10 cm and cut the yarn. One leg is done.
Info :
Rep rnds 1-10 for the second leg. Do not cut yarn when the second leg is finished.
Round 11 :
18 sc around the 1st leg's sts, then make 18 sc around the 2nd leg's sts (this is how legs are attached to each other) = 36 sts
Info :
!!!Then with the tail of the first leg yarn you should do 1 sl st inside the legs to prevent hole between the legs.
Round 12-18 :
sc in each st around = 36 sts
Info :
Now you need to stuff the legs. Otherwise it will be difficult later.
Round 19 :
(sc in next 4 sts, sc dec)*6 times = 30 sts
Round 20 :
sc in each st around = 30 sts
Round 21 :
(sc in next 3 sts, sc dec)*6 times = 24 sts
Round 22 :
sc in each st around = 24 sts
Round 23 :
(sc in next 2 sts, sc dec)*6 times = 18 sts
Info :
Now stuff the body and continue:
Round 24 :
(sc in next st, sc dec)*6 times = 12 sts
Round 25 :
sc in each st around = 12 sts
— Arm (Make 2) :
Info :
With plush white yarn and hook G/6 (4 mm) make a magic ring.
Round 1 :
6 sc in magic ring = 6 sts
Round 2 :
2 sc in each st around = 12 sts
Round 3-8 :
sc in each st around = 12 sts
Round 9 :
(sc in next 4 sts, sc dec)*2 times = 10 sts
Info :
Stuff the arm, do not stuff it too tight.
Round 10 :
(sc in next 3 sts, sc dec)*2 times = 8 sts
Round 11 :
(sc in next 2 sts, sc dec)*2 times = 6 sts
Info :
Fold arm in half and sc two sides together with sc 2. Fasten off, cut yarn and weave in ends. One arm is done.
Info :
Rep rnds 1-11 for the second arm.
— Buttons (make 2) :
Info :
With black cotton yarn and hook 3 mm make a magic ring.
Round 1 :
6 sc in magic ring = 6 sts
Round 2 :
2 sc in each st around = 12 sts
Info :
Fasten off. Leave the long tail for sewing. Repeat for second button.
— Nose :
Info :
With orange cotton yarn and hook 3 mm make a magic ring
Round 1 :
6 sc in magic ring = 6 sts
Round 2 :
sc in each st around = 6 sts
Round 3 :
(sc in next st, 2 sc in next st)*3 times = 9 sts
Round 4 :
sc in each st around = 9 sts
Round 5 :
(sc in next 2 st, 2 sc in next st)*3 times = 12 sts
Round 6 :
sc in each st around = 12 sts
Round 7 :
(sc in next 3 sts, 2 sc in next st)*3 times = 15 sts
Round 8 :
sc in each st around = 15 sts
Round 9 :
(sc in next 4 sts, 2 sc in next st)*3 times = 18 sts
Info :
Fasten off. Leave the long tail for sewing.
— Eyes (if you don\'t have safety eyes) :
Info :
With black yarn and hook or 3 mm make a magic ring.
Round 1 :
6 sc in magic ring = 6 sts
Round 2 :
2 sc in each st around = 12 sts
Info :
Join with sl st and fasten off. Leave the long tail of the yarn for sewing. Make 1 or two stiches with white yarn for eye shine.
— Hat variant 1:
Info :
With red plush or another chunky yarn and hook G/6 (4 mm) make:
Round 1 :
6 sc in magic ring = 6 sts
Round 2 :
sc in each st around = 6 sts
Info :
!!! Switch to green yarn, don\'t cut the red yarn
Round 3 :
2 sc in each st around = 12 sts
Round 4 :
sc in each st around = 12 sts
Info :
!!! Switch to red yarn, don\'t cut the green yarn
Round 5 :
(sc in next st, 2 sc in next st)*6 times = 18 sts
Round 6 :
sc in each st around = 18 sts
Info :
!!! Switch to green yarn, don\'t cut the red yarn
Round 7 :
(sc in next 2 sts, 2 sc in next st)*6 times = 24 sts
Round 8 :
sc in each st around = 24 sts
Info :
!!! Switch to red yarn, don\'t cut the green yarn
Round 9 :
(sc in next 3 sts, 2 sc in next st)*6 times = 30 sts
Round 10 :
sc in each st around = 30 sts
Info :
!!! Switch to green yarn, don\'t cut the red yarn
Round 11 :
(sc in next 4 sts, 2 sc in next st)*6 times = 36 sts
Round 12 :
sc in each st around = 36 sts
Info :
!!! Switch to red yarn, don\'t cut the green yarn
Round 13 :
(sc in next 5 sts, 2 sc in next st)*6 times = 42 sts
Round 14 :
sc in each st around = 42 sts
Info :
!!! Switch to green yarn, finish with the red yarn.
Round 15 :
(sc in next 6 sts, 2 sc in next st)*6 times = 48 sts
Round 16 :
sc in each st around = 48 sts
Info :
Fasten off. Cut yarn and weave in ends.
— Hat variant 2:
Info :
With black plush or another chunky yarn and G/6 (4 mm) make:
Round 1 :
6 sc in magic ring = 6 sts
Round 2 :
2 sc in each st around = 12 sts
Round 3 :
(sc in next st, 2 sc in next st)*6 times = 18 sts
Round 4 :
(sc in next 2 sts, 2 sc in next st)*6 times = 24 sts
Round 5 :
(sc in next 3 sts, 2 sc in next st)*6 times = 30 sts
Round 6 :
(sc in next 4 sts, 2 sc in next st)*6 times = 36 sts
Round 7 :
(Crochet in back loops only) sc in each st around = 36 sts
Round 8-9 :
sc in each st around = 36 sts
Info :
Fasten off. Cut yarn and weave in ends.
— Pompom for hats:
Info :
With white plush yarn and hook G/6 (4 mm) make a magic ring.
Round 1 :
6 sc in magic ring = 6 sts
Round 2 :
2 sc in each st around = 12 sts
Round 3 :
sc in each st around = 12 sts
Round 4 :
sc dec*6 times = 6 sts
Info :
Fasten off. Leave the long tail for sewing. Sew to the hat.
— Scarf (Variant 1) :
Info :
Work the scarf back and forth in rows. With red plush yarn and hook 4mm make ch 5.
Row 1 :
sc in 2nd chain from hook and in next 3 sts, ch1 = 4 sts, turn
Row 2-39 :
sc in next 4 sts, ch1 = 4 sts, turn
Row 40 :
sc in next 4 sts = 4 sts
Info :
Fasten off, cut yarn and weave in ends.
— Assembly :
Step 1 :
If you use safety eyes, you must insert them when you crocheted the head or sew the eyes to the head between rounds 11 and 12 with 9 sts in between.
Step 2 :
Sew the head to the body (attach linking sts from the round 20 of the head to sts from round 25 of the body). !!! To head does not dangle, fill the body strongly and sew twice.
Step 3 :
With the same thread using needle sculpting, shape the head. Use photo as a guide.
Step 4 :
Sew arms to the body between 24 and 25 rounds. !!!Try to stick the needle in the same place that will help to keep arms flexible.
Step 5 :
Sew the nose with the tail of the orange yarn between rounds 10 and 14.
Step 6 :
With the black cotton yarn embroider the mouth (between rounds 14 and 16 with 5st between) and with the same thread embroider eyebrows (between rounds 8 and 11 with 7 stitches between at the top) as shown at the photo.
Step 7 :
Tie the scarf on snowman neck.
Step 8 :
Then sew buttons on the belly with tail of the buttons yarn. 1st button between rounds 14 and 17, 2nd button between rounds 19 and 21.
Step 9 :
Also you can sew on Christmas hat to the head, or leave it removable.
Info :
That's all. Your toy is ready!
This cheerful Snowman amigurumi pattern combines plush yarn and simple shaping to create a lovable winter friend. Perfect for gifting or decorating your home during the holidays. Make a matching striped hat and scarf to add personality and festive charm. 🧶❄️🎁