🧢 Beautiful ✨ Detailed πŸ’ Adorable

Baby deer Amigurumi Pattern

Baby deer Amigurumi Pattern
4.2β˜… Rating
5-7 Hours Time Needed
3.7K Made This
βœ‚οΈ

Intermediate Level

Ideal for those with basic crochet experience, featuring slightly more advanced stitches and techniques to expand your skills.

⏱️

Weekend Treat

Takes 5-7 hours, making it an enjoyable project to finish over a couple of days.

🧸

Cute Companion

An adorable friend to cherish, handcrafted with love to bring comfort and joy for years to come.

About This Baby deer Amigurumi Pattern

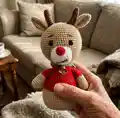
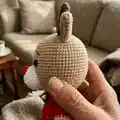
This pattern creates a small, cuddly Baby Deer amigurumi with a rounded body, sweater detail and sweet facial features. You will work in continuous rounds with color changes and simple shaping to form the body and head. The instructions include arms, ears, horns, a two-part nose and placement notes for eyes and nose.

Baby deer Amigurumi Pattern crochet pattern - detailed view of completed project

Perfect for intermediate crocheters who like shaping and assembly. The finished toy measures approximately 15 cm when using the suggested yarn and hook.

Why You'll Love This Baby deer Amigurumi Pattern

I absolutely love this pattern because it captures a lot of character with simple techniques and tiny details like the sweater stitches and bell. I enjoy how the shaping gives the deer a friendly rounded form that is quick to make. Sewing and placement steps let you personalise the expression and pose which makes every finished toy unique. The pattern is compact but satisfyingβ€”perfect for weekend projects or heartfelt handmade gifts.

Baby deer Amigurumi Pattern step 1 - construction progress Baby deer Amigurumi Pattern step 2 - assembly progress Baby deer Amigurumi Pattern step 3 - details and accessories Baby deer Amigurumi Pattern step 4 - final assembly and finishing

Switch Things Up

I love how easy it is to customize this pattern by changing colors for the sweater or body to create different personalities.

Try pastel shades for a softer nursery-friendly deer, or jewel tones for a festive holiday version.

If you want a bigger deer, use a bulkier yarn and a larger hook to scale up the entire pattern proportionally.

For a tiny keychain version, switch to finer yarn and a smaller hook and reduce stuffing for a compact result.

I often add embroidered details like tiny leaves or stars on the sweater to make each deer unique and seasonal.

Consider swapping safety eyes for embroidered eyes if making the toy for very young children for extra safety.

Mix yarn textures for a fluffy chest or tailβ€”using boucle or faux fur yarn adds a tactile element that kids love.

Add wire to the horns or limbs if you want posable features; be sure to wrap the wire before inserting to keep it secure and safe.

I sometimes make matching accessories, like tiny scarves or hats, to create a set or seasonal gift collection.

Experiment with face placement and eyebrow embroidery to change expressions from surprised to sleepy, giving each deer its own character.

Common Mistakes & How to Fix Them

βœ— Skipping the note to fill pieces as you go can cause difficulty shaping later; stuff gradually after each section to maintain the correct form. βœ— Forgetting to change color at the specified round will leave the sweater border incorrect; mark the color change round and switch yarn exactly where indicated. βœ— Not attaching safety eyes at the right rows leads to misaligned facial features; attach the eyes between rows 43 and 44, nine stitches apart as instructed. βœ— Ignoring BLO instructions will change the texture of the piece and may affect joins; when a round specifies BLO, always work into the back loop only for that round.

Baby deer Amigurumi Pattern

Create a sweet Baby Deer amigurumi with clear step-by-step rounds and charming finishing details. This pattern walks you through body shaping, head, arms, ears, nose, horns and assembly so you can craft a lovable toy. Perfect for gifting or adding a handmade companion to your collection. Detailed notes and stitch counts make it easy to follow along.

Intermediate 5-7 Hours

Materials Needed for Baby deer Amigurumi Pattern

β€” Main Fabric

  • 01
    Beige yarn suitable for 1.80-2.00 mm hook (main body color)
  • 02
    White yarn suitable for 1.80-2.00 mm hook (nose)
  • 03
    Brown yarn suitable for 1.80-2.00 mm hook (horns and eyebrow details)
  • 04
    Red yarn suitable for 1.80-2.00 mm hook (sweater and nose detail)
  • 05
    Green yarn suitable for 1.80-2.00 mm hook (embroidery accents on sweater)
  • 06
    YarnArt Jeans brand yarn used in project (as reference)

β€” Tools Required

  • 01
    Crochet hook size 1.80-2.00mm
  • 02
    Sewing/ tapestry needle
  • 03
    Fiberfill stuffing
  • 04
    8 mm safety eyes (2 pieces)
  • 05
    Small bell
  • 06
    Scissors
  • 07
    Stitch markers (optional)
  • 08
    Pins for assembly (optional)

Progress Tracker

0% Complete

β€” Body :

Info :

Start with beige color.

Round 1 :

15 ch, starking from 2nd ch inc, 12 sc, 3 sc in 1 stitch (work on the other side of tihe chain) 13 sc. (30)

Round 2 :

2 inc, 12 sc, 3 inc, 12 sc, inc. (36)

Round 3 :

(sc, inc) 2 times, 13 sc, (inc, inc) 3 times, 12 sc, inc. (42)

Round 4 :

(2 sc, inc) 2 times, 14 sc, (inc, 2 sc) 3 times,12 sc, inc. (48)

Round 5 :

BLO sc around. (48)

Round 6 :

sc around. (48)

Round 7 :

(7 sc, inc) 6 times. (54)

Round 8-13 :

sc around. (54)

Info :

change color (red)

Round 14 :

sc around. (54)

Round 15 :

(7 sc, dec) 6 times. (48)

Round 16-17 :

sc around. (48)

Round 18 :

(6 sc,dec) 6 times. (42)

Round 19-20 :

sc around. (42)

Round 21 :

(5 sc, dec) 6 times. (36)

Round 22-23 :

sc around. (36)

Round 24 :

(4 sc, dec) 6 times. (30)

Round 25-26 :

sc around. (30)

Round 27 :

(3 sc, dec) 6 times. (24)

Round 28-29 :

sc around. (24)

Info :

change color (beige)

Round 30 :

(3sc, inc) 6 times. (30)

Round 31 :

(4 sc, inc) 6 times.(36)

Round 32 :

(5 sc, inc) 6 times.(42)

Round 33 :

(6 sc,inc) 6 times. (48)

Round 34 :

(7 sc,inc) 6 times. (54)

Round 35 :

(8 sc,inc) 6 times. (60)

Round 36-48 :

sc around. (60)

Round 49 :

(8 sc,dec) 6 times. (54)

Round 50 :

(7 sc,dec) 6 times. (48)

Round 51 :

(6 sc,dec) 6 times.(42)

Round 52 :

(5 sc,dec) 6 times.(36)

Round 53 :

(4 sc,dec) 6 times. (30)

Round 54 :

(3 sc,dec) 6 times. (24)

Round 55 :

(2 sc,dec) 6 times. (18)

Round 56 :

(sc,dec) 6 times. (12)

Round 57 :

(dec) 6 times.

Info :

Attach the eyes to the 43rd and 44th rows, 9 stitches apart.

β€” Arms :

Info :

Start with beige color.

Round 1 :

6 sc into a magic ring. (6)

Round 2 :

(inc) 6 times. (12)

Round 3 :

(sc,inc) 6 times. (18)

Round 4 :

BLO sc around. (18)

Round 5-7 :

sc around. (18)

Round 8 :

(4 sc,dec) 3 times. (15)

Round 9-10 :

sc around. (15)

Info :

change color (red)

Round 11 :

sc around. (15)

Round 12 :

(3 sc,dec) (12)

Info :

Crochet the two edges together at the same time.

β€” Ears :

Info :

Start with beige color.

Round 1 :

6 sc into a magic ring. (6)

Round 2 :

(sc,inc) 3 times. (9)

Round 3 :

sc around. (9)

Round 4 :

(2 sc,inc) 3 times. (12)

Round 5 :

sc around. (12)

Round 6 :

(3 sc,inc) 3 times. (15)

Round 7-12 :

sc around. (15)

Info :

Crochet the two edges together at the same time.

β€” Nose (white) :

Info :

Start whit white color.

Round 1 :

1. 6 ch, starking from 2nd ch inc, 3 sc, 3 sc in 1 stitch (work on the other side of the chain) 4 sc . (12)

Round 2 :

2 inc, 3 sc,3 inc, 3 sc, inc. (18)

Round 3 :

( sc, inc) 2 times, 4 sc, (inc) 3 times, 3 sc, inc. (24)

Round 4 :

BLO sc. (24)

Round 5-7 :

sc around. (24)

β€” Nose (red) :

Round 1 :

6 sc into q magic ring. (6)

Round 2 :

(inc) 6 times.

β€” Horns :

Info :

Start with brown color.

Round 1 :

6 sc into a magic ring.(6)

Round 2 :

(sc, inc) 3 times. (9)

Round 3-5 :

sc around. (9)

Round 6-10 :

3 sc, inc, 4 sc, dec. (9)

Assembly Instructions

  • Sew the sleeves (arms) to the body between rows 25 and 26, positioning them evenly on both sides and sew securely using a whipstitch or mattress stitch.
  • Attach the eyes to the head between rows 43 and 44, making sure they are 9 stitches apart before securing the safety backs.
  • Sew the ears between rows 50 and 51 at the top sides of the head, spacing them symmetrically and sewing the base firmly.
  • Plant the antlers (horns) between rows 53 and 55 centered on the top of the head and secure tightly so they stand upright.
  • Sew the nose to the face between rows 32 and 39, centering it under the eyes; attach the red nose detail to the white nose as shown.

Important Notes

  • πŸ’‘Remember to fill in the pieces as you go; stuffing gradually gives better shaping control and avoids lumps.
  • πŸ’‘The finished approximate size will be 15 cm when using the recommended yarn and hook; different yarns will change the size.
  • πŸ’‘Use stitch markers to keep track of round starts and color change rows for accurate shaping and placement.
  • πŸ’‘Attach safety eyes before stuffing further to ensure correct placement and secure backs tightly for safety.

This adorable Baby Deer pattern is designed to bring a tiny woodland friend to life with simple shaping and sweet details. Make a cuddly gift or a decorative companion that adds warmth to any shelf. Happy crocheting and enjoy every stitch as you create your own handmade treasure! 🧢🧡

You ask,

we answer.

FAQs

What size will the finished piece be?

The finished amigurumi measures approximately 15 cm tall when using the recommended yarn and 1.80-2.00mm hook.

Can I use different yarn weights for this pattern?

Yes, you can use different yarn weights, but this will affect the final size and stitch counts; adjust your hook accordingly and expect a change in finished measurements.

Do I need prior crochet experience for this pattern?

This pattern is rated intermediate and assumes familiarity with basic stitches like single crochet, increases, decreases and working in the round.

How long does this project typically take to complete?

Most crocheters finish this project in 5-7 hours, depending on experience, speed, and time spent on assembly and embroidery details.