๐Ÿงถ Beautiful โœจ Detailed ๐Ÿ’ Adorable

Starfish Amigurumi Pattern

Starfish Amigurumi Pattern
4.6โ˜… Rating
2-3 Hours Time Needed
1.9K Made This
โœ‚๏ธ

Beginner Friendly Level

Perfect for those just starting their crochet journey, with clear instructions and simple techniques

โฑ๏ธ

Bite-Sized Project

Finishes in 2-4 hoursโ€”perfect for an afternoon of creative relaxation.

๐Ÿงธ

Cute Companion

An adorable friend to cherish, handcrafted with love to bring comfort and joy for years to come.

About This Starfish Amigurumi Pattern

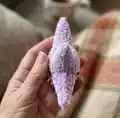
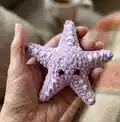
This pattern creates a soft, five-armed starfish amigurumi worked in super bulky yarn for a plush texture. You will crochet a circular belly and a shaped back, join them and form each arm with simple increases and decreases. The directions include exact rounds, stuffing tips, and finishing details so you can complete it with confidence.

Starfish Amigurumi Pattern crochet pattern - detailed view of completed project

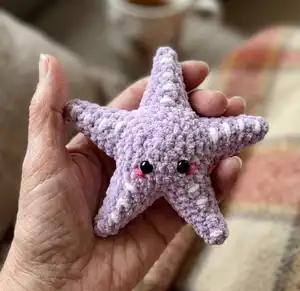
The pattern uses single crochet shaping and magic ring starts to build each part quickly. Photos and clear step instructions help you place eyes and embroider facial details.

Why You'll Love This Starfish Amigurumi Pattern

I absolutely love this pattern because it turns a few simple crochet techniques into a delightful, tactile toy that people of all ages adore. I enjoy how quickly the super bulky yarn builds up soft, squishy texture so projects finish fast. The shaping creates expressive arms with gentle points that give the starfish real personality. I also love that it is forgiving for beginners yet satisfying for more experienced makers who enjoy quick amigurumi. Making several variations in color is one of my favorite ways to personalize them.

Starfish Amigurumi Pattern step 1 - construction progress Starfish Amigurumi Pattern step 2 - assembly progress Starfish Amigurumi Pattern step 3 - details and accessories Starfish Amigurumi Pattern step 4 - final assembly and finishing

Switch Things Up

I love changing yarn colors to give each starfish a unique personality; try pastels, brights, or multicolor bulky yarns for fun effects.

I sometimes switch to a smaller hook and DK yarn to make a tiny keychain version that is perfect for gifts.

You can add embroidered spots or stripes using contrasting yarn to create a patterned surface and more visual interest.

I often vary the eye size for different expressionsโ€”smaller safety eyes make a cuter, subtler face while larger eyes give a playful look.

For a more decorative piece, I sew on small sequins or beads as accents on the arms for a sparkly finish.

I recommend experimenting with different stuffing levels: firmer stuffing keeps points sharper while softer stuffing gives a cuddlier feel.

I sometimes add a loop of yarn at the top and a hanging ribbon to turn the starfish into an ornament.

Try using velvet chenille or textured yarn to change the tactile qualityโ€”each yarn type changes the final character significantly.

I also enjoy making sets in complementary colors and arranging them as a nursery mobile or as shelf decor.

Finally, I like to embellish with tiny crocheted accessories like a mini shell or bow to personalize each starfish for the recipient.

Common Mistakes & How to Fix Them

โœ— Skipping a stitch marker when joining the belly and back can cause mismatched rounds; mark your start stitch and count regularly to keep alignment correct. โœ— Forgetting to stuff as you go will make shaping difficult later; stuff each arm gradually while shaping to maintain the intended form. โœ— Placing safety eyes too late or too close together can unbalance the face; attach the eyes between rows 3 and 4 with four stitches between them for the correct look. โœ— Crocheting with inconsistent tension leads to uneven arms and bumps; keep a steady, relaxed tension and practice a few rounds to match gauge before continuing. โœ— Cutting yarn too short at joins or ends makes finishing fiddly; leave generous tails for sewing and weaving in to secure parts neatly.

Starfish Amigurumi Pattern

Make a charming plush starfish using super bulky yarn and simple single crochet shaping. This pattern walks you through making the belly, back and five arms, with clear round-by-round instructions and helpful photos. Perfect for a quick, satisfying make that becomes a sweet toy or decorative accent for your home.

Beginner Friendly 2-3 Hours

Materials Needed for Starfish Amigurumi Pattern

โ€” Main Fabric

  • 01
    Super Bulky yarn (Category 6) - Purple color (amount not specified in pattern)
  • 02
    Fiberfill stuffing for filling the body and arms

โ€” Tools Required

  • 01
    Crochet hook size 3.5mm (E)
  • 02
    Stitch marker
  • 03
    Sewing needle (for finishing and embroidery)
  • 04
    Scissors
  • 05
    Plastic safety eyes 8mm (2 pieces)
  • 06
    Hot glue gun
  • 07
    Polyester stuffing (fiberfill)

Progress Tracker

0% Complete

โ€” STARFISH'S BELLY :

Round 1 :

5 SC in an MR (5)

Round 2 :

5 INC (10)

Round 3 :

10 INC (20)

Round 4 :

(SC, INC) 10 times (30)

Info :

Cut the yarn.

โ€” STARFISH'S BACK :

Round 1 :

6 SC in an MR (6)

Round 2 :

6 INC (12)

Round 3 :

(SC, INC) 6 times (18)

Round 4 :

(2 SC, INC) 6 times (24)

Round 5 :

(3 SC, INC) 6 times (30)

Info :

From this row, crochet together the abdominal part to create the arms of the starfish.

Round 6 :

6 SC (starfish's back), 6 SC (starfish's belly) (12)

Round 7 :

12 SC (12)

Round 8 :

(2 SC, DEC) 3 times (9)

Round 9 :

9 SC (9)

Round 10 :

2 SC, DEC, 3 SC, DEC (7)

Round 11 :

7 SC (7)

Round 12 :

DEC, SC, DEC, 2 SC (5)

Round 13 :

5 SC (5)

Info :

Cut the yarn.

Info :

*Stuffing*

Info :

Crochet the remaining 4 arms similarly as above.

Info :

Fasten off and cut the yarn.

โ€” ASSEMBLY & FINISHING :

Info :

Attach the eyes between rows 3 and 4, with 4 stitches between them.

Info :

Embroider pink and orange for the mouth and spikes. Complete the product.

Assembly Instructions

  • Join the belly and back as directed from Round 5 of the back piece to begin forming the first arm, working rounds 6โ€“13 to shape each arm.
  • Stuff each arm gradually during shaping (after Round 12 and before closing Round 13) to maintain a smooth, tapered point.
  • Attach the safety eyes between rounds 3 and 4 of the assembled starfish, leaving four stitches between the eyes for correct placement.
  • Embroider pink and orange details for the mouth and surface spikes using the sewing needle before final weaving in of ends.

Important Notes

  • ๐Ÿ’กUse a stitch marker to mark the first stitch of each round, especially when joining belly and back, for consistent shaping.
  • ๐Ÿ’กStuff the arms little by little while shaping to avoid lumps and to keep the points neat and tapered.
  • ๐Ÿ’กAttach safety eyes securely and use hot glue if desired for extra hold, but ensure eyes are placed before heavy stuffing and finishing.

This sweet starfish amigurumi brings seaside charm to your handmade collection and is quick to make with super bulky yarn. ๐Ÿงถ It makes a lovely gift or a cuddly decor piece for any ocean lover. โœจ Enjoy customizing colors and tiny embroidered details for a personal touch. ๐Ÿ˜Š

You ask,

we answer.

FAQs

What size will the finished piece be?

The finished amigurumi measures approximately 10-12 cm across depending on yarn tension and stuffing when using the recommended super bulky yarn and 3.5mm hook.

Can I use different yarn weights for this pattern?

Yes, you can use different yarn weights, but this will affect the final size and texture; make sure to adjust hook size and expect a smaller or larger finished starfish.

Do I need prior crochet experience for this pattern?

This pattern is rated beginner friendly, so basic crochet skills like magic ring, single crochet, increases and decreases are recommended for best results.

How long does this project typically take to complete?

Most crocheters complete this project in 2-3 hours, though time may vary based on experience level, yarn used, and how many arms you assemble at once.