🧢 Beautiful ✨ Detailed πŸ’ Adorable

Snowflake Ornament Pattern

Snowflake Ornament Pattern
4.2β˜… Rating
2-3 Hours Time Needed
2.6K Made This
βœ‚οΈ

Beginner Friendly Level

Perfect for those just starting their crochet journey, with clear instructions and simple techniques

⏱️

Bite-Sized Project

Finishes in 2-4 hoursβ€”perfect for an afternoon of creative relaxation.

πŸŽ„

Holiday Cheer

Festive fun for the season, bringing handmade magic to celebrations and creating new family traditions.

About This Snowflake Ornament Pattern

This pattern creates a pretty, lacy snowflake ornament that measures approximately 13 cm (5") across when made with the recommended yarn and hook. The design uses chains, double crochet, half treble and treble stitches to form a delicate six-point snowflake. It's a quick, satisfying make ideal for decorating your tree or gifting to friends and family.

Snowflake Ornament Pattern crochet pattern - detailed view of completed project

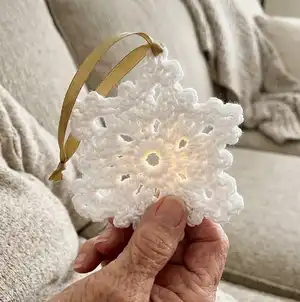
Worked in a single color, this ornament is perfect for beginner crocheters looking to practice shaping techniques. The finished piece looks lovely with a simple hanging loop or ribbon added at the end.

Why You'll Love This Snowflake Ornament Pattern

I absolutely love this pattern because it turns basic stitches into an elegant snowflake with minimal effort. I enjoy how quickly one snowflake can be completed, making it easy to produce a set for a whole tree. The stitch combinations create beautiful openwork that looks delicate and professional. I also love that it only needs a small amount of yarn, so it's great for using up leftovers and experimenting with different fibers and colors.

Snowflake Ornament Pattern step 1 - construction progress Snowflake Ornament Pattern step 2 - assembly progress Snowflake Ornament Pattern step 3 - details and accessories Snowflake Ornament Pattern step 4 - final assembly and finishing

Switch Things Up

I love customizing this snowflake by changing the yarn color to match my holiday palette; try metallic or glitter yarn for extra sparkle.

I sometimes use a finer thread and a smaller hook to create delicate, lacy snowflakes perfect for window displays.

I also make chunky versions using a bulkier yarn and larger hook to create rustic ornaments with lots of texture.

I like to add beads at the center or along the points for subtle shimmer and a more festive look.

I occasionally stitch small sequins or sew-on pearls to the petals to create heirloom-style decorations.

I recommend experimenting with ribbon widths and materials for hanging loops; satin ribbon creates an elegant finish while twine adds a rustic touch.

I sometimes make a garland by stringing several finished snowflakes together on a long ribbon or cord for festive mantel decor.

I enjoy combining two contrasting yarn colors and working one round in a second color for a highlight effect on the tips.

I also like to lightly starch and block my snowflakes for a crisp, durable finish that holds its shape over years of use.

I often gift sets in a small box tied with ribbon; they make lovely, handmade presents that are quick to produce in multiples.

Common Mistakes & How to Fix Them

βœ— Skipping the joining slip stitch at the end of rounds will lead to an off-center snowflake; always join each round as instructed to keep the shape even. βœ— Working with inconsistent tension causes uneven points and misshapen petals; maintain steady tension and practice on a swatch if needed before starting. βœ— Forgetting to count ch-3 spaces after Round 2 results in incorrect stitch placement for petals; count the 12 ch-3 spaces carefully before continuing. βœ— Not fastening off and weaving in ends securely can cause the hanging loop area to come loose; fasten off and weave ends well, and anchor the hanging loop firmly. βœ— Using a hook that is too large will make the snowflake floppy and oversized; check your tension/gauge and use a 3.75mm hook or adjust to match the 13 cm measurement.

Snowflake Ornament Pattern

Create a delicate snowflake ornament to decorate your tree or give as a handmade gift. This easy crochet pattern uses simple stitches and clear shaping to produce a beautiful 13 cm (5") snowflake. You will love how quickly it works up and how pretty it looks with a ribbon or metallic hanging loop. Perfect for holiday crafting and quick gift-making.

Beginner Friendly 2-3 Hours

Materials Needed for Snowflake Ornament Pattern

β€” Main Fabric

  • 01
    Red Heart Niki (A) - 1 ball 02034 White A - 50 g (1.76 oz), 106 m (116 yd) per ball
  • 02
    Medium (4) weight yarn - use the recommended ball or equivalent for similar gauge

β€” Tools Required

  • 01
    Crochet hook size 3.75mm [US F-5]
  • 02
    Yarn needle

Progress Tracker

0% Complete

β€” Snowflake :

Info :

Snowflake measures 13 cm [5"] in diameter.

Info :

With A, ch 6; join with a slip st to form a ring.

Round 1 :

Ch 1, 12 dc in ring; join with a slip st in first dc - 12 dc (12 dc)

Round 2 :

Ch 1, dc in first st, [ch 3, dc in next dc] 11 times; htr in first dc to join and form last space - 12 ch-3 spaces (12 ch-3 spaces)

Round 3 :

Ch 1, dc over htr, *(2 tr, ch 3, 2 tr) in next space**, dc in next space; repeat from * around, ending last repeat at **; join with a slip st in first dc (12 motifs)

Round 4 :

Ch 4, slip st in same st as joining, *ch 2, (dc, ch 3, dc, ch 5, dc, ch 3, dc) in next ch-3 space, ch 2**, (slip st, ch 4, slip st) in next dc; repeat from * around, ending last repeat at **; join with a slip st in slip st of last round. Fasten off. (final round)

β€” Finishing :

Info :

Weave in ends. Add hanging loop of your choice.

Infos :

ch = chain; cm = centimeters; dc = double crochet; htr = half treble crochet; mm = millimeters; st(s) = stitch(es); tr = triple or treble crochet; [ ] = work directions in brackets the number of times specified; * or ** = repeat whatever follows the * or ** as indicated.

Assembly Instructions

  • Weave in all loose ends securely using a yarn needle so the ornament will be neat and durable.
  • Add a hanging loop of your choice by threading ribbon, thread, or metallic cord through a point or top chain, then knot securely.
  • Fasten off any leftover yarn tails and hide them inside the snowflake structure when possible to keep the ornament tidy.
  • Block the finished snowflake lightly to shape the points and ensure it measures approximately 13 cm (5") in diameter before adding the hanging loop.

Important Notes

  • πŸ’‘Check your tension/gauge: the snowflake should measure 13 cm (5") in diameter when completed with the recommended hook and yarn.
  • πŸ’‘Use the slip stitch joins exactly as written to maintain the correct center placement and symmetry of the snowflake.
  • πŸ’‘Weave in ends carefully and add the hanging loop securely to ensure the ornament hangs flat and does not come apart.

Make your tree sparkle with these handmade snowflake ornaments that bring cozy holiday charm to every branch. They are quick to crochet and use very little yarn, making them perfect for crafting a whole set as gifts. Happy crocheting and enjoy the festive sparkle! πŸŽ„β„οΈ

You ask,

we answer.

FAQs

What size will the finished piece be?

The finished snowflake measures approximately 13 cm (5") in diameter when worked with the recommended yarn and 3.75mm hook.

Can I use a different yarn weight or hook size?

Yes, you can use different yarn weights or hook sizes, but the finished size and appearance will change. Check your tension and adjust the hook to achieve the desired 13 cm measurement if required.

Do I need to block the snowflake after finishing?

Blocking is recommended to help shape the points and set the snowflake to the correct diameter, especially if your stitches look uneven after finishing.

Is this pattern suitable for beginners?

Yes. This pattern is rated beginner friendly and uses common stitches like chains, double crochet, half treble and treble crochet with clear round-by-round instructions.