🧢 Beautiful ✨ Detailed πŸ’ Adorable

Pillow-dog Amigurumi Pattern

Pillow-dog Amigurumi Pattern
4.5β˜… Rating
5-7 Hours Time Needed
2.7K Made This
βœ‚οΈ

Beginner Friendly Level

Perfect for those just starting their crochet journey, with clear instructions and simple techniques

⏱️

Weekend Treat

Takes 5-7 hours, making it an enjoyable project to finish over a couple of days.

🧸

Cute Companion

An adorable friend to cherish, handcrafted with love to bring comfort and joy for years to come.

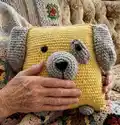
About This Pillow-dog Amigurumi Pattern

This pattern creates a square pillow shaped like a friendly dog, complete with ears, nose, spot, legs and arms. It uses plush velour yarn to achieve a soft, tactile surface perfect for children and adults alike. The construction is simple single crochet rounds worked into a rectangle for the pillow and small amigurumi pieces for details.

Pillow-dog Amigurumi Pattern crochet pattern - detailed view of completed project

Clear round-by-round instructions guide you through each small piece and the final assembly. The finished pillow measures about 30 x 30 cm depending on yarn and hook.

Why You'll Love This Pillow-dog Amigurumi Pattern

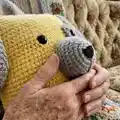
I absolutely love this pattern because it turns simple stitches into a joyful character that feels soft and luxurious. I enjoy how the plush velour yarn makes every detail β€” the ears, nose and spot β€” pop with texture. Sewing the features on gives so much personality; I always smile when I add the little spot and nose. This design is also very forgiving for beginners and makes a wonderful handmade gift.

Pillow-dog Amigurumi Pattern step 1 - construction progress Pillow-dog Amigurumi Pattern step 2 - assembly progress Pillow-dog Amigurumi Pattern step 3 - details and accessories Pillow-dog Amigurumi Pattern step 4 - final assembly and finishing

Switch Things Up

I love customizing this pillow by changing colors β€” try pastel shades for a nursery-friendly version or two-tone brights for a playful look.

You can make the pillow larger by using bulkier yarn and a larger hook, or smaller by using lighter yarn and a smaller hook.

I sometimes swap the eye beads for embroidered eyes for a child-safe option when making for little ones.

For a seasonal twist, add a tiny crocheted scarf or bow to the dog to match holidays or gift themes.

Try different placements for the spot and nose to create a sleepy or surprised expression β€” the face placement totally changes the personality.

If you want posable limbs, consider adding a short piece of wire inside the arms and legs before sealing them up.

I also like to slightly stuff the ears less for a floppy look, or more for a rounded, perky ear style depending on preference.

Use textured or variegated plush yarn for subtle shading effects on the spot and ears to give more visual interest.

Swap the black acrylic thread nose for a felt nose sewn on for a folk-style finish and easier shaping for beginners.

To create a matching set, make a smaller mini pillow-dog as a keychain by using a thinner plush yarn and smaller hook.

Common Mistakes & How to Fix Them

βœ— Skipping to sew the pillow top tightly can create gaps; sew the pillow top with 45 sc (or with acrylic yarn and needle) and fasten the thread securely to hide the ends inside the pillow. βœ— Forgetting to fix the beginning of each new round leads to mismatched seams; fix the beginning of each new circle with a pin or thread to keep rounds aligned. βœ— Overstuffing the pillow causes lumps and distortion; fill the pillow evenly and not too tightly so it keeps a smooth square shape and no 'balls' form. βœ— Not leaving long threads for sewing small parts makes assembly fiddly; always leave a long thread on ears, nose and limbs to make sewing and positioning much easier.

Pillow-dog Amigurumi Pattern

Make a soft, cuddly pillow-dog that doubles as a cute decorative pillow and a playful plush friend. This pattern uses plush velour yarn for a squishy texture and simple single crochet construction so you can finish a lovely gift-ready piece. Follow step-by-step rounds for the pillow body and all facial and limb details, plus clear assembly guidance to bring the character to life.

Beginner Friendly 5-7 Hours

Materials Needed for Pillow-dog Amigurumi Pattern

β€” Main Fabric

  • 01
    Kamtex Velor plush yarn (95 m / 100 g) - Color: yellow (main pillow)
  • 02
    Kamtex Velor plush yarn (95 m / 100 g) - Color: gray (ears, nose, spot, legs, arms)
  • 03
    Acrylic yarn for sewing - Colors: yellow, gray, black (for securing seams and embroidering nose)
  • 04
    Filler - hollofayber (polyester stuffing) for pillow interior
  • 05
    Black beads for eyes - 20-22 mm (2 pieces)

β€” Tools Required

  • 01
    Crochet hook size 4-5 mm (use size recommended on yarn label)
  • 02
    Tapestry/yarn needle for sewing
  • 03
    Scissors
  • 04
    Stitch markers or pins to fix start of rounds
  • 05
    Polyester stuffing (hollofayber)
  • 06
    Black beads for eyes 20-22 mm (2 pieces)
  • 07
    Optional: pins for assembly and a small embroidery needle for nose detail

Progress Tracker

0% Complete

β€” Pillow :

Info :

Do not forget to fix the beginning of each new circle with a pin or thread.

Round 1 :

90 ch, connect with the first loop

Round 2 – 35 :

90 sc

Info :

Sew the pillow top with 45 sc (or sew with acryl yellow yarn and needle). We fasten the thread and hide inside the pillow

β€” Ear (2 details) :

Round 1 :

6 sc in magic Ring {6}

Round 2 :

(inc) – repeat 6 times {12}

Round 3 :

(1 sc, inc) – repeat 6 times {18}

Round 4 :

(2 sc, inc) – repeat 6 times {24}

Round 5 :

(3 sc, inc) – repeat 6 times {30}

Round 6 :

(4 sc, inc) – repeat 6 times {36}

Round 7 – 11 :

36 sc

Round 12 :

19 sc, dec, 13 sc, dec {34}

Round 13 :

34 sc

Round 14 :

19 sc, dec, 11 sc, dec {32}

Round 15 :

18 sc, dec, 10 sc, dec {30}

Round 16 :

30 sc

Round 17 :

17 sc, dec, 9 sc, dec {28}

Round 18 – 19 :

28 sc

Info :

Sew two halves with 14 sc and Leave a long thread for sewing.

β€” Leg (2 details) :

Round 1 :

6 sc in magic Ring {6}

Round 2 :

(inc) – repeat 6 times {12}

Round 3 :

(1 sc, inc) – repeat 6 times {18}

Round 4 :

18 sc

Info :

Leave a long thread for sewing.

β€” Arm (2 details) :

Round 1 :

6 sc in magic Ring {6}

Round 2 :

(inc) – repeat 6 times {12}

Round 3 :

12 sc

Info :

Leave a long thread for sewing.

β€” Nose :

Round 1 :

6 sc in magic Ring {6}

Round 2 :

(inc) – repeat 6 times {12}

Round 3 :

(1 sc, inc) – repeat 6 times {18}

Round 4 :

(2 sc, inc) – repeat 6 times {24}

Round 5 :

(3 sc, inc) – repeat 6 times {30}

Round 6 :

(4 sc, inc) – repeat 6 times {36}

Round 7 :

(5 sc, inc) – repeat 6 times {42}

Info :

Leave a long thread for sewing.

Info :

Use black acryl yarn and embroider the nose and leave a long thread.

β€” Spot :

Round 1 :

9 ch, we begin to knit from the second loop from the hook 7 sc, in the first loop of the chain we knit 3 sc. Continue to crochet on the other side of the chain: 7 sc, inc.

Round 2 :

inc, 6 sc, (inc) – repeat 3 times, 7 sc, inc, 1 sc

Round 3 :

inc, 9 sc, inc, 2 sc, sl st.

Info :

Leave a long thread for sewing.

β€” Assembly :

Info :

Fill the pillow loosely. Sew the nose to the 12-22 rounds (see photo) in the center of the pillow, fill it. make the seam of the black thread down and fasten it and hide inside the nose. Sew a spot to the right of the nose.

Info :

We fix the eyes (or sew) on the 24 round, the distance between the eyes is 13 sc (we sew one eye on the spot).

Info :

Fill the pillow tightly, evenly, so that there are no "balls". Sew one edge of the ear to 6 sc from the beginning of the pillow, and bend the other edge back. Hands sew between 10-13 rounds from the side. Sew the bottom of the pillow with a yellow acryl yarn and needle. Sew legs at a distance of 17-18 sc.

Assembly Instructions

  • Fill the pillow loosely first, then position the nose and sew it to rounds 12-22 in the center of the pillow, stuff the nose and fasten the black thread down, hiding the end inside the nose.
  • Sew the spot to the right of the nose after positioning it and leaving a long thread for sewing to adjust placement.
  • Fix or sew the eyes on round 24 with a spacing of 13 sc between them (one eye is sewn on the spot feature).
  • Attach each ear by sewing one edge to the pillow 6 sc from the beginning of the pillow and bending the other edge back to create the folded ear look.
  • Sew arms (hands) between rounds 10-13 on the sides and leave long threads on limbs to make final adjustments before securing.
  • Sew the bottom seam closed with yellow acrylic yarn and needle, and attach legs along the bottom at a distance of 17-18 sc for even spacing.

Important Notes

  • πŸ’‘Do not forget to fix the beginning of each new circle with a pin or thread to keep round seams neat and consistent.
  • πŸ’‘Leave long threads on small parts (ears, nose, legs, arms) to make sewing and final placement easier during assembly.
  • πŸ’‘Stuff the pillow evenly and avoid overstuffing to prevent lumps and to maintain a smooth square shape.
  • πŸ’‘Use black acrylic yarn to embroider the nose detail and fasten the thread securely inside the nose after sewing.

This pillow-dog is a sweet, squishy addition to any home or a thoughtful handmade gift that both kids and adults will adore. It combines plush yarn, simple stitches, and charming details to create a lovable character you can make in a weekend. Enjoy the cozy texture and the big smile this little dog brings to your sofa or bed. 🧢🧡

You ask,

we answer.

FAQs

What size will the finished piece be?

The finished pillow measures approximately 30 x 30 cm when using Kamtex Velor yarn and a 4-5 mm hook, though size may vary with different yarns and hooks.

Can I use other plush yarn brands?

Yes, you can crochet with other plush yarns such as Himalaya Dolphin Baby or YarnArt Dolce; adjust hook size as recommended on the yarn label to maintain gauge.

Do I need to be experienced to make this pattern?

This pattern is beginner friendly and uses basic single crochet, increases and decreases, but familiarity with magic ring and sewing pieces will help with assembly.

How should I position the eyes and nose?

Place the nose centered between rounds 12-22, and fix the eyes on round 24 with 13 single crochet stitches between them (one eye can be sewn onto the spot).