About This Little Spark Amigurumi Pattern
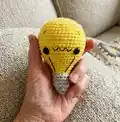
This pattern creates a small, adorable lightbulb amigurumi called Little Spark, worked in continuous rounds with a separate screw-fitting finish. It uses basic single crochet shaping and simple embroidery to add personality. The design is quick to make and perfect for beginners who want a satisfying, small project.
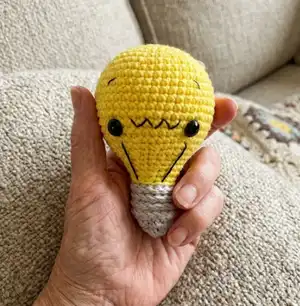
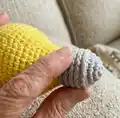
You will work mostly in single crochet with a short section using back/front loops to create the screw cap. Simple embroidery adds eyes, eyebrows, and decorative details for a finished look.
Why You'll Love This Little Spark Amigurumi Pattern
I absolutely love this pattern because it turns simple stitches into a playful little character that makes people smile. I enjoy how fast it works up — you can finish one in an afternoon and still feel really proud of the result. The embroidered face allows me to add personality without complicated techniques, and the screw fitting is a fun detail that gives the piece character. I also love that it uses small amounts of cotton yarn, so it's a great stash-buster and a satisfying quick gift.
Switch Things Up
I love how easy it is to customize Little Spark by changing colors — try pastel shades for a soft nursery friend or bright neons for a playful set.
You can make a miniature keychain version by using thinner yarn and a smaller hook, or scale up with bulky yarn for a plush cuddle buddy.
I often swap the silver screw color for a gold or copper shade to create different looks and personalities for each bulb.
Try embroidering different mouth shapes or eyebrow positions to create a range of expressions from sleepy to surprised.
I like to replace safety eyes with embroidered eyes for toys intended for small children or to give a softer handmade look.
For a posable version, consider adding thin wire inside the base before stuffing so the bulb can be posed slightly tilted.
Add tiny appliques like stars or hearts on the bulb surface using contrasting yarn for a whimsical touch.
Make a themed set by using seasonal colors — orange and black for Halloween or red and green for a festive holiday display.
If you want a textured screw fitting, experiment with front-post/back-post stitches or surface slip stitch rows instead of just FLO slip stitches.
I like to assemble a little gift bundle: a bulb, a mini card, and a loop to hang on bags; these make sweet, quick presents.
Don't be afraid to experiment with stuffing: firmer gives a sturdier toy, softer creates a squishier feel — I test both depending on the recipient.
Common Mistakes & How to Fix Them
✗ Not using a stitch marker can cause you to lose track of the start of rounds; place a marker at the first stitch of each round and move it up as you work.
✗ Failing to stuff gradually leads to lumps or a misshapen bulb; add stuffing in small amounts while shaping to maintain an even form.
✗ Changing yarn tension between the bulb and screw cap makes the seam noticeable; keep your tension consistent and check gauge as you transition colors.
✗ Incorrect placement of safety eyes can ruin facial symmetry; insert the eyes between rounds 16-17 with 10 stitches visible between them before stuffing fully.
✗ Skipping weaving the final tail through the FLO leaves a visible hole when closing; always weave the yarn tail through the front loops of the final round to close neatly.
✗ Forgetting to switch to BLO/FLO where instructed will flatten the screw fitting shape; follow the back/front loop instructions exactly for the right texture.