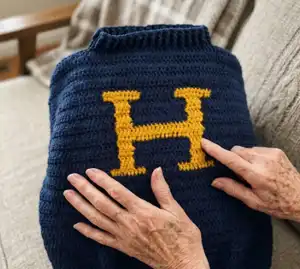
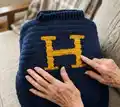
Make a cozy, handmade Weasley-style sweater complete with a bold initial on the back. This pattern guides you through casting on, shaping the back and fronts, knitting set-in sleeves, and finishing a neat ribbed neck and cuffs. Clear sizing options and chart guidance let you customize the letter for any size. Perfect for fans and gift makers who want a classic, vintage-inspired knit pullover.
Progress Tracker
0% Complete
— Stitches Used :
Info :
stockinette stitch = knit all RS (right side) rows, purl all WS (wrong side) rows
Info :
2x2 ribbing = on RS: K first two stitches, then (P2, K2) across row; on WS: Purl first two stitches, then (K2, p2) across row
Info :
K2tog = knit next two stitches together
Info :
SSK = slip next two stitches knitwise, return them to left needle, and knit together through the back loops
Info :
P2tog = purl next two stitches together
Info :
SSP = slip next two stitches knitwise, return them to left needle, and purl together through the back loops
— Back :
Info :
With [MC] cast on 60 (66, 72, 78, 84, 90, 96, 102, 108, 114, 120, 126, 132, 138) stitches.
Info :
Work in stockinette stitch *until piece measures 12 (13.5, 15, 16.5, 18, 19.5, 21, 22.5, 24, 25.5, 26.5, 26.5, 27.5, 28.5) inches, ending with WS row.
Info :
Make shoulders by binding off 18 (20, 22, 24, 26, 28, 30, 32, 34, 36, 38, 40, 42, 44) stitches at the beginning of the next two rows.
Info :
Place remaining 24 (26, 28, 30, 32, 34, 36, 38, 40, 42, 44, 46, 48, 50) stitches on holder or scrap yarn for the neck.
Info :
If you wish to grade the shoulders you can divide the shoulder bind offs into two, three, or four groups. For example, for the smallest size - bind off 9 stitches at beginning of next 2 rows, 2 times; for the seventh size (32 inch circ.) - bind off 10 stitches at beginning of next two rows, 3 times; for the largest size (44 inch circ.) - bind off 10 stitches at beginning of next two rows, 4 times.
Info :
Mark beginning of armhole by measuring 5 (6, 6.5, 6.5, 7, 7.5, 8, 8.5, 9, 9.5, 10, 10.5, 11, 11.5) inches DOWN from each shoulder edge and tying a spare scrap of yarn around the edge stitches.
— Front :
Info :
Work as for BACK until piece measures 5 (6, 7, 8, 9, 10, 11, 12, 13, 14, 15, 15, 16, 17) inches from bottom.
Info :
If you are knitting the initial into the front, begin working initial chart using a separate strand of [MC] and [CC] for each color section. Be sure to center chart for your size in the middle of the sweater.
Info :
If you will be adding the initial later with duplicate stitch, continue knitting in stockinette stitch with [MC] only. After completing chart, continue knitting with [MC] only until sweater measures 9.75 (11.25, 12.75, 14.25, 15.5, 17, 18.5, 20, 21.5, 22.75, 23.75, 24.75, 24.75, 25.75) inches, ending with WS row.
Info :
Make neck opening by knitting across first 24 (26, 29, 31, 34, 36, 39, 41, 44, 46, 49, 51, 54, 56) stitches, placing the center 12 (14, 14, 16, 16, 18, 18, 20, 20, 22, 22, 24, 24, 26) stitches onto holder or scrap yarn, and knitting the remaining 24 (26, 29, 31, 34, 36, 39, 41, 43, 46, 49, 51, 54, 56) stitches.
Info :
Continue on right side of neck only, working all following neck decreases for this side one stitch in from the egde as follows: on WS: Purl to last 3 stitches, P2tog, P1 on RS: K1, K2tog, K to end.
Info :
**Shape neck by decreasing one stitch at neck edge EVERY row, 4 (4, 5, 5, 5, 5, 6, 6, 6, 6, 7, 7, 7, 7) times, then EVERY OTHER ROW, 2 (2, 2, 2, 3, 3, 3, 3, 4, 4, 4, 4, 5, 5) times. Continue in stockinette stitch until front is as long as back to beginning of shoulder shaping (see *) and complete as for back.
Info :
Join new yarn at armhole edge of left side to begin working left side of neck. Work all following neck decreases for this side as follows: on RS: Knit to last 3 stitches, SSK, K1 on WS: P1, SSP, P to end Shape neck as for other side (see **).
Info :
Mark beginning of armhole by measuring 5 (6, 6.5, 6.5, 7, 7.5, 8, 8.5, 9, 9.5, 10, 10.5, 11, 11.5) inches DOWN from each shoulder edge and tying a spare scrap of yarn around the edge stitches.
— Sleeves :
Info :
Sew shoulders together. Pick up and knit 58 (66, 72, 78, 84, 88, 96, 100, 108, 112, 120, 124, 132, 136) stitches around left armhole from marked stitch on front to marked stitch on back.
Info :
Beginning with a purl row, work in stockinette stitch for 1 (1, 1, 1, 1.25, 1.25, 1.25, 1.25, 1.25, 1.5, 1.5, 1.5, 1.5, 1.5) inches.
Info :
Begin shaping sleeve, by working decreases on each side one stitch in from the edge, as follows: on RS: K1, K2tog, knit to last 3 stitches, SSK, K1 on WS: P1, SSP, P to last 3 stitches, P2tog, P1
Info :
Work decreases on next and then on every 6 (6, 6, 6, 5, 5, 5, 5, 5, 4, 4, 4, 4, 4)th row until 38 (42, 46, 50, 54, 54, 58, 58, 62, 62, 66, 66, 70, 70) stitches remain.
Info :
When decreases are complete, continue working in stockinette stitch until sleeve measures 8.5 (9.5, 10.5, 11.5, 12, 13, 14, 15, 16, 16.5, 17, 17.5, 18, 18.5) inches, then work 2x2 ribbing (beginning and ending each row with K2) for 1.5 (1.5, 1.5, 1.5, 2, 2, 2, 2, 2, 2.5, 2.5, 2.5, 2.5, 2.5) inches.
Info :
Bind off in pattern. Repeat for right armhole.
— Neck :
Info :
Transfer remaining 24 (26, 28, 30, 32, 34, 36, 38, 40, 42, 44, 46, 48, 50) stitches from back holder onto circular needle and beginning at right shoulder, knit across to left side of neck.
Info :
Pick up approximately 14 (14, 15, 15, 16, 16, 17, 17, 18, 18, 19, 19, 20, 20) stitches down left neck edge. (Just try to pick up evenly without leaving big gaps. If you get a number anywhere close to mine, then that's fine.)
Info :
Move remaining 12 (14, 14, 16, 16, 18, 18, 20, 20, 22, 22, 24, 24, 26) stitches from front from holder to left hand needle and knit across. Pick up approximately 14 (14, 15, 15, 16, 16, 17, 17, 18, 18, 19, 19, 20, 20) stitches up right neck edge.
Info :
You should have approximately 64 (68, 72, 76, 80, 84, 88, 92, 96, 100, 104, 108, 112, 116) stitches total for neck. Work in the round, knitting all rounds for 1.5 (1.5, 1.5, 1.5, 2, 2, 2, 2, 2.5, 2.5, 2.5, 2.5, 2.5, 2.5) inches and bind off loosely.
Info :
Sew side seams of body and sleeves and weave in ends. Accio sweater!
— Charts :
Info :
You can also make your own chart with your computer. Print out knitter's graph paper (like that found at Sweaterscapes) and put back it in your printer's paper bin. Using a word processor or an image editing program, type the letter you want in a font you like and print it onto the knitter's graph paper. Voila - chart!
Info :
If you have good image editing software, you can also save and open the graph paper image in the image editing program, then type the letter into the graph paper image. Adjust the size of the letter such that it lines up with the squares as much as possible. For both methods, you'll want to try several different font sizes to get your letter to be a good size for your sweater. Also, be ready to go over the chart a bit by hand to neaten things up.
Info :
These charts were made using an image of knitter's graph paper (found at Sweaterscapes). I opened the image in an image editing program, then typed the letter "H" in a font I liked over the graph paper image. I adjusted the size of the "H" to be about the right width and so that it lined up with the squares as much as possible. You may want to go over the squares with a colored pen to be sure it's clear which squares are filled in.
Info :
SMALLEST SIZES: (chart image included in pattern)
Info :
MIDDLE SIZES: (chart image included in pattern)
Info :
LARGEST SIZES: (chart image included in pattern)
This Weasley sweater pattern is a delight for knitters who love a cozy, handmade finished piece with personality. Knit the bold initial into the back or add it later with duplicate stitch for a polished look. With clear shaping, pickup instructions, and charting tips, you can make a treasured gift or nostalgic wardrobe piece. 🧶🧵