🧢 Beautiful ✨ Detailed πŸ’ Adorable

Snowberry cushion cover Pattern

Snowberry cushion cover Pattern
4.2β˜… Rating
5-7 Hours Time Needed
2.5K Made This
βœ‚οΈ

Intermediate Level

Iο»Ώdeal for those with basic crochet experience, featuring slightly more advanced stitches and techniques to expand your skills.

⏱️

Weekend Treat

Takes 5-7 hours, making it an enjoyable project to finish over a couple of days.

🏑

Cozy Accent

A warm touch for your space that transforms ordinary corners into inviting nooks filled with handmade charm.

About This Snowberry cushion cover Pattern

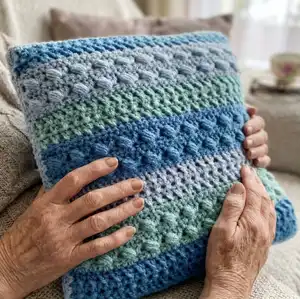
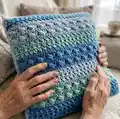
This pattern creates a textured Snowberry cushion cover worked in two identical panels and joined to fit a 14" x 14" pillow form. It uses a Sideways Puff stitch (SW Puff ST) to create the distinctive rows and alternating treble/half-treble (UK) or double/half-double (US) sections for contrast. You will make two panels, add a neat edged border, and sew them together for a polished finish.

Snowberry cushion cover Pattern crochet pattern - detailed view of completed project

Includes both UK and US instructions, full stitch abbreviations, and clear finishing steps with photos. The pattern is ideal for using 3 shades of aran weight yarn for a soft striped effect.

Why You'll Love This Snowberry cushion cover Pattern

I absolutely love this pattern because the Sideways Puff stitch creates a plush, tactile texture that looks far more complicated than it is. I enjoy how the colour changes give a calm, coastal palette that brightens any room, and the repeatable rows make it relaxing to work. The design is versatile so I can easily adapt the size or colours, and the finishing method gives a professional-looking cushion that I am proud to display or gift.

Snowberry cushion cover Pattern step 1 - construction progress Snowberry cushion cover Pattern step 2 - assembly progress Snowberry cushion cover Pattern step 3 - details and accessories Snowberry cushion cover Pattern step 4 - final assembly and finishing

Switch Things Up

I love how easy it is to customise this cushion by changing colours; try a monochrome palette for a modern look or bold brights for an energetic splash.

You can make the cover larger by using thicker yarn and a bigger hook, then adjusting the foundation chain to suit the new gauge for a bigger pillow.

I often swap the Sideways Puff rows position to create different stripe patterns β€” try grouping two puff rows together for a chunkier texture.

For a more rustic finish, use a wool blend aran yarn and a slightly larger hook for a softer, fluffy surface.

Want a removable cover? Add a buttoned or zipper closure on the final edge instead of sewing all sides shut so you can wash it easily.

I sometimes add tiny crocheted tassels or pompoms to the corners for a playful, bohemian vibe that suits the colour palette.

Try substituting the border with a scallop or picot edge if you prefer a decorative finish instead of the simple double crochet rounds.

If you prefer a reversible cushion, work both panels identically and join with an invisible mattress stitch for a seamless look on both sides.

I recommend experimenting with cotton yarn for a cooler, summery cushion or acrylic for easy care and durability in everyday use.

Don't be afraid to change the puff spacing β€” increasing or decreasing the number of plain rows between puffs can create a unique rhythm in the texture.

Common Mistakes & How to Fix Them

βœ— Skipping the chain at the start of a row; always account for the turning chains as the pattern specifies whether they count as a stitch. βœ— Forgetting to fasten off between colour blocks causes messy joins; always fasten off where the pattern directs and weave in ends neatly. βœ— Not placing stitch markers during repeats can cause lost pattern repeats; mark the first stitch of a repeat or the beginning of the row to keep count. βœ— Working the Sideways Puff stitch into the wrong place will distort the texture; insert the hook into the base indicated (not the top of the stitch) for correct puff placement. βœ— Overstuffing the pillow form or leaving panels loose makes the cushion lumpy; insert the pillow form after sewing three sides and adjust filling for an even finish.

Snowberry cushion cover Pattern

Make a cosy Snowberry cushion cover with beautiful textured Sideways Puff rows and easy colour changes. This pattern gives clear UK and US terms so you can follow whichever you prefer, and it includes step-by-step finishing instructions. Create a stylish 14" x 14" cushion cover perfect for gifting or brightening your home.

Intermediate 5-7 Hours

Materials Needed for Snowberry cushion cover Pattern

β€” Main Fabric

  • 01
    Paintbox Yarns Simply Aran - Dolphin Blue (Color 1) approx. 161 yards / 147 meters (80 grams)
  • 02
    Paintbox Yarns Simply Aran - Washed Teal (Color 2) approx. 100.5 yards / 92 meters (50 grams)
  • 03
    Paintbox Yarns Simply Aran - Duck Egg Blue (Color 3) approx. 161 yards / 147 meters (80 grams)
  • 04
    Extra yarn of chosen shades to sew the squares together and to weave in ends

β€” Tools Required

  • 01
    Crochet hook size 5 mm (H)
  • 02
    Yarn needle for weaving in ends and sewing panels together
  • 03
    Scissors
  • 04
    14" x 14" pillow form
  • 05
    Stitch markers (optional)
  • 06
    Pins for assembly (optional)

Progress Tracker

0% Complete

β€” Special Stitches :

Info :

Sideways Puff Stitch (SWPuff ST): Before you make a sideways puff stitch you always have 3 TR STS (Picture 1). Yarn over hook, insert hook in indicated stitch (this is going to be the ST you put the first TR into the base of the first TR, NOT the TR itself!), pull up a long loop through that stitch/space (3 loops on hook) (Picture 2). Yarn over hook again and insert hook into the same stitch, pull up a loop (same height as the previous one) 3 more times. You should have 9 loops on your hook. Yarn over and pull through 8 loops (2 loops on your hook), yarn over and pull through both loops.

Info :

Pictures 1-9 in the pattern show the step-by-step construction of the Sideways Puff Stitch for reference.

Info :

Gauge UK: 3 HTR = 1" (3 HTR = 2.5 cm).

Info :

Gauge US: 3 HDC = 1" (3 HDC = 2.5 cm).

Infos :

If a row/round starts with a Chain 1, it is not counted as a stitch, unless stated otherwise. Slip stitches do not count as stitches. Chain 2 always count as treble crochet (UK) / double crochet (US). Weave in the ends after every 8-10 rows to reduce ends to weave in later. Notes are written in a different color or in brackets to help you through the pattern.

β€” Instructions (UK TERMS) :

Make :

Make 2

Row 0 :

To start: With Color 1 (Dolphin Blue) CH 52

Row 1 :

1 TR into the 4th CH from the hook, 1 TR in each CH to end (50 TR)

Row 1 Note :

TURN

Row 2 :

CH 2 (counts as TR), {SK 1 ST, 1 TR in next ST, 1 TR in skipped ST} 24 times, 1 TR in top of 3 CH (2 TR, 24 TR "crosses")

Row 2 Note :

TURN

Row 3-4 :

same as Row 2

Row 4 Note :

Fasten off. TURN

Row 5 (WS) :

Join Color 2 (Washed Teal) to the last ST of last row with a standing HTR or alternatively, you can CH 1 and HTR in same ST. 1 HTR in next 48 STS, 1 HTR in top of CH 2 (50 HTR)

Row 5 Note :

TURN

Row 6 (RS) :

CH 2 (counts as TR), {1 TR in next 3 STS, 1 SWPuff ST, SK 1 ST} 12 times, 1 TR in last ST (38 TR, 12 SWPuff ST)

Row 6 Note :

TURN

Row 7 (WS) :

CH 1, 1 HTR in same ST, 1 HTR in next 48 STS, 1 HTR in top of CH 2 (50 HTR)

Row 7 Note :

TURN

Row 8-9 :

same as Row 6-7

Row 9 Note :

Fasten off. TURN

Row 10 (RS) :

Join Color 3 (Duck Egg Blue) to the last ST of last row with a standing TR or alternatively, you can CH 1 and TR in same ST. {SK 1 ST, 1 TR in next ST, 1 TR in skipped ST} 24 times, 1 TR in last ST (2 TR, 24 TR "crosses")

Row 10 Note :

TURN

Row 11-12 :

same as Row 2

Row 12 Note :

Fasten off. TURN

Row 13 (WS) :

Join Color 1 (Dolphin Blue) the last ST of last row with a standing HTR or alternatively, you can CH 1 and HTR in same ST. same as Row 5 (50 HTR)

Row 13 Note :

TURN

Row 14-17 :

repeat Row 6-7 twice (50 HTR)

Row 17 Note :

Fasten off. TURN

Row 18-20 :

Join Color 2 (Washed Teal) to the last ST of last row with a standing TR or alternatively, you can CH 1 and TR in same ST. same as Row 10-12

Row 20 Note :

Fasten off. TURN

Row 21-25 :

Join Color 3 (Duck Egg Blue) to the last ST of last row with a standing HTR or alternatively, you can CH 1 and HTR in same ST. same as Row 13-17 (50 HTR)

Row 25 Note :

Fasten off. TURN

Row 26-28 :

Join Color 1 (Dolphin Blue) the last ST of last row with a standing TR or alternatively, you can CH 1 and TR in same ST. same as Row 10-12

Row 28 Note :

Fasten off.

β€” Edge (UK TERMS) :

Round 1 :

Join Color 3 (Duck Egg Blue) to the first ST of last Row (that’s the top right corner on the right side) CH 1, 2 DC in same ST, 1 DC in next 48 STS, 3 DC in next ST, DC 48 evenly on the side, 3 DC into the base of 3 CH, 1 DC in next 48 CH, 3 DC in last CH, DC 48 evenly on the side, 1 DC into the first ST with the 2 DC in it, join with a SLST to first DC (Corner: 3 DC Sides: 48 DC)

Round 2 :

CH 1, 2 DC in same ST, 1 DC in next 50 STS, 3 DC in next ST, 1 DC in next 50 STS, 3 DC in next ST, 1 DC in next 50 STS, 3 DC in next ST, 1 DC in first ST with the 2 DC in it, join with a SLST to first DC (Corner: 3 DC Sides: 50 DC)

Round 2 Note :

Fasten off, weave in all ends.

β€” Finishing :

Info :

As you have 2 squares (one for each side), line them up, facing with the right side. (Picture 1)

Step :

Start in one of the corners and start sewing the sides together with the yarn left from the project. (I used the Duck Egg Blue shade) (Picture 2-3)

Step :

Keep sewing and when you sew 3 sides together, insert the pillow form.

Step :

Continue to sew up the last side and then weave in the loose ends.

β€” Instructions (US TERMS) :

Make :

Make 2

Row 0 :

To start: With Color 1 (Dolphin Blue) CH 52

Row 1 :

1 DC into the 4th CH from the hook, 1 DC in each CH to end (50 DC)

Row 1 Note :

TURN

Row 2 :

CH 2 (counts as DC), {SK 1 ST, 1 DC in next ST, 1 DC in skipped ST} 24 times, 1 DC in top of 3 CH (2 DC, 24 DC "crosses")

Row 2 Note :

TURN

Row 3-4 :

same as Row 2

Row 4 Note :

Fasten off. TURN

Row 5 (WS) :

Join Color 2 (Washed Teal) to the last ST of last row with a standing HDC or alternatively, you can CH 1 and HDC in same ST. 1 HDC in next 48 STS, 1 HDC in top of CH 2 (50 HDC)

Row 5 Note :

TURN

Row 6 (RS) :

CH 2 (counts as DC), {1 DC in next 3 STS, 1 SWPuff ST, SK 1 ST} 12 times, 1 DC in last ST (38 DC, 12 SWPuff ST)

Row 6 Note :

TURN

Row 7 (WS) :

CH 1, 1 HDC in same ST, 1 HDC in next 48 STS, 1 HDC in top of CH 2 (50 HDC)

Row 7 Note :

TURN

Row 8-9 :

same as Row 6-7

Row 9 Note :

Fasten off. TURN

Row 10 (RS) :

Join Color 3 (Duck Egg Blue) to the last ST of last row with a standing DC or alternatively, you can CH 1 and DC in same ST. {SK 1 ST, 1 DC in next ST, 1 DC in skipped ST} 24 times, 1 DC in last ST (2 DC, 24 DC "crosses")

Row 10 Note :

TURN

Row 11-12 :

same as Row 2

Row 12 Note :

Fasten off. TURN

Row 13 (WS) :

Join Color 1 (Dolphin Blue) the last ST of last row with a standing HDC or alternatively, you can CH 1 and HDC in same ST. same as Row 5 (50 HDC)

Row 13 Note :

TURN

Row 14-17 :

repeat Row 6-7 twice (50 HDC)

Row 17 Note :

Fasten off. TURN

Row 18-20 :

Join Color 2 (Washed Teal) to the last ST of last row with a standing DC or alternatively, you can CH 1 and DC in same ST. same as Row 10-12

Row 20 Note :

Fasten off. TURN

Row 21-25 :

Join Color 3 (Duck Egg Blue) to the last ST of last row with a standing HDC or alternatively, you can CH 1 and HDC in same ST. same as Row 13-17 (50 HDC)

Row 25 Note :

Fasten off. TURN

Row 26-28 :

Join Color 1 (Dolphin Blue) the last ST of last row with a standing DC or alternatively, you can CH 1 and DC in same ST. same as Row 10-12

Row 28 Note :

Fasten off.

β€” Edge (US TERMS) :

Round 1 :

Join Color 3 (Duck Egg Blue) to the first ST of last Row (that’s the top right corner on the right side) CH 1, 2 SC in same ST, 1 SC in next 48 STS, 3 SC in next ST, SC 48 evenly on the side, 3 SC into the base of 3 CH, 1 SC in next 48 CH, 3 SC in last CH, SC 48 evenly on the side, 1 SC into the first ST with the 2 SC in it, join with a SLST to first SC (Corner: 3 SC Sides: 48 SC)

Round 2 :

CH 1, 2 SC in same ST, 1 SC in next 50 STS, 3 SC in next ST, 1 SC in next 50 STS, 3 SC in next ST, 1 SC in next 50 STS, 3 SC in next ST, 1 SC in first ST with the 2 SC in it, join with a SLST to first SC (Corner: 3 SC Sides: 50 SC)

Round 2 Note :

Fasten off, weave in all ends.

β€” Finishing :

Step 1 :

As you have 2 squares (one for each side), line them up, facing with the right side. (Picture 1)

Step 2 :

Start in one of the corners and start sewing the sides together with the yarn left from the project. (I used the Duck Egg Blue shade) (Picture 2-3)

Step 3 :

When you have sewn 3 sides together, insert the pillow form.

Step 4 :

Keep sewing and when you sew 3 sides together, insert the pillow form. Continue to sew up the last side and then weave in the loose ends.

Assembly Instructions

  • Line up the two panels with right sides facing each other and align all edges before you begin sewing for an even finish.
  • Start sewing from one corner using the yarn left from the last round and a yarn needle; sew three sides first and leave one side open to insert the pillow form.
  • Insert the 14" x 14" pillow form after sewing three sides, adjust the pillow inside so the corners sit neatly, and then finish sewing the last side closed.
  • Weave in all loose ends neatly into the inside seams once sewing is completed to avoid visible tails on the cushion exterior.
  • If desired, block the panels lightly before sewing to ensure edges are even and the textured stitches are relaxed and uniform.

Important Notes

  • πŸ’‘Use stitch markers to keep track of the beginning of rows and complex repeats, especially during colour changes and SWPuff placement.
  • πŸ’‘Weave in ends regularly after every 8-10 rows to reduce the amount of loose ends you need to finish at the end.
  • πŸ’‘When working the Sideways Puff Stitch, always insert the hook into the base indicated (not the top of the stitch) to ensure consistent puff placement.
  • πŸ’‘Chain 2 counts as treble (UK) or double (US) depending on which version you are following, so follow the version-specific notes carefully.
  • πŸ’‘Pin panels together before sewing to ensure correct alignment and symmetrical edges for a professional finish.

This Snowberry cushion cover pattern brings textured stitches and soft stripes into your home decor. It uses simple repeats and the Sideways Puff stitch for a plush look and cosy feel. Perfect for gifting or brightening your own couch, this pattern is relaxing to work and gives a polished result. 🧢✨

You ask,

we answer.

FAQs

What size will the finished piece be?

The finished cushion cover measures approximately 14.5" x 14.5" / 37 cm x 37 cm when using the recommended aran weight yarn and a 5 mm hook.

Can I use different yarn weights for this pattern?

Yes, you can use different yarn weights but this will affect the final size and drape; choose an appropriate hook and adjust stitch count if necessary to maintain dimensions.

Do I need prior crochet experience for this pattern?

This pattern is rated intermediate because it uses the Sideways Puff stitch and alternates treble/half-treble (UK) or double/half-double (US) rows, so familiarity with basic stitches and reading row instructions is recommended.

How long does this project typically take to complete?

Most crocheters complete this project in 5-7 hours, depending on experience level and how quickly you work through the textured puff rows and finishing.