🧢 Beautiful ✨ Detailed πŸ’ Adorable

Lily Bunny Amigurumi Pattern

Lily Bunny Amigurumi Pattern
4.4β˜… Rating
5-7 Hours Time Needed
1.5K Made This
βœ‚οΈ

Intermediate Level

Ideal for those with basic crochet experience, featuring slightly more advanced stitches and techniques to expand your skills.

⏱️

Weekend Treat

Takes 5-7 hours, making it an enjoyable project to finish over a couple of days.

🧸

Cute Companion

An adorable friend to cherish, handcrafted with love to bring comfort and joy for years to come.

About This Lily Bunny Amigurumi Pattern

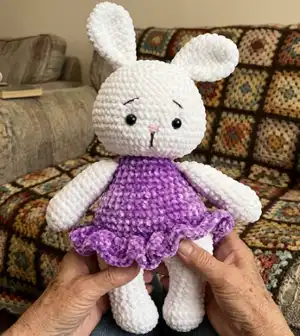
This pattern shows how to crochet Lily Bunny, a plush amigurumi made with soft chenille sport yarn and a playful ruffled skirt. It includes step-by-step rounds for arms, legs, body, head, ears and skirt with clear stitch counts. You will learn simple shaping, head sculpting, and how to attach safety eyes and embroidered details. The finished toy measures around 35 cm tall when using the recommended materials.

Lily Bunny Amigurumi Pattern crochet pattern - detailed view of completed project

Worked in continuous rounds using US terminology, the pattern uses basic increases and decreases to shape the pieces. Materials list and placement notes are included to ensure accurate assembly.

Why You'll Love This Lily Bunny Amigurumi Pattern

I absolutely love this pattern because it transforms plush chenille yarn into a soft, huggable bunny with charming details. I enjoy the combination of simple amigurumi shaping and a pretty ruffled skirt that adds personality. The pattern is satisfying to make because every piece comes together cleanly and the head sculpting creates a sweet expressive face. I also appreciate how easy it is to personalize with different colors or embroidered expressions.

Lily Bunny Amigurumi Pattern step 1 - construction progress Lily Bunny Amigurumi Pattern step 2 - assembly progress Lily Bunny Amigurumi Pattern step 3 - details and accessories Lily Bunny Amigurumi Pattern step 4 - final assembly and finishing

Switch Things Up

I love making this pattern in different color combinations; try pastel shades for a baby-friendly look or bright colors for a playful toy.

I often change yarn weight and hook size to create different sizes β€” bulky yarn and a larger hook will give you a cuddly oversized bunny, while thinner yarn makes a mini version.

I sometimes swap the chenille body for regular acrylic to make the skirt more textured and the body less plush for easier stuffing.

I like to embroider different facial expressions β€” moving the eyebrows or changing the nose shape completely alters personality, so experiment before final stitching.

Try adding little accessories like a tiny crocheted scarf, bow, or a removable dress to create outfit variations you can change seasonally.

For a more poseable toy, I add thin wire inside the limbs and secure it during assembly so the bunny can hold tiny props.

I sometimes use safety eyes in different sizes or embroider eyes for a softer, toddler-safe option depending on the recipient.

To make a matching set, I create smaller minis using the same color palette and give them simple accessories for gift sets.

I recommend trying gradient or variegated yarns for the skirt to create subtle color shifts without changing yarn mid-row.

Don't be afraid to personalize length and fullness of the ruffle: add more dc rounds for a fuller skirt or fewer for a delicate edge.

Common Mistakes & How to Fix Them

βœ— Skipping placement of the stitch marker when joining legs to the body can misalign rounds; place a marker at the join and move it at the start of each round. βœ— Not stuffing as you go leads to hard-to-fill cavities and lumps; add fiberfill gradually and check shape frequently while crocheting. βœ— Cutting yarn too early before sewing pieces together can make finishing awkward; leave long tails for sewing and fasten off only after positioning pieces. βœ— Forgetting to insert safety eyes before stuffing too much will be difficult and unsafe; place safety eyes between the specified rounds with the correct stitch spacing before heavy stuffing.

Lily Bunny Amigurumi Pattern

Create a sweet Lily Bunny with this friendly amigurumi crochet pattern. You will make a cuddly bunny with a ruffled skirt, embroidered features, and soft chenille yarn. The pattern is clear and photo-guided so you can follow along easily and enjoy the process. Perfect as a handmade gift or nursery companion.

Intermediate 5-7 Hours

Materials Needed for Lily Bunny Amigurumi Pattern

β€” Main Fabric

  • 01
    Sport yarn - White (Chenille 01)
  • 02
    Sport yarn - Purple (Chenille 13)
  • 03
    Brown embroidery thread for eyebrows and muzzle
  • 04
    Pink embroidery thread for the nose
  • 05
    White thread for head sculpting

β€” Tools Required

  • 01
    Safety eyes 14 mm
  • 02
    Crochet hook 5 mm
  • 03
    Stuffing (Polyester fiber fill)
  • 04
    Brown thread to embroider eyebrows and muzzle
  • 05
    Pink thread to embroider the nose
  • 06
    White thread for head sculpting
  • 07
    Stitch markers

Progress Tracker

0% Complete

β€” Arms :

Info :

Crochet with white yarn. Stuff only 2/3 of the arm.

Round 1 :

6 sc into a magic ring (6)

Round 2 :

6 inc (12)

Round 3 :

(3 sc, inc) * 3 (15)

Round 4-5 :

15 sc (2 rounds)

Round 6 :

(3 sc , dec ) * 3 (12)

Round 7-14 :

8 sc (8 rounds)

Round 15 :

(4 sc , dec ) * 2 (10)

Round 16 :

10 sc

Info :

Fold the arm in half and crochet 5 sc through both sides. Fasten off and cut the yarn, leaving a tail for sewing.

Info :

Sew the arms two rounds under the beginning of the head.

β€” Legs :

Info :

Crochet with white yarn. Stuff as you go.

Round 1 :

7 sc into a magic ring (7)

Round 2 :

7 inc (14)

Round 3 :

(sc, inc) * 7 (21)

Round 4-5 :

21 sc (2 rounds)

Round 6 :

7 sc, 4 dec, 6 sc (17)

Round 7 :

7 sc, 2 dec, 6 sc (15)

Round 8-10 :

15 sc (3 rounds)

Round 11 :

(4 sc, inc) * 3 (18)

Round 12 :

18 sc

Round 13 :

For the left leg: crochet only 14 sc Fasten off, cut the yarn.

Round 13 :

For the right leg: 18 sc Don't cut the yarn, we will continue with the body:

β€” Body :

Round 1 :

Crochet 7 sc on the right leg; make 3 chains; 18 sc on the left leg; 3 sc on the chain; 18 sc on the right leg ; 3 sc on the chain; put the marker here (42)

Round 2 :

(6 sc, inc ) * 6 (48)

Round 3-6 :

48 sc (4 rounds). Change the yarn to pink color:

Round 7 :

48 sc

Round 8 :

back loops only: 48 sc

Round 9 :

(6 sc, dec ) * 6 (42)

Round 10-11 :

42 sc (2 rounds)

Round 12 :

(5 sc, dec ) * 6 (36)

Round 13-14 :

36 sc (2 rounds)

Round 15 :

(4 sc, dec ) * 6 (30)

Round 16-17 :

30 sc (2 rounds)

Round 18 :

(3 sc, dec ) * 6 (24)

Round 19 :

24 sc

Round 20 :

(6 sc, dec ) * 3 (21)

Info :

Stuff the body firmly, especially in the neck. Cut the pink yarn, we will continue with the head, but first, we need to make the dress.

β€” Skirt :

Info :

Attach the pink yarn to the back of the body in the front loops of round 8. Crochet with the body turned upside down:

Round 1 :

(2 dc in one stitch) * 48 (96)

Round 2 :

96 dc Fasten off, and cut the yarn. Hide the thread inside the body.

β€” Head :

Info :

Change the yarn to white color. Stuff as you go.

Round 1 :

21 sc

Round 2 :

21 inc (42)

Round 3 :

(6 sc, inc ) * 6 (48)

Round 4 :

(7 sc, inc ) * 6 (54)

Round 5-9 :

54 sc (5 rounds) Insert the safety eyes between rounds 8 and 9 with 8 st between them.

Round 10 :

(7 sc, dec ) * 6 (48)

Round 11-13 :

48 sc (3 rounds)

Round 14 :

(6 sc, dec ) * 6 (42)

Round 15 :

42 Sc

Round 16 :

(5 sc, dec ) * 6 (36) (30)

Round 17 :

(4 sc, dec ) * 6

Round 18 :

(3 sc, dec ) * 6 (24)

Round 19 :

(2 sc, dec ) * 6 (18)

Round 20 :

(sc, dec ) * 6 (12)

Round 21 :

6 Dec (6) Make sure that the head is stuffed firmly. Close the opening and hide the yarn inside. Head sculpting

β€” Ears :

Info :

Crochet with white yarn .

Round 1 :

6 sc into a magic ring (6)

Round 2 :

6 inc (12)

Round 3 :

(sc , inc ) * 6 (18)

Round 4 :

(2 sc , inc ) * 6 (24)

Round 5-6 :

24 sc (2 rounds)

Round 7 :

(6 sc , dec ) * 3 (21)

Round 8 :

(5 sc , dec ) * 3 (18)

Round 9 :

(4 sc , dec ) * 3 (15)

Round 10-12 :

15 sc (3 rounds) Fasten off and cut the yarn , leaving a tail for sewing. Fold the ear in half and sew the ends together. Sew the ears on the top of the head with 4 stitches between them.

Assembly Instructions

  • Insert safety eyes between rounds 8 and 9 of the head with 8 stitches between them before heavy stuffing and secure the safety backs.
  • Fold each arm in half and crochet 5 sc through both sides, fasten off leaving a long tail, then sew the arms two rounds under the beginning of the head.
  • Sew the ears to the top of the head with approximately 4 stitches between them, using the tail left from the ear and hide ends inside the head.
  • Attach the pink yarn for the skirt to the front loops of round 8 on the back of the body and crochet the skirt rounds as instructed, then hide ends inside the body.

Important Notes

  • πŸ’‘Use a stitch marker to mark the beginning of each round and at the body join to avoid losing count during shaping.
  • πŸ’‘Stuff pieces gradually and firmly, especially the neck and head area, to achieve a smooth and stable silhouette.
  • πŸ’‘Hide and secure all yarn ends inside the body and head after assembly to keep the toy neat and safe.

This charming Lily Bunny pattern brings cozy chenille yarn and a sweet ruffle skirt together for a delightful handmade friend. Make one for a nursery, gift, or to brighten a shelf with handcrafted personality. Customize the colors and facial expressions to make your bunny truly unique. 🧢🧡

You ask,

we answer.

FAQs

What size will the finished piece be?

The finished amigurumi measures approximately 35 cm tall when using the recommended sport chenille yarn and a 5 mm hook.

Can I use different yarn weights for this pattern?

Yes, you can use different yarn weights, but this will affect the final size; choose an appropriate hook size and adjust stuffing and placement accordingly.

Do I need prior crochet experience for this pattern?

This pattern is rated intermediate, so basic knowledge of single crochet, increases, decreases, and working in rounds is recommended.

How long does this project typically take to complete?

Most crocheters complete this project in 5-7 hours, though the time may vary based on experience, yarn chosen, and finishing details.