About This Dave The Duck Amigurumi Pattern
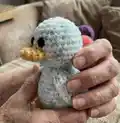
This pattern creates a small, cuddly duck amigurumi named Dave using DK yarn and a 3.5mm hook. It is worked in continuous spirals with simple increases and decreases. Pieces are small and quick to make, making this a satisfying quick project.
Includes full round-by-round instructions for head, body, wings, beak and feet. Clear assembly notes show how to sew pieces together for a neat finish.
Why You'll Love This Dave The Duck Amigurumi Pattern
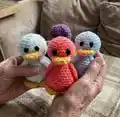
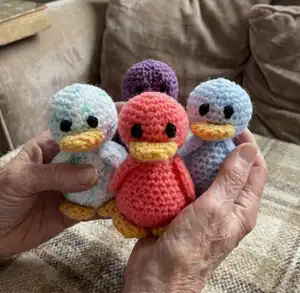
I absolutely love this pattern because it turns basic stitches into a charming little character you can finish in an afternoon. I enjoy how customizable Dave is — change colours and make a whole family of ducks. The design is compact and satisfying to stitch, so it never feels overwhelming. I also love that the pattern uses continuous spirals, which gives a smooth finish and makes shaping easy.
Switch Things Up
I love how easy it is to customize Dave by changing yarn colours; swap in pastel shades for a nursery-friendly version.
You can make a tiny keychain by using fingering weight yarn and a 2.5mm hook to scale Dave down significantly.
I often experiment with different eye treatments: embroidered eyes for safety or tiny safety eyes for a more polished look.
Try using variegated DK yarn for a speckled, unique body effect without extra sewing or colour changes.
Add tiny accessories like a crocheted scarf, hat, or a felt bow to personalize each duck for gifting.
Make a family of ducks in graduated sizes by changing hook and yarn weight for coordinated sets.
I sometimes stuff the body slightly less for a floppy, squishier toy, or a bit firmer for a sturdier figure that stands well.
Embroider eyelashes, freckles, or little wing markings to give different personalities to each duck.
Use metallic or sparkly yarn for the beak and feet to create a playful, festive version for holidays.
Consider making a mobile by creating several small ducks and hanging them with ribbons for a nursery decoration.
I also enjoy combining fabrics: sew tiny felt wings or a felt beak for a mixed-media look that’s child-safe and charming.
Change the stitch tension or substitute similar stitches (for example use HDC where you prefer a denser fabric) to experiment with texture and drape.
Common Mistakes & How to Fix Them
✗ Skipping the magic ring or starting with an incorrect number of stitches; always start with a proper magic ring and count your initial stitches to ensure correct shaping.
✗ Forgetting that the pattern uses UK terms can cause confusion; double-check the UK-to-US conversion (Dc = Sc) before you begin to avoid stitch mistakes.
✗ Not stuffing as you go leads to lumps or a misshapen body; stuff gradually after increases and before you close rounds for an even shape.
✗ Sewing pieces in the wrong position makes the face look uneven; pin and align the head, wings and feet before stitching to ensure symmetry.