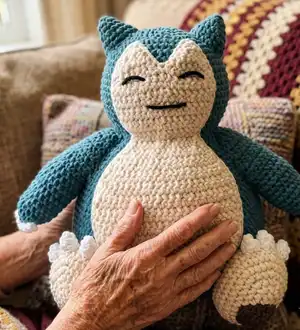
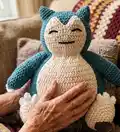
Create a giant, huggable Snorlax plush using this detailed crochet pattern. Youll follow clear step-by-step rounds for the head, body, arms, feet, belly patch and little claws. The pattern uses Bernat Blanket yarn and is written in continuous rounds with helpful assembly tips so you can sew everything together neatly. Perfect for gifting or keeping as a big cuddly companion.
Progress Tracker
0% Complete
— Notes :
Infos :
If you would rather make a smaller one, just follow the pattern using a worsted weight yarn & smaller crochet hook (3mm/3.5mm/4mm). Like all amigurumi, gauge doesnt matter. Just make sure your stitches are tight/consistent.
— Head :
Info :
Worked in continuous rounds - do not slip stitch/chain one to join rounds. Made in "Lagoon" or "Lapis"
Round 1 :
Make 6 sc in a magic ring (6)
Round 2 :
Increase in each stitch (12)
Round 3 :
(sc, inc) x 6 (18)
Round 4 :
sc, inc, (2 sc, inc) x 5, sc (24)
Round 5 :
(3 sc, inc) x 6 (30)
Round 6 :
2 sc, inc, (4 sc, inc) x 5, 2 sc (36)
Round 7 :
(5 sc, inc) x 6 (42)
Round 8 :
3 sc, inc, (6 sc, inc) x 5, 3 sc (48)
Round 9 :
(7 sc, inc) x 6 (54)
Round 10 :
sc in each stitch (54)
Round 11 :
4 sc, inc, (8 sc, inc) x 5, 4 sc (60)
Round 12 :
sc in each stitch (60)
Round 13 :
(14 sc, inc) x 4 (64)
Round 14-18 :
sc in each stitch (64)
Round 19 :
(14 sc, dec) x 4 (60)
Round 20 :
sc in each stitch (60)
Round 21 :
4 sc, dec, (8 sc, dec) x 5, 4 sc (54)
Round 22 :
sc in each stitch (54)
Round 23 :
(7 sc, dec) x 6 (48)
Info :
Fasten off. Add stuffing to the head. The increases from round 13 should make the head slightly oval-shaped.
— Body :
Info :
Worked in an oval shape. Worked in continuous rounds - do not slip stitch/chain one to join. Made in "Lagoon" or "Lapis"
Round 1 :
Chain 18. Starting in the second chain from the hook: inc, 15 sc, make 3 sc in the last chain. Turn so you are working on the opposite side of the foundation chain. 16 sc. (36)
Round 2 :
inc, inc, 15 sc, inc, inc, inc, 15 sc, inc (42)
Round 3 :
sc, inc, sc, inc, 16 sc, inc, sc, inc, sc, inc, 16 sc, inc (48)
Round 4 :
2 sc, inc, 2 sc, inc, 17 sc, inc, 2 sc, inc, 2 sc, inc, 17 sc, inc (54)
Round 5 :
3 sc, inc, 3 sc, inc, 18 sc, inc, 3 sc, inc, 3 sc, inc, 18 sc, inc (60)
Round 6 :
4 sc, inc, 4 sc, inc, 19 sc, inc, 4 sc, inc, 4 sc, inc, 19 sc, inc (66)
Round 7 :
5 sc, inc, 5 sc, inc, 20 sc, inc, 5 sc, inc, 5 sc, inc, 20 sc, inc (72)
Round 8 :
4 sc, inc, (8 sc, inc) x 7, 4 sc (80)
Round 9 :
(9 sc, inc) x 8 (88)
Round 10 :
5 sc, inc, (10 sc, inc) x 7, 5 sc (96)
Round 11 :
sc in each stitch (96)
Round 12 :
(11 sc, inc) x 8 (104)
Round 13 :
sc in each stitch (104)
Round 14 :
6 sc, inc, (12 sc, inc) x 7, 6 sc (112)
Round 15-24 :
sc in each stitch (112)
Round 25 :
6 sc, dec, (12 sc, dec) x 7, 6 sc (104)
Round 26-29 :
sc in each stitch (104)
Round 30 :
(11 sc, dec) x 8 (96)
Round 31 :
sc in each stitch (96)
Round 32 :
5 sc, dec, (10 sc, dec) x 7, 5 sc (88)
Round 33 :
sc in each stitch (88)
Round 34 :
(9 sc, dec) x 8 (80)
Round 35 :
4 sc, dec, (8 sc, dec) x 7, 4 sc (72)
Round 36 :
sc in each stitch (72)
Round 37 :
(7 sc, dec) x 8 (64)
Round 38 :
sc in each stitch (64)
Round 39 :
3 sc, dec, (6 sc, dec) x 7, 3 sc (56)
Round 40 :
sc in each stitch (56)
Round 41 :
(5 sc, dec) x 8 (48)
Info :
Fasten off, leaving a very long tail to sew the body to the head. Add a LOT of stuffing to the body.
— Ears :
Info :
Make two ears. Made in continuous rounds - do not slip stitch/chain one to join. Made in "Lagoon" or "Lapis"
Round 1 :
Make 6 sc in a magic ring (6)
Round 2 :
(sc, inc) x 3 (9)
Round 3 :
sc, inc, 2 sc, inc, 2 sc, inc, sc (12)
Round 4 :
sc, inc, 2 sc, inc, 2 sc, inc, 2 sc, inc, sc (16)
Round 5 :
(3 sc, inc) x 4 (20)
Round 6 :
2 sc, inc, 4 sc, inc, 4 sc, inc, 4 sc, inc, 2 sc (24)
Info :
Fasten off, leaving a long tail to sew to the head.
— Arms :
Info :
Make two arms. Made in continuous rounds - do not slip stitch/chain one to join. Made in "Lagoon" or "Lapis"
Round 1 :
Make 6 sc in a magic ring (6)
Round 2 :
increase in each stitch (12)
Round 3 :
inc, inc, 3 sc, inc, inc, inc, 3 sc, inc (18)
Round 4 :
sc in each stitch (18)
Round 5 :
4 sc, inc, 8 sc, inc, 4 sc (20)
Round 6 :
9 sc, inc, 9 sc, inc (22)
Round 7-11 :
sc in each stitch (22)
Round 12 :
sc in each stitch, then chain one & turn to start working in rows (22)
Info :
Working in rows instead of rounds. Make sure you have already chained & turned!
Round 13 :
16 sc, chain one & turn (16)
Round 14 :
dec, 12 sc, dec, chain one & turn (14)
Round 15 :
14 sc, chain one & turn (14)
Round 16 :
dec, 10 sc, dec, chain one & turn (12)
Round 17 :
12 sc, chain one & turn (12)
Round 18 :
dec, 8 sc, dec, chain one & turn (10)
Round 19 :
10 sc, chain one & turn (10)
Round 20 :
dec, 6 sc, dec, chain one & turn (8)
Round 21 :
8 sc, chain one & turn (8)
Round 22 :
dec, 4 sc, dec, chain one & turn (6)
Info :
Fasten off, leaving a long tail to sew to the sides of the body. Add stuffing to the bottom of the arm (the part thats in rows will be stuffed when the arm is sewed to the body).
— Feet :
Info :
Make two feet. Worked in continuous rounds - do not slip stitch/chain one to join. Made in "Birch"
Round 1 :
Chain 6. Starting in the second chain from the hook: inc, 3 sc, make 3 sc in the last chain. Turn so you are working on the opposite side of the foundation chain. 4 sc. (12)
Round 2 :
inc, inc, 3 sc, inc, inc, inc, 3 sc, inc (18)
Round 3 :
sc, inc, sc, inc, 4 sc, inc, sc, inc, sc, inc, 4 sc, inc (24)
Round 4 :
2 sc, inc, 2 sc, inc, 5 sc, inc, 2 sc, inc, 2 sc, inc, 5 sc, inc (30)
Round 5 :
3 sc, inc, 3 sc, inc, 6 sc, inc, 3 sc, inc, 3 sc, inc, 6 sc, inc (36)
Round 6 :
3 sc, inc, 4 sc, inc, 7 sc, inc, 4 sc, inc, 4 sc, inc, 7 sc, inc, sc (42) - please note the beginning of this round does NOT have an error in it. My rounds shifted a bit (the first increase wasnt centered with the chain) - it should be "4 sc, inc, 4 sc, inc" BUT instead, one of the first four single crochet stitches is at the end of the round. Ezpz.
Round 7-8 :
sc in each stitch (42)
Round 9 :
4 sc, dec, 4 sc, dec, 7 sc, dec, 4 sc, dec, 4 sc, dec, 7 sc, dec (36) again, rounds shifted a bit, so instead of doing the 3 sc and then having the fourth sc at the END of the round, just do 4 sc at the beginning. Feel free to ignore these explanations & just follow the pattern - theyre only written for the folks who are nit-picky about patterns ;)
Round 10 :
3 sc, dec, 3 sc, dec, 6 sc, dec, 3 sc, dec, 3 sc, dec, 6 sc, dec (30)
Round 11 :
2 sc, dec, 2 sc, dec, 5 sc, dec, 2 sc, dec, 2 sc, dec, 5 sc, dec (24)
Round 12 :
2 sc, dec, 4 sc, dec, 4 sc, dec, 4 sc, dec, 2 sc (20)
Info :
Fasten off, leaving a long tail to sew each of the feet to the body. Add stuffing to the feet.
— Foot pads :
Info :
Make two foot pads. Worked in joined rounds - slip stitch & chain one at the end of each round. Made in "Taupe"
Round 1 :
Make 8 hdc in a magic ring, slip stitch to the first stitch & chain one (8)
Round 2 :
Make a half double crochet increase in the same stitch as the slip stitch. Half double crochet increase in each of the next 7 stitches. Slip stitch to the first stitch (16)
Info :
Fasten off, leaving a tail to sew to the foot.
— Belly Patch :
Info :
Worked in rows. Made in "Birch"
Row 1 :
Chain 13. Starting in the second chain from the hook: inc, 10 sc, inc, chain one & turn (14)
Row 2 :
inc, 12 sc, inc, chain one & turn (16)
Row 3 :
inc, 14 sc, inc, chain one & turn (18)
Row 4 :
inc, 16 sc, inc, chain one & turn (20)
Row 5 :
inc, 18 sc, inc, chain one & turn (22)
Row 6 :
inc, 20 sc, inc, chain one & turn (24)
Row 7-18 :
24 sc, chain one & turn (24)
Row 19 :
dec, 20 sc, dec, chain one & turn (22)
Row 20 :
22 sc, chain one & turn (22)
Row 21 :
dec, 18 sc, dec, chain one & turn (20)
Row 22 :
20 sc, chain one & turn (20)
Row 23 :
dec, 16 sc, dec, chain one & turn (18)
Row 24 :
dec, 14 sc, dec, chain one & turn (16)
Row 25 :
16 sc, chain one & turn (16)
Row 26 :
dec, 12 sc, dec, chain one & turn (14)
Row 27 :
dec, 10 sc, dec, chain one & turn (12)
Row 28 :
12 sc, chain one & turn (12)
Row 29 :
inc, 10 sc, inc, chain one & turn (14)
Row 30 :
inc, 12 sc, inc, chain one & turn (16)
Row 31-37 :
16 sc, chain one & turn (16)
Row 38 :
dec, 4 sc, dec. Place marker in the next stitch (the ninth stitch from row 37). Chain one & turn (6)
Row 39 :
6 sc, chain one & turn (6)
Row 40 :
dec, 2 sc, dec, chain one & turn (4)
Row 41 :
dec, dec, chain one & turn (2)
Info :
Fasten off. Attach yarn in the stitch that was marked in row 37, when making row 38 & continue:
Row 43 :
dec, 4 sc, dec, chain one & turn 6 (6)
Row 44 :
6 sc, chain one & turn (6)
Row 45 :
dec, 2 sc, dec, chain one & turn (4)
Row 46 :
dec, dec, chain one & turn (2)
Info :
Fasten off. Flip the belly patch over so that the right side of the piece is facing. Attach a new piece of yarn to the bottom left corner & sc a border around. Make 3 sc in row 42. Make 4 sc down the sides of the rows of the top piece. Dec over the next two stitches. Make 4 sc up the other side of the rows (on the second top piece) & make 3 sc in row 47. Then continue on down the other side of the piece.
Info :
Make sure that you have an even number of stitches on both of the long sides of the piece. When finished crocheting the border, fasten off & leave a very long tail to sew the belly patch to the body.
— Claws (hands) :
Info :
Make 10 claws (yeah, its a pain). Made in "White"
Round 1 :
Make a magic ring with 3 sc. Slip stitch to the first stitch (3)
Info :
Fasten off, leaving a tail to sew to the hands. IF you are finding it difficult to make a magic ring with 3 sc: Chain 2. Make 3 sc in the second chain from the hook. Slip stitch to the first stitch (3). Fasten off, leaving a tail to sew to the hands.
— Claws (feet) :
Info :
Make 6 claws. Worked in continuous rounds - do not slip stitch/chain one to join. Made in "White". You can start the claws the alternative way that the hand claws are made.
Round 1 :
Make a magic ring with 3 sc (3)
Round 2 :
inc, inc, inc (6)
Round 3 :
sc in each stitch (6)
Info :
Fasten off, leaving a tail to sew the claws to the feet.
— Assembly :
Info :
Stuff the body & head firmly. Itll take a LOT of stuffing, but thats okay. Hell be nice & cuddly.
Step :
Using the tail left over on the body, sew the body to the head. Sew through the tops of the stitches on the body and around the POSTS of the stitches from the last round of the head. The head should be slightly oval shaped (the increases from round 13 of the head should be on the sides) & the body is definitely oval shaped - so be mindful of that when sewing the two pieces together.
Step :
Pin the belly patch to the body. The bottom of the patch should sit between rounds 15&16 of the body. The top of the belly patch should sit between rounds 8&9 of the head. Rows 27 & 28 of the belly patch are the neck, the rows after that are all sewed to the head.
Step :
Work around the posts of the stitches on the border when sewing - it will give you a waaay neater look than whip stitching it on. Take your time; use T-pins to keep the patch in place while sewing.
Step :
Pin the ears to the head. They should sit between rounds 5&6, to between rounds 11&12 of the head. Before the ears are fully sewed on, add stuffing to them.
Step :
Pin the arms to the sides of the body. The top six stitches of the arms (where theyve been fasted off) align with the last round of the body (near the head). The bottom six stitches (left over from when the arm switched from working in rounds to working in rows) should be pinned between rounds 28&29 of the body. Sew the arms on, adding stuffing near the row part so it blends with the bottom of the arm/hand.
Step :
Pin 5 claws to each of the hands & sew them to the hands. They dont need stuffing - theyre way too small for it.
Step :
Sew a foot pad to each of the feet. They should sit between rounds 3&4 of the feet. Sew around the posts of the stitches on the foot pad for a neat finish.
Step :
Sew the feet to the body - they should be angled kind of outwards. The bottoms of the feet should sit between rounds 12&13 of the body. The tops of the feet should sit between rounds 19&20 of the body.
Step :
Sew 3 of each of the foot claws to the feet. You can add a little bit of stuffing to them if you want. They should sit between rounds 7&8 to between rounds 8&9 of the feet.
Step :
Using a piece of black yarn, embroider the eyes & mouth on the head part of the belly patch. You can VERY carefully use a tiny bit of fabric glue to make the eyes a bit rounder. Cut two little triangles out of white felt for the teeth. Glue the teeth near the mouth; the top parts of the little triangles should point upwards.
Info :
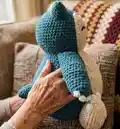
If you made it this far - congratulations, youre finished! Refer to the photos for placement and final finishing touches.
This large Snorlax amigurumi is a joyful, cuddly project that becomes a treasured companion when finished. Its soft, squishy body and detailed belly patch make it perfect for snuggles and display. Sew carefully, follow the step-by-step rounds, and enjoy making something big and handmade! 🧶🧸