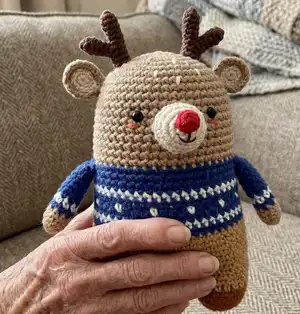
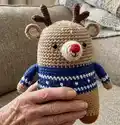
Make a sweet, pocket-sized deer amigurumi with clear step-by-step instructions and playful colorwork. This pattern guides you through head, body, legs, arms, horns, ears and facial details so you can create a charming handmade friend. Perfect as a gift or a cozy decoration, the design uses simple stitches and cute finishing touches to bring the deer to life.
Progress Tracker
0% Complete
— Head :
Rnd 1 :
scx6 in the yarn loop, tighten the loop [6 sts]
Rnd 2 :
(2-sc inc) x 6 [12]
Rnd 3 :
(scx1, 2-sc inc) x 6 [18]
Rnd 4 :
(scx2, 2-sc inc) x 6 [24]
Rnd 5 :
(scx3, 2-sc inc) x 6 [30]
Rnd 6 :
(scx4, 2-sc inc) x 6 [36]
Rnd 7 :
(scx5, 2-sc inc) x 6 [42]
Rnd 8 :
(scx6, 2-sc inc) x 6 [48]
Round 9~36 :
sc in all 48 st [48]
Info :
Use the Brown yarn to make MAGIC RING for Rnd 1-19 (Head). Do not forget to change the color as shown in the illustration to the right. Place eyes between Rnd 13 and 14.
— Divide the legs :
Info :
To make a leg, identify the center space between the legs by the 6 stitches, and each leg identifies the other by 18. (Use stitch markers to help.) Sc at the 31th st of the Rnd 36. *1 This sc is the first st of the first leg (left leg). Continue working on the first leg (left leg).
— Legs :
Rnd 37~40 :
sc in all 18 st [18]
Rnd 41 :
(scx1, sc2tog) x 6 [12]
Info :
Fasten off, leaving a long tail. Stuff the leg. Using a yarn needle, weave the yarn tail through the front loop of each remaining st and pull tight to close.
Second leg (Right leg) :
Rejoin the Yellow yarn to 7th back unworked st of Rnd 36. *2 This sc is the first st for the second leg (right Leg). Continue working the second leg (right leg) the same way as the first leg (left leg), from Rnd 37–42. Using a yarn needle, sew the 6 sts between the legs. *3
— Body :
Info :
Rnd 20~36 correspond to the body colorwork area (change the color according to the symbol patterns). Changing the yarn color is not mentioned in the descriptive design so follow the symbol chart for color changes (Navy / White / Yellow yarn for Rnd 20~36).
— Arms :
Rnd 1 :
scx5 in the yarn loop, tighten the loop [5 sts]
Rnd 2 :
(2-sc inc) x 5 [10]
Rnd 3~11 :
sc in all 10 st [10]
Info :
Fasten off, Leaving a long tail for sewing. Flatten the ARM, do not stuff. Arms location: Between Rnd 20 and 21.
— Long Horn x2 :
Rnd 1 :
scx4 in the yarn loop, tighten the loop [4 sts]
Rnd 2~5 :
sc in all 4 st [4]
Rnd 6 :
2-sc inc, scx3 [5]
Rnd 7 :
2-sc inc, scx4 [6]
Info :
Fasten off, Leaving a long tail for sewing. Do not stuff.
— Short Horn x2 :
Rnd 1 :
scx4 in the yarn loop, tighten the loop [4 sts]
Rnd 2~4 :
sc in all 4 st [4]
Info :
Fasten off, Leaving a long tail for sewing. Do not stuff. Sew the Short horn to long horn. *4
— Snout :
Rnd 1 :
Use the Light beige yarn to make 3 chains. scx1 in second ch from hook ,scx3 in the bottom chain, Working up the other side-scx1, scx1 in the next chain, slst [6 sts]
Rnd 2 :
ch 1, (2-sc inc) x 6, slst [12]
Rnd 3 :
ch 1, sc in all 12 st, slst [12]
Rnd 4 :
ch 1, scx4, 2-sc inc, scx6, 2-sc inc, slst [14]
Rnd 5 :
ch 1, sc in all 14 st, slst [14]
Info :
Fasten off, Leaving a long tail for sewing. Fill in some stuffing to the snout. And then make a nose and mouth on the snout.
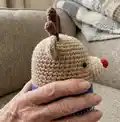
— Eyes :
Info :
Eyes Location: Between Rnd 13 and 14. Use 5mm black plastic eyes and glue or secure as preferred.
— Ear x2 :
Rnd 1 :
scx6 in the yarn loop, tighten the loop [6 sts]
Rnd 2 :
(2-sc inc) x 6 [12]
Info :
Fasten off, and make another Light beige ear, two Brown ears by the same way.
Rnd 3 (Edging) :
Locate light beige colored ear part on the brown ear, and then SC together with brown yarn. [12]
Info :
Fasten off, Leaving a long tail for sewing.
— Assembly :
Info :
Sew ears to the head (ear top positions shown in diagram). Sew long and short horns together then attach to the top of the head. Sew the snout to the face with the nose centered between the eyes location. Place arms between Rnd 20 and 21 and sew securely. Use a yarn needle to sew the 6 sts between the legs and close the opening. Use glue if preferred to secure plastic eyes. Weave in ends and trim.
This Minimals Deer pattern is a delightful little project that makes a perfect handmade gift or decoration. It blends simple amigurumi techniques with charming colorwork and tiny assembled parts to create a playful friend. Enjoy the relaxing process of crocheting and assembling each detail — happy stitching! 🧶🧸