🧢 Beautiful ✨ Detailed πŸ’ Adorable

Alice, the Doll Amigurumi Pattern

Alice, the Doll Amigurumi Pattern
4.2β˜… Rating
5-7 Hours Time Needed
2.0K Made This
βœ‚οΈ

Intermediate Level

Ideal for those with basic crochet experience, featuring slightly more advanced stitches and techniques to expand your skills.

⏱️

Weekend Treat

Takes 5-7 hours, making it an enjoyable project to finish over a couple of days.

🧸

Cute Companion

An adorable friend to cherish, handcrafted with love to bring comfort and joy for years to come.

About This Alice, the Doll Amigurumi Pattern

This pattern guides you through crocheting Alice, a sweet amigurumi doll with a detailed hairstyle and expressive face. You will work the head, ears, hair pieces and embroidered features using cotton yarns and a small hook. The design emphasizes neat finishing: proper eye placement, sewn hairstyles and embroidered facial expressions to bring Alice to life.

Alice, the Doll Amigurumi Pattern crochet pattern - detailed view of completed project

Includes full round-by-round instructions and step photos for key steps like inserting safety eyes and stitching the hair. Perfect for crafters who enjoy assembling and finishing details to achieve a polished result.

Why You'll Love This Alice, the Doll Amigurumi Pattern

I absolutely love this pattern because it combines simple amigurumi shaping with delightful finishing details that really bring the character to life. I enjoy creating small hairstyles and embroidery that give the doll personality and charm. The instructions are written to help you place eyes, sew the hair and embroider the nose accurately, which makes finishing relaxing and satisfying. Every time I make a doll like Alice I feel proud of the tiny details that elevate the finished piece.

Alice, the Doll Amigurumi Pattern step 1 - construction progress Alice, the Doll Amigurumi Pattern step 2 - assembly progress Alice, the Doll Amigurumi Pattern step 3 - details and accessories Alice, the Doll Amigurumi Pattern step 4 - final assembly and finishing

Switch Things Up

I love how easy it is to customize Alice by changing yarn colors and adding accessories; try pastel shades for a softer look or brighter colors for a playful character.

You can scale the doll by using different yarn weights and hook sizes: bulky yarn and a larger hook creates a chunky, snuggly version, while thinner yarn makes a tiny keychain-sized doll.

Swap the hairstyle: instead of braids, stitch on a short bob or curly puffs using loop stitch or by attaching many short strands for a fuller look.

I often add tiny felt accessories like a scarf, hat, or miniature bag to personalize my dolls β€” sew them on or make removable pieces with snaps or buttons.

If you want a posable doll, try inserting light aluminum wire into limbs or between body pieces for subtle movement while still keeping it child-safe if needed.

Experiment with facial expressions by moving the nose and eyebrow placement slightly; even small changes change the whole personality of the doll.

Add tiny surface embroidery details on the sweater or jumpsuit for extra charm β€” little flowers, initials, or decorative stitches work wonderfully.

For a vintage aesthetic, tint the cheeks with a dry pastel and add tiny freckles with brown thread; these small details make each doll unique.

Mix yarn textures: use a slightly fuzzier yarn for hair overlays to create natural-looking highlights and depth without changing the base construction.

I recommend making a set of outfits β€” a couple of removable jumpers, hats or tiny shoes β€” so you can turn Alice into a mini wardrobe project as well.

Common Mistakes & How to Fix Them

βœ— Skipping the marker placement between rounds 19 and 20 can make eye placement ambiguous; place a marker or a thread of contrast color at the specified spot to count stitches accurately. βœ— Forgetting to count the six stitches from the marker before inserting the safety eyes will misplace them; always count 6 sc from the marker in both directions to center the eyes correctly. βœ— Not stuffing the head firmly enough results in a floppy face and poor embroidery base; stuff the head tightly with small amounts of fiberfill while shaping to keep a stable surface. βœ— Cutting hair strands too short or unevenly makes the hairstyle look unfinished; measure and pin hair pieces in place first, then trim and secure evenly when satisfied with placement.

Alice, the Doll Amigurumi Pattern

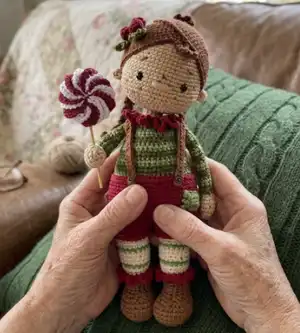
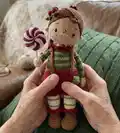
Make a charming handmade Alice doll with this detailed amigurumi pattern. You will create a fully crocheted head, hairstyle, ears and facial details with clear step-by-step rounds and helpful photos. The pattern uses easy-to-find cotton yarns and includes placement notes for eyes, nose and hair to get a professional finish. Enjoy crafting this adorable companion that makes a lovely gift or keepsake.

Intermediate 5-7 Hours

Materials Needed for Alice, the Doll Amigurumi Pattern

β€” Main Fabric

  • 01
    Alize Cotton Gold - beige 262 (main color for head and skin)
  • 02
    Alize Cotton Gold - colors for sweater: 385 and 372
  • 03
    YarnArt Jeans - brown 70 (hairstyle)
  • 04
    YarnArt Jeans - boots colors 40 and 66
  • 05
    Alize Cotton Gold - jumpsuit color 390
  • 06
    YarnArt Jeans - straps color 40
  • 07
    Alize cotton/ yarn - patch on jumpsuit color 385
  • 08
    YarnArt Jeans - berries color 390
  • 09
    YarnArt Jeans - leaves color 372
  • 10
    Alize Cotton Gold - pantyhose colors 62 and 385
  • 11
    Alize Cotton Gold - collar color 390
  • 12
    Safety eyes size 6 mm (2 pieces)

β€” Tools Required

  • 01
    Crochet hook 2 mm
  • 02
    Long needle for sewing and embroidery
  • 03
    Yarn needle for sewing pieces together
  • 04
    Stitch markers
  • 05
    Scissors
  • 06
    Polyester stuffing (fiberfill)
  • 07
    Stick for stuffing or tweezers
  • 08
    Buttons 4 mm (for decoration if required)
  • 09
    Mouline thread of black, white and brown colors
  • 10
    Dry or oil pink pastel (for tinting cheeks)
  • 11
    Tinting brush
  • 12
    Pins for positioning hair pieces
  • 13
    Carton or plastic for the insoles
  • 14
    Aluminum wire 1.5-2 mm (optional for structure)

Progress Tracker

0% Complete

β€” Head :

Info :

The main color - Alize Cotton gold beige 262.

Round 1 :

6 sc in MR

Round 2 :

6*(inc) (12)

Round 3 :

(1 sc, inc)*6 (18)

Round 4 :

1 sc, inc, (2 sc, inc)*5, 1 sc (24)

Round 5 :

(3 sc, inc)*6 (30)

Round 6 :

2 sc, inc, (4 sc, inc)*5, 2 sc (36)

Round 7 :

(5 sc, inc)*6 (42)

Round 8 :

3 sc, inc, (6 sc, inc)*5, 3 sc (48)

Round 9 :

(7 sc, inc)*6 (54)

Round 10 :

4 sc, inc, (8 sc, inc)*5, 4 sc (60)

Round 11-19 :

9 rnds of 60 sc

Round 20 :

30 sc, put the marker or the thread of contrast color, 30 sc (60)

Info :

Between 19th and 20th rnds count 6 sc from the marker in both directions. Insert the safety eyes and fix them.

Round 21 :

20 sc, inc, 2 sc, inc, 12 sc, inc, 2 sc, inc, 20 sc (64)

Round 22-25 :

4 rnds of 64 sc

Round 26 :

(14 sc, dec)*4 (60)

Round 27 :

4 sc, dec, (8 sc, dec)*5, 4 sc (54)

Round 28 :

(7 sc, dec)*6 (48)

Round 29 :

3 sc, dec, (6 sc, dec)*5, 3 sc (42)

Round 30 :

(5 sc, dec)*6 (36)

Round 31 :

2 sc, dec, (4 sc, dec)*5, 2 sc (30)

Round 32 :

(3 sc, dec)*6 (24)

Round 33 :

1 sc, dec, (2 sc, dec)*5, 1 sc (18)

Round 34 :

(4 sc, dec)*3 (15)

Info :

Cut off the thread, stuff the head tight with fiberfill.

β€” Hairstyle (2 pcs) :

Info :

Crochet with brown YarnArt Jeans 70.

Round 1 :

6 sc in MR

Round 2 :

6*(inc) (12)

Round 3 :

(1 sc, inc)*6 (18)

Round 4 :

1 sc, inc, (2 sc, inc)*5, 1 sc (24)

Round 5 :

(3 sc, inc)*6 (30)

Round 6 :

2 sc, inc, (4 sc, inc)*5, 2 sc (36)

Round 7 :

(5 sc, inc)*6 (42)

Round 8 :

3 sc, inc, (6 sc, inc)*5, 3 sc (48)

Round 9 :

(7 sc, inc)*6 (54)

Round 10 :

4 sc, inc, (8 sc, inc)*5, 4 sc (60)

Round 11-14 :

4 rnds of 60 sc

Info :

Cut off the thread, leaving a tip for sewing

β€” Braids :

Info :

Crochet with the same brown color. All 3 strands will take 8 sc. (Fix the thread, make a ch of 37 sts, from the 2nd st from the hook crochet 36 sc, 1 sc along the hairstyle, skip 1 sc)*3 After you skipped 1 sc, cut the thread and attach a new thread to the next sc, continue to make a ch of 37 sts for the 2nd strand.

β€” Forelock :

Info :

Crochet with the same brown color.

Item Name (P1) :

1st part of the forelock: 5 ch, from the 2nd st from the hook crochet 4 sc. Cut the thread, leaving a tip for sewing.

Item Name (P2) :

2nd part of the forelock: 7 ch, from the 2nd st from the hook crochet 6 sc. Cut the thread, leaving a tip for sewing.

β€” Back hairs :

Info :

Crochet with the same brown color. Make a ch of 4 sts, from the 2nd st from the hook crochet: 3 sc; 5 ch, from the 2nd st from the hook crochet: 4 sc; 3 ch, from the 2nd st from the hook crochet: 2 sc. Cut off the thread and sew off the hairs with a needle, as shown in the photo.

β€” Ears (2 pcs) :

Info :

The main color - Alize Cotton gold beige 262.

Round 1 :

6 sc in MR

Info :

Cut off the thread, leaving a tip for sewing.
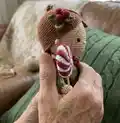
β€” Decoration :

Info :

Cut a long beige thread and make a tightening, as shown in the photo. Follow the points: 1-2-3. Cut a new thread and do the same on the other side: 4-5-6. Tie the threads together in a knot, pulling the eyes a little.

β€” Embroidery & Finishing :

Info :

Embroider the nose between 21st and 22nd rnds. The width of the nose is 5 sc. Embroider as shown in the photo.

Info :

Take the white thread and embroider the whites of the eyes.

Info :

Take the brown thread and embroider the eyebrows.

Info :

Embroider the freckles with a thin Mouline thread of brown color. The photo shows where you need to embroider them.

Info :

Sew on the ears between 20th and 21st rnds.

Info :

Place the hairstyles as shown in the photo and sew them on.

Info :

Sew the forelock in the middle, sew the short hairs on the back.

Assembly Instructions

  • Insert and secure safety eyes between rounds 19 and 20, counting 6 single crochets from the marker in both directions, then fix the eyes firmly.
  • Sew on the ears between the 20th and 21st rounds, aligning the ear base with the marked stitches and securing with small invisible stitches.
  • Position the hairstyle pieces on the head as shown in photos, pin them in place, and sew around the edges to secure; braid and tie braids with a small red thread if desired.
  • Embroider the nose between rounds 21 and 22 (width 5 sc), embroider whites of the eyes with white thread, then add eyebrows and freckles with brown Mouline thread.
  • Sew the forelock centered at the front and stitch the short back hairs in rows following the photo guides, trimming and shaping hair to achieve the desired look.

Important Notes

  • πŸ’‘Use stitch markers and/or a contrasting thread to mark important rounds for accurate placement of eyes and facial features.
  • πŸ’‘Stuff the head firmly with fiberfill as you go, adding small amounts to shape evenly and avoid lumps under embroidered areas.
  • πŸ’‘Pin hair pieces and facial elements in place before permanently sewing to ensure symmetrical placement and correct proportions.
  • πŸ’‘Weave in and secure thread tails from hair and small pieces carefully to prevent them from coming loose during play or display.

This delightful Alice doll pattern helps you create a lovable, handmade companion full of charm and personality. The project focuses on tidy finishing β€” precise eye placement, sewn hairstyles and gentle embroidery for facial details. Perfect for gift-giving or a special keepsake you made with your own hands. 🧢✨

You ask,

we answer.

FAQs

What size will the finished piece be?

The finished amigurumi measures approximately 22-25 cm tall depending on yarn tension and whether you add braids and accessories.

Can I use different yarn weights for this pattern?

Yes, you can use different yarn weights, but it will change the final size and require an appropriate hook size; use the same yarn across parts for consistent proportions.

Do I need prior crochet experience for this pattern?

This pattern is rated intermediate, so basic knowledge of single crochet, increases, decreases, magic ring and simple embroidery is recommended for best results.

How long does this project typically take to complete?

Most crocheters complete this project in 5-7 hours, though time may vary depending on experience level and time spent on finishing details like sewing hair and embroidery.

Where should I place the safety eyes?

Place safety eyes between rounds 19 and 20, counting 6 single crochets from the marker in both directions to ensure even spacing and symmetry.