🧢 Beautiful ✨ Detailed πŸ’ Adorable

Minimals Mini Dog Amigurumi Pattern

Minimals Mini Dog Amigurumi Pattern
4.8β˜… Rating
5-7 Hours Time Needed
2.4K Made This
βœ‚οΈ

Intermediate Level

Ideal for those with basic crochet experience, featuring slightly more advanced stitches and techniques to expand your skills.

⏱️

Weekend Treat

Takes 5-7 hours, making it an enjoyable project to finish over a couple of days.

🧸

Cute Companion

An adorable friend to cherish, handcrafted with love to bring comfort and joy for years to come.

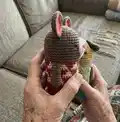
About This Minimals Mini Dog Amigurumi Pattern

This pattern makes a small, stylized dog amigurumi in a minimalist design with charming color-block clothing. You will work the head, body and legs seamlessly, then make separate arms, ears and a snout to attach. Symbol charts are included for the color pattern and exact instructions guide you through shaping and finishing.

Minimals Mini Dog Amigurumi Pattern crochet pattern - detailed view of completed project

The pattern uses worsted-weight yarn on a 3mm hook to create a 15cm (5.9 in) doll. Clear placement notes are provided for eyes, cheeks, clothes pattern and snout stitching.

Why You'll Love This Minimals Mini Dog Amigurumi Pattern

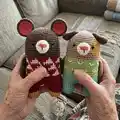
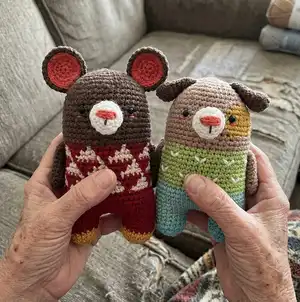
I absolutely love this pattern because it turns simple single crochet into a lovable character with very little fuss. I enjoy how the minimal shapes and small size make it a quick and satisfying make that still has personality. The color-pattern charts let you create fun sweaters and leg colors without complicated stitches. Sewing on details like the snout and ears always feels rewarding and brings the doll to life.

Minimals Mini Dog Amigurumi Pattern step 1 - construction progress Minimals Mini Dog Amigurumi Pattern step 2 - assembly progress Minimals Mini Dog Amigurumi Pattern step 3 - details and accessories Minimals Mini Dog Amigurumi Pattern step 4 - final assembly and finishing

Switch Things Up

I love customizing this pattern by changing the sweater and leg colors to make different personalities β€” try pastel shades for a soft look or bright contrasting colors for a playful version.

I often swap the yarn weight and hook to create different sizes; using thinner yarn and a smaller hook will make a tiny keychain version, while bulky yarn makes a cuddly larger toy.

I sometimes embroider freckles, spots, or different eye expressions to completely change the character's mood β€” even small shifts in eye placement give a new personality.

Try adding tiny crocheted accessories like a scarf, hat, or a bow to match seasons or gifting occasions; they are quick to make and add charm.

For a posable figure, I add thin wire inside the arms before flattening and sewing; this lets me pose the arms for display.

I like to use felt for small details like inner ear highlights or mouth pieces when I want a cleaner edge rather than embroidered options.

Change the nose color and snout size to make other animals β€” a longer snout in a different color can turn the pattern into a fox or a bear variant.

Try using variegated yarn for the body band to add subtle color transitions without changing yarns every round.

When gifting, I attach a small sewn-on label or tiny button for a handmade touch β€” it makes each doll feel special and unique.

I recommend keeping notes of color and round changes as you work so you can reproduce favorites or make matching sets later on.

Common Mistakes & How to Fix Them

βœ— Skipping stitch markers during the leg division can cause misplacement of legs; mark the center and the stitch boundaries before dividing to ensure correct alignment. βœ— Changing color without securing ends neatly may cause loose tails and bulky joins; weave in and carry colors or change with tidy joins to hide ends inside the work. βœ— Not stuffing at the right stages leads to odd shapes and lumps; stuff gradually during shaping and finish stuffing before final decreases to preserve form. βœ— Pulling tension too tight on increases and decreases can distort the circle; keep an even, moderate tension and count stitches frequently to maintain shape.

Minimals Mini Dog Amigurumi Pattern

Create an adorable minimal-style mini dog amigurumi with this complete crochet pattern. You will follow clear step-by-step rounds for the head, body, legs, arms, ears and snout, plus detailed placement notes for face and assembly. Perfect for creating a pocket-sized handmade friend or a sweet gift. The pattern uses simple single crochet construction and color changes guided by the included symbol charts.

Intermediate 5-7 Hours

Materials Needed for Minimals Mini Dog Amigurumi Pattern

β€” Main Fabric

  • 01
    Worsted weight yarn (#4) - Soft Brown yarn (main head/body color)
  • 02
    Worsted weight yarn (#4) - Yellow yarn (face detail)
  • 03
    Worsted weight yarn (#4) - White yarn (snout and details)
  • 04
    Worsted weight yarn (#4) - Brown yarn (ear and inner ear color)
  • 05
    Worsted weight yarn (#4) - Orange yarn (nose detail)
  • 06
    Worsted weight yarn (#4) - Sky blue yarn (leg/clothes color)
  • 07
    Worsted weight yarn (#4) - Neon blue yarn (leg/clothes accent)
  • 08
    Worsted weight yarn (#4) - Light green yarn (body clothes color)

β€” Tools Required

  • 01
    Crochet hook 5/0 (3mm)
  • 02
    Yarn needle (weave in ends and sewing parts)
  • 03
    Fiberfill stuffing
  • 04
    Glue (to glue the eyes on the face if preferred)
  • 05
    5mm black plastic eyes x2
  • 06
    Stitch markers
  • 07
    Scissors
  • 08
    Wooden pins (optional for straightening doll feet)

Progress Tracker

0% Complete

β€” Head / Body / Legs :

Info :

Use the Soft brown yarn to make MAGIC RING.

Round 1 :

scx6 in the yarn loop, tighten the loop [6 sts]

Round 2 :

(2-sc inc) x 6 [12]

Round 3 :

(scx1, 2-sc inc) x 6 [18]

Round 4 :

(scx2, 2-sc inc) x 6 [24]

Round 5 :

(scx3, 2-sc inc) x 6 [30]

Round 6 :

(scx4, 2-sc inc) x 6 [36]

Round 7 :

(scx5, 2-sc inc) x 6 [42]

Round 8 :

(scx6, 2-sc inc) x 6 [48]

Round 9~36 :

sc in all 48 st [48]

Info :

DIVIDE THE LEGS. To make a leg, identify the center space between the legs by the 6 stitches, and each leg identifies the other by 18.(Use stitch markers to help.) Sc at the 31th st of the Rnd 36. *1 This sc is the first st of the first leg (left leg). Continue working on the first leg (left leg).

Round 37~40 :

sc in all 18 st [18]

Round 41 :

(scx1, sc2tog) x 6 [12]

Round 42 :

(sc2tog) x 6 [6]

Info :

Fasten off, leaving a long tail. Stuff the leg. Using a yarn needle, weave the yarn tail through the front loop of each remaining st and pull tight to close.

Second Leg (Right leg) :

Rejoin the Sky blue yarn to 7th back unworked st of Rnd 36.*2 This sc is the first st for the second leg (right Leg). Continue working the second leg (right leg) the same way as the first leg (left leg), from Rnd 37–42. Using a yarn needle, sew the 6 sts between the legs.*3

β€” Arm x2 :

Info :

Use the Soft brown yarn to make MAGIC RING.

Round 1 :

scx5 in the yarn loop, tighten the loop [5 sts]

Round 2 :

(2-sc inc) x 5 [10]

Round 3~11 :

sc in all 10 st [10]

Info :

Fasten off, Leaving a long tail for sewing. Flatten the ARM, do not stuff.

β€” Snout :

Info :

Use the White yarn to make 4 chains.

Round 1 :

scx1 in second ch from hook ,scx1 in the next chain, scx3 in the bottom chain, Working up the other side-scx1, scx2 in the next chain, slst [8 sts]

Round 2 :

ch 1, 2-sc inc, scx1, (2-sc inc) x 3, scx1, (2-sc inc) x 2, slst [14]

Round 3 :

ch 1, 2-sc inc, scx3, 2-sc inc, scx2, sc2tog, scx1, sc2tog, scx2, slst [14]

Round 4 :

ch 1, sc in all 14 st, slst [14]

Info :

Fasten off, Leaving a long tail for sewing. Fill in some stuffing to the snout. And then make a nose and mouth on the snout.

Info :

Eyes Location: Between Rnd 13 and 14. Section for the snout stitching on the face: 19sts and 8sts as indicated in the diagram.

β€” Ear x2 :

Info :

Use the Brown yarn to make MAGIC RING.

Round 1 :

scx5 in the yarn loop, tighten the loop [5 sts]

Round 2 :

(2-sc inc) x 5 [10]

Round 3 :

(scx1, 2-sc inc) x 5 [15]

Round 4 :

sc in all 15 st [15]

Round 5 :

scx6, sc2tog, scx5, sc2tog [13]

Round 6 :

scx6, sc2tog, scx5 [12]

Round 7 :

sc in all 12 st [12]

Round 8 :

(scx4, sc2tog) x 2 [10]

Round 9~10 :

sc in all 10 st [10]

Info :

Fasten off, Leaving a long tail for sewing. Flatten the EAR, do not stuff.

Info :

*Complete face details and doll assemblies by referring to illustrations showing location for each part and pictures in the following description. Thank you.

Info :

TIP: How to straighten a doll: Plug wooden pin on the back of the doll's feet.

Assembly Instructions

  • Position and glue or sew the 5mm black plastic eyes between rounds 13 and 14 on the head using the diagram for spacing as a guide; the pattern indicates the eye placement clearly between these rounds.
  • Sew the snout to the face in the highlighted grid section (19 sts across, with the snout centered over the 8-st area as shown) and embroider or stitch the nose and mouth after stuffing the snout slightly.
  • Attach the ears to the head between rounds 14 and 15, aligning each ear at the cheek locations shown in the illustration and sew securely using the long tails left from the ears.
  • Attach the arms between rounds 20 and 21 on each side, using the long tails to sew them in place; flatten the arm before sewing and do not stuff the arms.
  • When legs are completed, sew the 6 stitches between the legs together using a yarn needle as directed to close the center gap and secure the body bottom.
  • Pin all parts in position first to check symmetry and balance, then sew firmly with matching yarn and weave in all ends before finishing.

Important Notes

  • πŸ’‘Change the color of the yarn according to the SYMBOL PATTERNS on page 1; color changes are not repeated in the written rounds.
  • πŸ’‘Use stitch markers to help identify stitch positions and the center space when dividing legs at round 36.
  • πŸ’‘Stuff the legs and snout appropriately before final decreases, and avoid overstuffing the head to preserve shape.

This Minimals Mini Dog is a tiny handmade companion that brings a lot of charm in a small package. Make one to gift, collect, or keep as a cozy pocket pal. The clear symbol charts and step-by-step rounds help you make a polished doll every time. 🧢🐢✨

You ask,

we answer.

FAQs

What size will the finished piece be?

The finished amigurumi measures approximately 15 cm (5.9 inches) tall when using the recommended worsted yarn and a 3mm crochet hook.

Can I use different yarn weights for this pattern?

Yes, but changing yarn weight will change the finished size; if you use fingering weight yarn on a 3mm hook you will get a similar small size, while bulkier yarns will create a larger, chunkier doll.

Do I need prior crochet experience for this pattern?

This pattern is rated intermediate because it includes shaping, color changes and assembly; basic single crochet knowledge and experience with increases and decreases are recommended.

How long does this project typically take to complete?

Most crocheters finish this mini amigurumi in about 5-7 hours, depending on experience level and time spent on finishing and embroidery details.