🧢 Beautiful ✨ Detailed πŸ’ Adorable

Rose Turtle Amigurumi Pattern

Rose Turtle Amigurumi Pattern
4.2β˜… Rating
5-7 Hours Time Needed
1.7K Made This
βœ‚οΈ

Intermediate Level

Ideal for those with basic crochet experience, featuring slightly more advanced stitches and techniques to expand your skills.

⏱️

Weekend Treat

Takes 5-7 hours, making it an enjoyable project to finish over a couple of days.

🧸

Cute Companion

An adorable friend to cherish, handcrafted with love to bring comfort and joy for years to come.

About This Rose Turtle Amigurumi Pattern

This pattern creates a sweet rose-shelled turtle amigurumi with a layered rose shell and plush body. It combines simple amigurumi shaping with a spiral petal technique to form a realistic rose. You will work the shell in back loops only and add petals in the front loops for a textured floral effect.

Rose Turtle Amigurumi Pattern crochet pattern - detailed view of completed project

The pattern uses bulky/fluffy yarn for a soft, cuddly finish and includes clear attachment and finishing guidance. Safety eyes and simple embroidery finish the face for a polished look.

Why You'll Love This Rose Turtle Amigurumi Pattern

I absolutely love this pattern because it blends a classic amigurumi turtle with a beautiful rose shell for a unique twist. I enjoy the tactile process of working the petals in a spiral β€” the texture really pops when you use velvety bulky yarn. The assembly is satisfying: attaching the legs and tail into a body round feels precise and neat. I also love how forgiving the petal stitch sequence is, so each flower turns out slightly different and charming. Making this turtle always feels cozy and creative, and it makes a lovely handmade gift.

Rose Turtle Amigurumi Pattern step 1 - construction progress Rose Turtle Amigurumi Pattern step 2 - assembly progress Rose Turtle Amigurumi Pattern step 3 - details and accessories Rose Turtle Amigurumi Pattern step 4 - final assembly and finishing

Switch Things Up

I love customizing this pattern by changing the shell color to make different moods; try blush pink for a soft look or deep plum for a dramatic rose.

I often swap the bulky yarn for a slightly thinner yarn and a smaller hook to make a miniature keychain-sized turtle.

I sometimes add embroidery or tiny felt leaves tucked under the petals to add botanical detail and dimension.

For a whimsical version I mix two reds in the petal spiral for a variegated rose effect that looks hand- painted.

If you want a sturdier toy, I add more stuffing and use tighter tension; for a floppy, plush version I stuff lightly and use looser tension.

I also experiment with different safety eye sizes for expression β€” smaller eyes give a cuter baby face while larger eyes are more playful.

You can create a matching set by making several turtles with alternate petal counts and arranging them as a centerpiece.

I sometimes embroider small patterns on the body shell before attaching the head for extra personalization and texture.

Try adding a loop of yarn to the top of the shell to convert your turtle into an ornament or hanging decor piece.

If I want a more realistic leaf effect, I shape the legs slightly differently and add a subtle stitch line down the center to mimic a leaf vein.

Mixing yarn textures is fun β€” pair a fuzzy body yarn with a smooth velvet petal yarn for contrast that highlights the petals.

Common Mistakes & How to Fix Them

βœ— Not using stitch markers with fluffy or chunky yarn can make rounds hard to track; place markers at the start of each round and at key front-loop positions to avoid losing your place. βœ— Forgetting to stuff gradually leads to lumps or flattened shapes; stuff small amounts at a time while shaping the head and body to keep a smooth, even profile. βœ— Attaching legs and tail without checking orientation results in asymmetry; follow the placement photos and position curves to the right/left as directed before securing with single crochet. βœ— Skipping the back-loop only (BLO) instruction for the shell prevents petals from sitting correctly; work the top of the shell in BLO so the front loops remain free for petal construction. βœ— Cutting yarn too short when finishing the head makes sewing difficult; leave a long tail (about 8-9 inches) when fastening off the head so you have plenty to sew it securely.

Rose Turtle Amigurumi Pattern

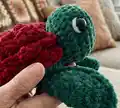
Make a charming rose-shelled turtle using bulky, velvety yarn for a plush, tactile amigurumi. This pattern guides you through crocheting the shell petals, body, head, legs and tail with clear shaping and assembly steps. Perfect as a handmade gift or a decorative keepsake, the rose turtle combines floral detail with a cuddly toy form. Follow the instructions closely for best results and enjoy personalizing the colors and details.

Intermediate 5-7 Hours

Materials Needed for Rose Turtle Amigurumi Pattern

β€” Main Fabric

  • 01
    Size 5-6 Bulky Yarn (pattern uses bulky/fluffy yarn for plush texture)
  • 02
    Premier Parfait Chunky (Size 6) - Emerald (used for body/head/legs; author notes it is similar to size 5)
  • 03
    Premier Parfait Chunky (Size 6) - White (used for eye detail)
  • 04
    Yarn Bee Velvety Smooth (Size 5) - Red (used for shell petals)
  • 05
    Note: Premier Parfait Chunky and Yarn Bee Velvety Smooth are very similar in size even though labeled different weights; author considers both to be size 5

β€” Tools Required

  • 01
    Crochet hook size 4.5mm
  • 02
    Safety eyes 14mm (2 pieces)
  • 03
    Tapestry needle for weaving and sewing
  • 04
    Scissors
  • 05
    Poly-Fil stuffing
  • 06
    Stitch markers (recommended for front loops and round starts)

Progress Tracker

0% Complete

β€” Front Legs :

Info :

Using Emerald (Make 2)

Round 1 :

8 SC in MR (8)

Round 2 :

Inc (16)

Round 3 :

SC, Inc (24)

Round 4 :

3SC, Inc (30)

Info :

Fold your circle in half to make a half circle.

Info :

Working around the half circle and through both sides, SC through both stitches. Continue until you reach the end of the half circle. FO, there is no need to leave a tail for sewing, you will SC the legs into a round of the body.

β€” Back Legs :

Info :

Using Emerald (Make 2)

Round 1 :

8 SC in MR (8)

Round 2 :

Inc (16)

Round 3 :

SC, Inc (24)

Info :

Working around the half circle and through both sides, SC through both stitches. Continue until you reach the end of the half circle. FO, there is no need to leave a tail for sewing, you will SC the legs into a round of the body.

β€” Tail :

Info :

Using Emerald

Round 1 :

6 SC in MR (6)

Round 2-4 :

SC (6)

Info :

SS, FO, there is no need to leave a tail for sewing, you will SC the tail piece into a round of the body.

β€” Head :

Info :

Using Emerald

Round 1 :

8 SC in MR (8)

Round 2 :

Inc (16)

Round 3 :

SC, Inc (24)

Round 4 :

3SC, Inc (30)

Round 5-7 :

SC (30)

Round 8 :

3SC, Dec (24)

Round 9 :

SC, Dec (16)

Info :

SS, leave a long tail for sewing. I leave about 8-9 inches to be safe, but I usually have a lot left over.

Info :

Add eyes and stuff the head. I added my eyes at around rows 5-6 and about 9-10 stitches apart.

β€” Shell/Body :

Info :

The top of the shell is all worked in the BLO (back loops only) of the previous round. The petals are formed in the front unworked loops once the top of the shell is completed.

Info :

Using Red

Round 1 :

8 SC in MR (8)

Round 2 :

Working in BLO: Inc (16)

Info :

*I highly suggest stitch markers to mark your front loops, at least one in the front loop of the first stitch of each row.

Round 3 :

Working in BLO: SC, Inc (24)

Round 4 :

Working in BLO: (SC, Inc, SC)*8 (32)

Round 5 :

Working in BLO: 3SC, Inc (40)

Round 6 :

Working in BLO: (5SC, Inc, 2SC)*5 (45)

Round 7 :

Working in BLO: SC (45)

Info :

Color change to green. We will now make the petals. Drop your working yarn, the rest of the body will be finished after we complete the petals.

β€” Petals :

Info :

To make the petals, you will be working in a continuous spiral on top of the shell in the unworked front loops of each round.

Info :

Grab your red yarn and attach it with a SC in the very first unworked front loop of row 2.

Info :

Working into the remaining front loops repeat the following pattern until you reach the last front loop: HDC, DC, TC, DC, HDC, SS

Info :

**Please note, you should be careful not to miss any stitches, however, this is a very forgiving sequence of stitches so if you miss a loop/double up a loop anywhere it is not a huge deal. No two flowers are the same, so it is ok if your turtle is unique! If you find you have missed a stitch/stitches just end the round on whichever stitch you have left and complete a SS in the ending stitch as well. If you find you have stitches remaining you can continue the sequence until you reach the end or you can SS until the end, whichever you prefer.

Info :

FO, weave in the ends.

β€” Body (continued) :

Info :

The remaining steps of the body will be worked normally, through both loops. Picking up where you left off with your green yarn.

Round 8 :

3SC, Dec (36)

Round 9 :

Grab your legs and tail, this is the row you will SC your pieces into. You place your pieces in front of the stitches of the body, pushing your hook through the leg/tail first then through the body stitch.

Round 9 (part) :

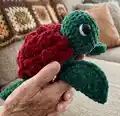
4SC, Grab the first big leg, attach using 3SC (curve of the leg should be on your right), 5SC, Grab the first small leg, attach using 2SC (curve on your right), 3SC, Grab your tail and using 3SC attach the tail (placement as photo).

Round 9 (part 2) :

3SC, Grab the second small leg, attach using 2SC (curve on your left), 5SC, Grab the second big leg, attach using 3SC (curve on your left), 3SC (36)

Round 10 :

SC, Dec (24)

Info :

Stuff the body to your desired firmness.

Round 11 :

SC, Dec (16)

Info :

Add any additional stuffing.

Round 12 :

Dec (8)

Info :

SS, cut yarn leaving a short tail to sew the hole closed. Weave the yarn tail back and forth into the stitches around then pull tight to close. Tie to secure and weave the rest of the yarn tail into the body.

β€” Finishing Details :

Info :

Sew the head onto the body. I sew mine in the middle of the front two legs, half way over the rose and half over the bottom portion of the body, this help cover your color changes.

Info :

Eye Detail: If you would like the white detail on the eye, grab your white yarn and embroider a line up the side of the eye. Insert your needle at the middle bottom of the safety eye and bring it up to the top middle of the safety eye, it will tend to curve around the safety eye when you pull it tighter.

Assembly Instructions

  • Sew the head onto the body centered above the front two legs, positioning it halfway over the rose and halfway over the bottom portion of the body to conceal color changes, then secure with evenly spaced whipstitches.
  • Attach the legs and tail during Round 9 by placing each piece in front of the body stitch, push your hook through the leg/tail first then through the body stitch, and SC to secure according to the sequence in Round 9.
  • When joining the petals to the shell, attach the red yarn into the first unworked front loop of row 2 and work the petal sequence continuously in a spiral; FO and weave in ends when complete.
  • Weave and pull the final tail closed after Round 12: pass the yarn tail back and forth through the surrounding stitches, pull tight to close the hole, tie to secure and weave the remaining tail into the body.
  • Embroider white eye detail after head is attached by inserting the needle at the middle bottom of the safety eye and bring it up to the top middle, pulling gently so the line curves naturally around the safety eye.

Important Notes

  • πŸ’‘Use stitch markers to mark your front loops and the start of rounds when working with fluffy/bulky yarn because stitches are harder to see.
  • πŸ’‘Stuff gradually and evenly while shaping the head and body to avoid lumps and to maintain the turtle's rounded form.
  • πŸ’‘Work the shell top in the BLO (back loops only) so the front loops remain free for forming the petals; this separation is essential for petal attachment.
  • πŸ’‘When attaching legs and tail, check the orientation of each piece (curve direction) before securing to ensure symmetry and correct pose.

This adorable Rose Turtle pattern pairs a plush turtle with a layered rose shell to create a sweet, decorative amigurumi. It is perfect for gifting, displaying, or gifting as a handmade keepsake. Make one in bright red and emerald for a festive look, or swap colors for a softer pastel version. 🧢🌹✨

You ask,

we answer.

FAQs

What size will the finished piece be?

The finished amigurumi measures approximately 6 inches long, 6.5 inches wide, and 3 inches tall using the recommended bulky yarn and 4.5mm hook.

Can I use different yarn weights for this pattern?

Yes, you can use different yarn weights but it will change the final size and texture; if you choose a different weight, adjust your hook size accordingly and expect a different finished measurement.

Do I need prior crochet experience for this pattern?

This pattern is rated intermediate: basic amigurumi experience and familiarity with working in BLO/FLO, increases/decreases, and sewing pieces together is recommended.

How long does this project typically take to complete?

Most crocheters complete this project in 5-7 hours, depending on experience and how much time you spend on the petal spiral and assembly.