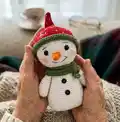
About This Snowman Amigurumi Pattern
This pattern creates a sweet little snowman amigurumi approximately 15 cm tall using fingering/sport weight yarn and a small hook. It includes step-by-step round instructions for the body, hat, nose, arms, and scarf with photos for guidance. You'll embroider facial details and attach buttons for a charming finished look.
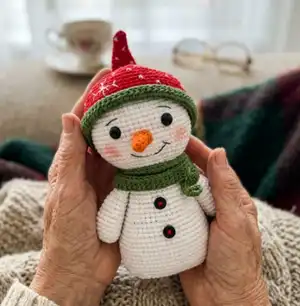
Perfect for holiday decor or a handmade gift, the snowman works up quickly with clear rounds and easy assembly. The pattern includes recommendations for materials and exact round counts for each piece.
Why You'll Love This Snowman Amigurumi Pattern
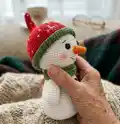
I absolutely love this pattern because it combines simple amigurumi shaping with sweet seasonal details that make the snowman feel full of personality. I enjoy the gentle sculpting of the body and the playful hat shape that you can customize with embroidery. The instructions are structured so you can see progress quickly while still offering small challenges to improve your skills. Seeing the finished face come together with embroidered seams and a tiny carrot nose always makes me smile.
Switch Things Up
I love how easily this snowman pattern adapts to color changes, so I often swap the hat and scarf colors to match my decor.
I sometimes use a thicker yarn and larger hook to make a chunkier, cuddlier version for a bigger display piece.
For a tiny keychain friend, I use thinner yarn and smaller hook to scale the pattern down and add a keyring loop to the hat tip.
I like adding embroidered freckles or blush details with pastel yarn to give each snowman a unique personality.
Try swapping the round safety eyes for buttons or French knots if you prefer a fully handmade touch without safety eyes.
Embellish the hat with beads, tiny pom-poms, or contrasting embroidery stars for a festive look.
Make a family set by changing the scarf patterns—striped, checkered, or textured rows using hdc or dc stitches.
I often stuff the hat slightly to make it stand up naturally; you can also flatten it for a slouchy style depending on how you finish the tip.
Experiment with different nose shapes by varying the nose rounds: a shorter rounded carrot or a longer tapered one both look great.
Finally, I recommend trying different button sizes and positions on the belly to alter the character—larger buttons give a vintage toy feel while small ones look modern.
Common Mistakes & How to Fix Them
✗ Skipping stitch markers when working continuous rounds will make it hard to track the beginning of each round; place a marker at the first stitch of every round and move it as you go.
✗ Not stuffing pieces as you go can lead to uneven or squashed shapes; stuff little by little and shape firmly for a smooth finish.
✗ Forgetting to count after increases and decreases causes incorrect stitch counts; count after every shaping round and correct mistakes immediately.
✗ Pulling yarn too tightly at color changes creates puckering on the hat or body; keep an even, relaxed tension and weave in ends neatly.
✗ Attaching eyes without checking placement can throw off facial symmetry; mark positions and measure nine stitches apart at rows 43-44 before fixing eyes.