๐Ÿงถ Beautiful โœจ Detailed ๐Ÿ’ Adorable

Keychain Cow Amigurumi Pattern

Keychain Cow Amigurumi Pattern
4.1โ˜… Rating
2-4 Hours Time Needed
1.7K Made This
โœ‚๏ธ

Beginner Friendly Level

Perfect for those just starting their crochet journey, with clear instructions and simple techniques

โฑ๏ธ

Bite-Sized Project

Finishes in 2-4 hoursโ€”perfect for an afternoon of creative relaxation.

๐Ÿงธ

Cute Companion

An adorable friend to cherish, handcrafted with love to bring comfort and joy for years to come.

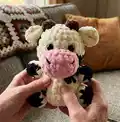
About This Keychain Cow Amigurumi Pattern

This pattern guides you step-by-step to crochet a tiny cow keychain using soft chenille yarn and simple amigurumi techniques. It features separate pieces for the head, body, ears, horns, hands, legs, and a cute pink nose. Detailed round instructions and photos help you assemble the pieces with confidence. Perfect for gifting, decorating bags, or making a small collection of handmade companions.

Keychain Cow Amigurumi Pattern crochet pattern - detailed view of completed project

The design uses safety eyes and easy color changes to create charming cow markings and details. You will finish with clear assembly steps to attach the head, nose, limbs, ears and horns.

Why You'll Love This Keychain Cow Amigurumi Pattern

I absolutely love this pattern because it turns simple stitches into a delightful little character thatโ€™s full of personality. I enjoy how the soft chenille yarn makes the cow cuddly and tactile โ€” perfect for keychains or tiny gifts. The construction is straightforward, yet the color changes and separate small pieces give a professional, finished look. I find it very satisfying to see the little face appear as you attach the nose and eyes, and I hope you will love making them as much as I do.

Keychain Cow Amigurumi Pattern step 1 - construction progress Keychain Cow Amigurumi Pattern step 2 - assembly progress Keychain Cow Amigurumi Pattern step 3 - details and accessories Keychain Cow Amigurumi Pattern step 4 - final assembly and finishing

Switch Things Up

I love how easy it is to customize this cow by simply changing yarn colors; try pastels for a soft, baby-friendly version.

I sometimes use a thinner yarn and smaller hook to make a tiny keyring version that fits perfectly on backpacks.

For a chunkier, squishier toy I use a bulkier chenille and a larger hook โ€” it makes a great plush for little hands.

I like to embroider small freckles or a smile on the nose for extra personality instead of using a felt mouth.

Swap the safety eyes for embroidered eyes if you need a fully child-safe version without hard parts.

Make a matching set by varying spot placement and colors so each cow has a unique look; I give mine little scarves sometimes.

I often add a tiny bell or metal keychain loop before closing the body so it becomes a true keychain accessory.

If you want poseable limbs, try inserting a short length of wire into the arms before stuffing and closing.

Use metallic or glitter chenille for a fun, sparkly effect โ€” great for holiday gift tags or ornaments.

I recommend practicing the nose and eye placement on a scrap ball first to ensure the face matches your desired expression.

Common Mistakes & How to Fix Them

โœ— Skipping stitch markers during rounds may lead to losing track of the beginning; place a stitch marker at the first stitch of each round to maintain correct stitch counts. โœ— Forgetting to stuff gradually can create lumps or uneven shaping; stuff small amounts at a time and shape as you go for a smooth finish. โœ— Changing colors without securing ends can cause loose joins later; weave in or secure tails as you switch colors to keep the inside neat and stable. โœ— Not counting your stitches after increases or decreases often leads to mis-shaped pieces; recount after every shaping round to ensure your numbers match the pattern.

Keychain Cow Amigurumi Pattern

Create a cute, pocket-sized cow keychain with this easy-to-follow crochet pattern. You will work with soft chenille yarn to make a plush, squishy toy perfect for gifting or keeping. The pattern includes clear round-by-round instructions and simple assembly steps so you can bring your cow to life. Suitable for a relaxing, creative afternoon project.

Beginner Friendly 2-4 Hours

Materials Needed for Keychain Cow Amigurumi Pattern

โ€” Main Fabric

  • 01
    100g Soft Chenille Yarn (main quantity)
  • 02
    Color: Brown - small amount for horns and spots
  • 03
    Color: Black - small amount for hooves and spots
  • 04
    Color: Pink - small amount for nose
  • 05
    Color: White - main body and head
  • 06
    Fiberfill stuffing (small amount)

โ€” Tools Required

  • 01
    Crochet hook size 3.5mm
  • 02
    Stitch marker
  • 03
    Sewing needle (yarn needle)
  • 04
    Scissors
  • 05
    Plastic safety eyes 8mm (2 pieces)
  • 06
    Hot glue gun (for securing parts if desired)
  • 07
    Polyester stuffing (fiberfill)

Progress Tracker

0% Complete

โ€” Head :

Info :

*join the rounds with a slip stitch*

Info :

Begin with White Yarn and change the yarn color according to the font color.

Round 1 :

8 SC in an MR (8)

Round 2 :

8 INC (16)

Round 3 :

(SC, INC) 6 times, (SC, INC) 2 times (24)

Round 4 :

18 SC, 6SC (24)

Round 5 :

19 SC, 4 SC, SC (24)

Round 6 :

24 SC (24)

Round 7 :

8 SC, 3 SC, 13 SC (24)

Round 8 :

(2 SC, DEC) 2 times, 2 SC, DEC, (2 SC, DEC) 3 times (18)

Round 9 :

(SC, DEC) 6 times (12)

Info :

*stuffing*

Info :

Cut the yarn, leaving a long tail for sewing.

โ€” Body :

Round 1 :

Make chain 4, start in second chain from the hook. Working on both sides of a chain (working on afoundation chain), 2 SC, 3SC in one st, SC, INC (8)

Round 2 :

INC, SC, 3 INC, SC, 2 INC (14)

Round 3 :

SC, INC, SC, (SC, INC) 3 times, 2 SC, INC, SC, INC (20)

Round 4 :

16 SC, 4 SC (20)

Round 5-6 :

20 SC (20)

Round 7 :

8 SC, DEC, SC, 2 SC, 5 SC, DEC (18)

Round 8 :

(SC, DEC) 3 times, SC, DEC, (SC, DEC) 2 times (12)

Info :

*stuffing*

Info :

Cut the yarn

โ€” Ears :

Item Name (EARS) :

(Make 2)

Round 1 :

6 SC into MR (6)

Round 2 :

6 INC (12)

Info :

Cut the yarn, leaving a long tail for sewing.

โ€” Horns :

Item Name (HORNS) :

(Make 2)

Round 1 :

6 SC into MR, slst (6)

โ€” Hands :

Item Name (HANDS) :

(Make 2)

Info :

Begin with black yarn

Round 1 :

6 SC into MR (6)

Info :

Change to white yarn

Round 2 :

6 SC (6)

Round 3 :

(SC, DEC) 2 times (4)

Info :

Cut the yarn, leaving a long tail for sewing.

โ€” Legs :

Item Name (LEGS) :

(Make 2)

Info :

Begin with black yarn

Round 1 :

8 SC into MR (8)

Info :

Change to white yarn

Round 2-3 :

8 SC (8)

Round 4 :

4 DEC (4)

Info :

Cut the yarn, leaving a long tail for sewing.

โ€” Nose :

Round 1 :

Make chain 4, start in the second chain from the hook, 3 SC, (3 SC), 2 SC, INC (10)

Round 2 :

INC, 2 SC, 3 INC, 2 SC, 2 INC (16)

Round 3 :

16 SC (16)

Info :

Cut the yarn, leaving a long tail for sewing.

โ€” Assembly :

Info :

TIME TO ATTACH THEM TO THE BODY

Info :

Attach the head and the nose to the body

Info :

Attach the horns and the ears to the head

Info :

Sew the hands and the legs to the body (as photo)

Info :

Use eye size 8mm and attach to row 6

Assembly Instructions

  • Attach the head and the nose to the body using the long tails left from each piece and sew securely with a yarn needle.
  • Attach the horns and the ears to the top of the head, positioning them evenly and sewing them in place with the long tails.
  • Sew the hands to either side of the body and the legs to the bottom of the body, matching the placement shown in the photos for symmetry.
  • Use 8mm safety eyes and attach them to row 6 of the head, securing washers on the inside and checking placement before final fastening.
  • Weave in all remaining ends and use a small amount of hot glue if needed to secure tiny pieces or prevent shifting.

Important Notes

  • ๐Ÿ’กUse a stitch marker to mark the first stitch of each round to avoid losing your place when joining rounds.
  • ๐Ÿ’กStuff pieces gradually and evenly; overstuffing can distort the shape while understuffing will make the toy floppy.
  • ๐Ÿ’กLeave long tails when finishing small parts so you have enough length to sew pieces together securely.

Thank you for making this little cow keychain โ€” I hope it brings a smile to your day! ๐Ÿฎ This pattern was created to be sweet, quick, and satisfying for makers of all levels. ๐Ÿงถ Happy crocheting and enjoy gifting your handmade cow to someone special! ๐ŸŽ

You ask,

we answer.

FAQs

What size will the finished piece be?

The finished amigurumi measures approximately 8-12 cm tall depending on your tension and yarn, using the recommended chenille yarn and 3.5mm hook.

Can I use different yarn weights for this pattern?

Yes, you can use different yarn weights but it will change the final size; use an appropriate hook for your chosen yarn and adjust stuffing accordingly.

Do I need prior crochet experience for this pattern?

This pattern is beginner friendly and uses basic stitches like single crochet, increases and decreases, so some basic crochet knowledge is helpful.

How long does this project typically take to complete?

Most crocheters complete this project in 2-4 hours, though time may vary based on experience level and the number of small parts assembled.