🧢 Beautiful ✨ Detailed πŸ’ Adorable

Dip Edge Crochet Basket Pattern

Dip Edge Crochet Basket Pattern
4.1β˜… Rating
5-7 Hours Time Needed
3.3K Made This
βœ‚οΈ

Beginner Friendly Level

Perfect for those just starting their crochet journey, with clear instructions and simple techniques

⏱️

Weekend Treat

Takes 5-7 hours, making it an enjoyable project to finish over a couple of days.

🏑

Cozy Accent

A warm touch for your space that transforms ordinary corners into inviting nooks filled with handmade charm.

About This Dip Edge Crochet Basket Pattern

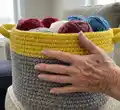
This pattern creates a roomy, modern dip-edge crochet basket using Bernat Blanket yarn held as two strands. The basket is worked in continuous rounds from the base up, switching colors to create the dipped edge and finished with sturdy crocheted handles. It is designed to be durable and practical while adding a handmade accent to your home.

Dip Edge Crochet Basket Pattern crochet pattern - detailed view of completed project

Worked with simple single crochet increases and short rounds, the construction is straightforward and fast. The finished basket measures approximately 14" diameter by 9Β½" high.

Why You'll Love This Dip Edge Crochet Basket Pattern

I absolutely love this pattern because it transforms chunky yarn into a useful and attractive storage solution with minimal effort. The technique of holding two strands together creates a dense, robust fabric that stands up to everyday use, which I find incredibly satisfying. The dip-edge color change adds instant visual interest without complex colorwork, and the easy-to-make handles finish the basket with a professional look. It is a quick, rewarding project that makes great gifts and stylish home accents.

Dip Edge Crochet Basket Pattern step 1 - construction progress Dip Edge Crochet Basket Pattern step 2 - assembly progress Dip Edge Crochet Basket Pattern step 3 - details and accessories Dip Edge Crochet Basket Pattern step 4 - final assembly and finishing

Switch Things Up

I love customizing this basket by changing the color placement; for a modern look I often use a neutral base with a bright dip edge, or try ombre tones for a softer effect.

To change the size I adjust the number of increase rounds at the base; add more increase rounds for a wider basket or fewer for a smaller one, while keeping the increase pattern even.

If you want a firmer, more structured basket I use a tighter tension and sometimes a slightly smaller hook, or add a removable fabric liner for an extra crisp shape and washable interior.

For different textures try holding one strand of Bernat Blanket with a strand of a textured yarn, or switch to a boucle or cotton rope for a rustic, rope-like finish that's great for heavier use.

I also experiment with the handle style: make the handles longer for a tote-like basket, or use a single thick cord wrapped and sewn into place for a different look and feel.

Try decorative stitches for the dip edge by substituting a puff or bobble stitch row instead of single crochet rows to create a scalloped or bobbled rim.

To create a matching set, make multiple baskets in graduated sizes by adjusting the number of base increase rounds and body height while keeping the same dip edge color.

I sometimes add small feet by crocheting little discs and sewing them to the base to lift the basket slightly and protect floors from moisture.

For gifting, I embroider initials or attach a small crocheted tag to the handle; these little personal touches make each piece unique and special.

Don't be afraid to mix yarn brands or weights if you match the gauge; swapping yarns can create very interesting color and texture combinations that reflect your personal style.

Common Mistakes & How to Fix Them

βœ— Using only one strand of the bulky yarn instead of two strands held together; hold two strands together exactly as instructed to achieve the correct gauge and sturdy fabric. βœ— Skipping stitch markers or joining incorrectly when working rounds; always join each round with a slip stitch to the first single crochet and place a marker when instructed. βœ— Failing to increase evenly during base rounds which causes a warped or misshapen base; follow the increase pattern carefully and count stitches after each increase round. βœ— Switching colors without securing ends can lead to loose joins; weave in or secure ends as you change from Contrast A to Contrast B to keep the edge neat and sturdy. βœ— Not checking the gauge before beginning which changes final size significantly; make a 4" gauge swatch of 7 sc and 7 rows holding two strands together to match the pattern dimensions.

Dip Edge Crochet Basket Pattern

Make a stylish and sturdy Dip Edge Crochet Basket to organize your yarn or household items. This easy crochet pattern uses two strands held together for a thick, durable fabric and creates a modern two-tone basket with comfortable handles. You will enjoy quick rounds and simple shaping to build a roomy basket perfect for gifting or home decor. Clear instructions and gauge notes help you achieve professional results.

Beginner Friendly 5-7 Hours

Materials Needed for Dip Edge Crochet Basket Pattern

β€” Main Fabric

  • 01
    Bernat Blanket (10.5 oz/300 g; 220 yds/201 m)
  • 02
    Contrast A Dark Gray (10044) - 3 balls or 500 yds/455 m
  • 03
    Contrast B Moss (10803) - 1 ball or 140 yds/128 m

β€” Tools Required

  • 01
    Size U.S. M/13 (9 mm) crochet hook or size needed to obtain gauge
  • 02
    1 stitch marker

Progress Tracker

0% Complete

β€” Measurements :

Measurements :

Approx 14" [35.5 cm] diameter x 9Β½" [24.5 cm] high.

β€” Gauge :

Gauge :

7 sc and 7 rows = 4" [10 cm] with 2 strands of yarn held tog.

β€” Instructions :

Info :

Note: Join all rnds with sl st to first sc.

Info :

With 2 strands of A held tog, ch 2.

Round 1 :

8 sc in 2nd ch from hook. Join.

Round 2 :

Ch 1. 2 sc in each sc around. Join. 16 sc.

Round 3 :

Ch 1. *2 sc in next sc. 1 sc in next sc. Rep from * around. Join. 24 sc.

Round 4 :

Ch 1. *2 sc in next sc. 1 sc in each of next 2 sc. Rep from * around. Join. 32 sc.

Round 5 :

Ch 1. *2 sc in next sc. 1 sc in each of next 3 sc. Rep from * around. Join. 40 sc.

Round 6 :

Ch 1. *2 sc in next sc. 1 sc in each of next 4 sc. Rep from * around. Join. 48 sc.

Round 7 :

Ch 1. *2 sc in next sc. 1 sc in each of next 5 sc. Rep from * around. Join. 56 sc.

Round 8 :

Ch 1. *2 sc in next sc. 1 sc in each of next 6 sc. Rep from * around. Join. 64 sc.

Info :

Cont in this manner, inc 8 sc evenly around next 5 rnds (as established). 104 sc.

Next rnd :

Ch 1. Working into back loops only, 1 sc in each sc around. Join. Place marker at end of rnd.

Next rnd :

Ch 1. Working into both loops, 1 sc in each sc around. Join. Rep last rnd until work from marked rnd measures 8" [20.5 cm]. Join 2 strands of B at end of last rnd.

Info :

With 2 strands of B held tog, rep last rnd twice more. Do not fasten off.

Next rnd (Handle openings) :

Ch 1. 1 sc in each of next 21 sc. Ch 1. Skip next sc. 1 sc in each of next 8 sc. Ch 1. Skip next sc. 1 sc in each of next 42 sc. Ch 1. Skip next sc. 1 sc in each of next 8 sc. Ch 1. Skip next sc. 1 sc in each sc to end of rnd. Join.

Next rnd :

Ch 1. 1 sc in each sc and ch-1 sp around. Join.

Next rnd :

Ch 1. 1 sc in each sc around. Join. Fasten off.

β€” Handles :

Handles :

With 2 strands of B held tog, ch 26. Thread chain through first ch-1 sp of Handle opening rnd and back out through second ch-1 sp of same rnd. Join with sl st to first ch to form ring, being careful not to twist.

Next rnd :

Ch 1. 1 sc in each ch around, rotating chain through Handle opening for ease of working. Join. Fasten off. Rep for second Handle.

Assembly Instructions

  • Join each round with a slip stitch to the first single crochet to keep a neat edge and to mark round endings.
  • Place a stitch marker at the end of the back-loop-only round and work until the distance from this marked round measures 8" [20.5 cm] before changing colors.
  • When switching to Contrast B, join 2 strands at the end of the last A round and work the B rounds without fastening off until indicated, then fasten off after the final sc round.
  • Form each handle by chaining 26 with 2 strands of B, threading the chain through the ch-1 openings of the handle opening round, joining with a slip stitch to form a ring, then sc around the chain and join. Repeat for the second handle.

Important Notes

  • πŸ’‘Hold two strands of yarn together throughout the base and body to achieve the correct gauge and a sturdy fabric.
  • πŸ’‘Join all rounds with a slip stitch to the first single crochet unless otherwise stated to maintain consistent round counts.
  • πŸ’‘Place a marker at the end of the back-loop-only rnd as indicated, and measure from that marked rnd to determine the body height before adding the dip edge.

This Dip Edge Crochet Basket is a quick and gorgeous way to add handmade storage to your home. The two-strand construction makes it super sturdy and wonderfully tactile, perfect for yarn, blankets, or everyday clutter. Make one in contrasting colors for a modern look or mix neutrals for a subtle accent. 🧢🏑

You ask,

we answer.

FAQs

What size will the finished piece be?

The finished basket measures approximately 14" [35.5 cm] diameter x 9Β½" [24.5 cm] high when using the recommended Bernat Blanket yarn held as two strands and a 9 mm hook.

Can I use a different yarn or hook size?

Yes, you can use different yarn weights or hook sizes, but the finished size and firmness will change; make a gauge swatch (7 sc and 7 rows = 4") holding two strands to match the pattern before proceeding.

How difficult is this pattern?

This pattern is rated Easy and is suitable for beginners comfortable with single crochet, increases, and joining rounds; working with two strands is the main technique to learn.

How long does this project typically take?

Most crocheters complete this project in 5-7 hours, depending on experience, yarn handling, and whether you make one or a pair of baskets.

How do I make the handles sturdy?

The pattern instructs you to chain 26 with two strands of yarn, thread the chain through the handle openings, join into a ring, then single crochet around the chain which creates a thick, comfortable handle; ensure you do not twist the chain when joining.