About This Blue the Dumbo Octopus Amigurumi Pattern
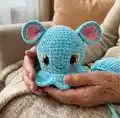
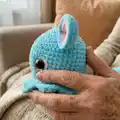
This pattern creates a squishy Dumbo-style octopus with big expressive eyes, ruffled frill tentacles, and floppy elephant-like ears. It uses bulky weight #6 yarn and a large hook for a soft, plush finish and quick progress. Detailed assembly photos and eye placement tips are included to help you finish a professional-looking toy.

The pattern includes head and body shaping, a decorative frill (tentacles), and two-part ears in contrasting colors. Clear abbreviations, materials list, and helpful tips make following along straightforward for intermediate crocheters.
Why You'll Love This Blue the Dumbo Octopus Amigurumi Pattern
I absolutely love this pattern because it combines simple amigurumi shaping with playful details like the ruffle frill and Dumbo-style ears that give the octopus lots of character. I enjoy how quickly the chunky yarn works up into a cuddly, tactile toy that is perfect for gifting. The eye placement technique in the pattern makes the face expressive without complicated embroidery. I also love teaching others how to assemble and finish pieces neatly — seeing your finished octopus is so rewarding.
Switch Things Up
I love how easy it is to customize this octopus by swapping colors — try soft pastels for a nursery-friendly version or bright neons for a playful look.
Want a mini keychain? Use a DK or sport weight yarn with a smaller hook and reduce eye size to create a tiny version perfect for bags.
I often change the eye style: try safety eyes in different sizes or embroider the eyes for a completely soft, kid-safe toy.
For a sturdier display piece, stuff more firmly and use a slightly smaller hook to make the stitches tighter and the shape more defined.
I sometimes add wire inside the tentacles for a posable effect — just be careful to securely wrap and anchor any wire so it is not exposed.
Try adding tiny crocheted accessories like a bow, hat, or little scarf to give your octopus personality and seasonal flair.
I also like to embroider tiny freckles or lashes to change the expression — subtle changes to eyebrow placement can make a big difference.
To make a bath toy, substitute machine-washable acrylic yarn and securely sew all parts; avoid beads or exposed washers if it will be used by young children.
If you want a textured frill, experiment with different stitch repeats for the ruffle row to make tighter or looser waves.
I recommend testing placements with pins and lightly stuffing before permanently sewing parts so you can easily tweak the balance and expression.
Common Mistakes & How to Fix Them
✗ Not using a stitch marker for continuous rounds leads to missed increases or decreases; use a stitch marker to mark the beginning of each round and move it every round to maintain correct stitch counts.
✗ Placing safety eyes without checking placement can make the face look uneven; always measure and count stitches between eyes and use temporary pins before securing them permanently.
✗ Overstuffing the head and body can distort the shape and make assembly difficult; stuff gradually, shape as you go, and avoid packing the stuffing too tightly near closed edges.
✗ Skipping the recommended hook size and yarn weight will change the finished size and fabric density; match the bulky #6 yarn with a J/6.00 mm hook or adjust placements and eye sizes accordingly.