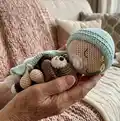
๐Ÿงถ Beautiful โœจ Detailed ๐Ÿ’ Adorable

Puppy Security Blanket Amigurumi Pattern

Puppy Security Blanket Amigurumi Pattern
4.2โ˜… Rating
12-15 Hours Time Needed
3.0K Made This
โœ‚๏ธ

Intermediate Level

Ideal for those with basic crochet experience, featuring slightly more advanced stitches and techniques to expand your skills.

โฑ๏ธ

Multi-Day Project

A rewarding 12+ hour journeyโ€”perfect for dedicated crafters who love detailed work.

๐Ÿงธ

Cute Companion

An adorable friend to cherish, handcrafted with love to bring comfort and joy for years to come.

About This Puppy Security Blanket Amigurumi Pattern

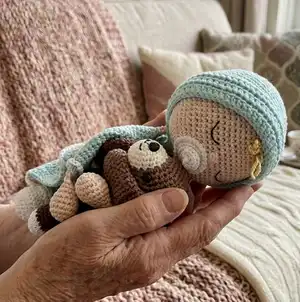
This pattern teaches you how to crochet a baby security blanket with a tiny puppy companion using cotton yarns and a couple of hook sizes. The design includes a hooded blanket, a pacifier, embroidered facial details, and a small amigurumi puppy to cuddle. Clear round-by-round instructions and photo references help you assemble and finish each piece with confidence.

Puppy Security Blanket Amigurumi Pattern crochet pattern - detailed view of completed project

You will change hook sizes to keep the blanket soft while the head, feet and puppy are firm with tighter tension. Materials are common cotton yarns and basic toolsโ€”perfect for gift making and nursery decor.

Why You'll Love This Puppy Security Blanket Amigurumi Pattern

I absolutely love this pattern because it combines a comforting blanket with a charming little puppy for double the cuddle factor. I enjoy how the design balances simple amigurumi shaping with textured blanket stitches to make a professional-looking piece. I always appreciate patterns that include clear rounds for every partโ€”this one makes assembly straightforward and satisfying. I hope you feel proud making this handmade gift for a newborn or a special little person.

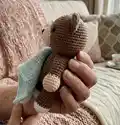
Puppy Security Blanket Amigurumi Pattern step 1 - construction progress Puppy Security Blanket Amigurumi Pattern step 2 - assembly progress Puppy Security Blanket Amigurumi Pattern step 3 - details and accessories Puppy Security Blanket Amigurumi Pattern step 4 - final assembly and finishing

Switch Things Up

I love how easy it is to customize this pattern by changing colors โ€” I often make a pastel palette for baby girls or earthy tones for a neutral nursery.

To make a larger or smaller version I change yarn weight and hook size; bulky yarn and a larger hook give a chunky friend, while fine yarn with a smaller hook creates a tiny keychain buddy.

I sometimes swap the hood texture by adding rows of post stitches for a ribbed look, which gives the blanket a different drape and feel.

I add embroidered cheeks or tiny crocheted buttons to personalize the puppyโ€™s collar for special occasions or to match nursery decor.

I like to experiment with hair length and style โ€” shorter loops or trimmed strands change the dollโ€™s personality completely.

For safety-conscious gifts, I embroider eyes and nose instead of using safety eyes so the toy is suitable for younger babies.

I sometimes make a set with two puppies in complementary colors so siblings can each have a companion; small changes to the color blocks are all it takes.

Try adding a removable mini-blanket or a little bow to the puppy to create a playset your child can dress and undress.

If I want a more vintage look, I choose muted cotton yarns and lightly distress the edges by trimming loops for a soft, worn appearance.

I often use variegated yarn for the hood border to get subtle color shifts without changing yarns frequently โ€” itโ€™s an easy time-saver and looks great.

Common Mistakes & How to Fix Them

โœ— Working with a hook that is too large makes stitches loose and lets stuffing show; use a hook 1-2 sizes smaller for amigurumi parts to keep tension tight and the stuffing hidden. โœ— Not stuffing gradually can create lumps or weak shaping; stuff little by little and shape as you go for smooth, even curves. โœ— Skipping stitch markers will cause you to lose round starts and miscount increases; place a marker at the start of each round and move it after each round. โœ— Changing yarn color without securing ends may show gaps or loose tails; weave in ends as you switch colors or secure with small knots and sew tails inside pieces. โœ— Overtightening the last rounds when closing pieces creates puckered edges; leave consistent tension and finish off by threading the tail through remaining stitches and pulling gently closed.

Puppy Security Blanket Amigurumi Pattern

Make a lovable baby security blanket with a cuddly puppy companion using this detailed crochet pattern. You will find step-by-step rounds, clear material lists, and finishing instructions so you can create a soft, handmade comfort toy. Perfect for a thoughtful gift or a cozy nursery friend, the pattern combines simple amigurumi shapes with a textured blanket hood and tiny accessories.

Intermediate 12-15 Hours

Materials Needed for Puppy Security Blanket Amigurumi Pattern

โ€” Main Fabric

  • 01
    Medium cotton yarn (#3/4) light blue - approximately 100 g (main blanket and hood)
  • 02
    Medium cotton yarn (#3/4) skin color - included in 100 g for head and details
  • 03
    Medium cotton yarn (#3/4) white - included in 100 g for feet, pacifier and accents
  • 04
    Extra light cotton yarn (very fine) yellow - approx 50 g for hair
  • 05
    Extra light cotton yarn white - approx 50 g for pacifier/rings
  • 06
    Small amount of light cotton yarn black for embroidered details and nose
  • 07
    Medium cotton yarn brown - approx 100 g for puppy body and accents
  • 08
    Polyester fiberfill stuffing - small bag for stuffing head, arms, legs and puppy

โ€” Tools Required

  • 01
    Crochet hook size 2.5mm
  • 02
    Crochet hook size 3.5mm
  • 03
    Crochet hook size 2.0mm (for hair loops)
  • 04
    Tapestry needle for sewing
  • 05
    Scissors
  • 06
    Polyester fiberfill stuffing
  • 07
    Pins for assembly
  • 08
    Safety eyes (optional)
  • 09
    Stitch markers (optional)

Progress Tracker

0% Complete

โ€” Arms :

Round 1 :

6 sc in a magic ring (6)

Round 2 :

6 inc (12)

Round 3 :

1 sc, 1 inc (18)

Round 4-6 :

18 sc (3 rounds) (18)

Round 7 :

1 sc, 1 dec (12)

Round 8-9 :

12 sc (2 rounds) (12) Start stuffing.

Round 10 :

Hold the edge flat and close with 6 sc.

Round 11 :

Sc around the 6 front loops and sc around the 6 back loops (you'll have 12 sc again), move the marker.

Round 12 :

Change to light blue yarn and make 12 sc (12)

Round 13 :

12 sc (12)

Round 14 :

BLO 3 sc, 1 inc (15)

Round 15-28 :

15 sc (14 rounds) (15)

โ€” Body Blanket :

Info :

Starts on the feet with hook size 2.5mm

Round 1 :

6 sc in a magic ring (6)

Round 2 :

6 inc (12)

Round 3 :

1 sc, 1 inc (18)

Round 4 :

2 sc, 1 inc (24)

Round 5-7 :

24 sc (4 rounds) (24)

Round 8 :

6 sc, 6 dec, 6 sc (18)

Round 9 :

6 sc, 3 dec, 6 sc (15)

Round 10 :

15 sc BLO (15)

Round 11 :

15 sc (15) Stuff the tip of the feet.

Round 12 :

15 sc (15)

Round 13 :

Change to skin color, BLO 15 sc (15)

Round 14 :

15 sc (15)

Round 15 :

Change to light blue color, 15 sc (15)

Round 16 :

15 sc (15)

Round 17 :

15 sc + 3 sc after the marker.

Round 18 :

Hold the edge flat and close with 7 sc (7)

Round 19 :

7 sc on the front loops and 8 sc on the back loops, and another 15 sc around (photos 3-6). Cut the yarn and make another piece.

Round 20 :

When the second foot is done, without cutting the yarn, make 5 ch, 1 sc on the first piece, 14 sc, 5 sc on the chain, 15 sc, 5 sc on the chain, place the marker (40)

Info :

Change to hook size 3.5mm

Round 21 :

40 sc (40)

Round 22 :

19 sc, 1 inc, 19 sc, 1 inc (42)

Round 23 :

6 sc, 1 inc (48)

Round 24-25 :

48 sc (2 rounds) (48)

Round 26 :

7 sc, 1 inc (54)

Round 27 :

54 sc (54)

Round 28 :

8 sc, 1 inc (60)

Round 29-32 :

60 sc (5 rounds)

Round 33 :

60 sc BLO (60)

Round 34 :

60 sc (60)

Round 35 :

8 sc, 1 dec (54)

Round 36 :

54 sc (54)

Round 37 :

54 sc BLO (54)

Round 38 :

7 sc, 1 dec (48)

Round 39 :

48 sc (48)

Round 40 :

48 sc BLO (48)

Round 41 :

6 sc, 1 dec (42)

Round 42 :

42 sc BLO (42)

Round 43 :

Change to hook size 2.5mm, 42 sc (42)

Round 44 :

5 sc, 1 dec (36)

Round 45 :

36 sc (36)

Round 46 :

Pin the arms: 3 sc, with the arm placed on the body, join the edges with 7 sc (photos 13-16) 11 sc, join the other arm with 7 sc, 8 sc (36)

Round 47 :

3 sc, 8 sc with the upper edge of arm,11 sc and 8 sc on the other arm (38)

Round 48 :

17 sc, 1 dec, 17 sc, 1 dec (36)

Round 49 :

4 sc, 1 dec (30)

Round 50 :

30 sc BLO (30)

Round 51 :

Change to skin color, 30 sc (30)

Round 52 :

3 sc, 1 dec (24)

Round 53 :

2 sc, 1 dec (18)

Info :

Donโ€™t cut the yarn. The next rounds will be counted as headโ€™s rounds.

โ€” Head :

Round 1 :

2 dec, flat the edge, close it with 8 sc.

Infos :

Sc around the edge, 8 sc FLO and 8 sc BLO (photos 21-22). Place the marker.

Round 2 :

16 inc (32)

Round 3 :

3 sc, 1 inc (40)

Round 4 :

4 sc, 1 inc (48)

Round 5 :

5 sc, 1 inc (56)

Round 6-7 :

56 sc (2 rounds) (56)

Round 8 :

6 sc, 1 inc (64)

Round 9-16 :

64 sc (8 rounds) (64)

Round 17 :

23 sc, (1 sc, 1 dec) x 2, 26 sc, (1 sc, 1 dec) x 2, 3 sc (60)

Round 18 :

60 sc (60)

Round 19 :

8 sc, 1 dec (54)

Round 20-21 :

54 sc (2 rounds) (54)

Round 22 :

7 sc, 1 dec (48)

Round 23 :

6 sc, 1 dec (42)

Round 24 :

5 sc, 1 dec (36)

Round 25 :

4 sc, 1 dec (30)

Round 26 :

3 sc, 1 dec (24)

Round 27 :

2 sc, 1 dec (18)

Round 28 :

1 sc, 1 dec (12)

โ€” Pacifier :

Round 1 :

6 sc in a magic ring (6)

Round 2 :

6 inc (12)

Round 3 :

1 sc, 1 inc (18)

Round 4 :

2 sc, 1 inc (24)

Round 5 :

24 crab stitch

Info :

Pacifier ring: 6 ch, 1 sl st, 12 sc, 18 sc on the 12 sc made.

โ€” Hood Hat :

Info :

With hook size 3.5mm

Round 1 :

6 sc in a magic ring (6)

Round 2 :

6 inc (12)

Round 3 :

1 sc, 1 inc (18)

Round 4 :

2 sc, 1 inc (24)

Round 5 :

3 sc, 1 inc (30)

Round 6 :

4 sc, 1 inc (36)

Round 7 :

5 sc, 1 inc (42)

Round 8 :

6 sc, 1 inc (48)

Round 9 :

7 sc, 1 inc (54)

Round 10 :

8 sc, 1 inc (60)

Round 11-17 :

60 sc (7 rounds) (60)

Round 18 :

52 sc, 1 ch and turn (52)

Round 19-24 :

FLO on the even rounds and BLO on the odd rounds: 52 sc (6 rounds) (52)

Round 25 :

52 sl st (52)

Info :

Finish with a chain of 20 st, cut the yarn. Make another chain of 20 st on the other side.

โ€” Final Touches :

Item Name (P1) :

Pacifier: Sew the pacifier on the middle, between the rounds 7 and 12.

Item Name (P2) :

Nose: Embroider a small loop in skin color in the center of round 13, by taking 2 sc, pass the needle 5 - 6 times.

Item Name (P3) :

Eyes: Embroider the eyes closed between rounds 14 and 15, making them 5 stitches wide. Between both eyes there is 6 sc of separation.

Info :

Details: On the loops that remain, make 1 sl st, 1 ch.

โ€” Hair :

Info :

With extra light cotton yarn and hook size 2mm

Info :

Start with a chain of 21 stitches and 20 sc on the chain. On each sc: 20 ch and 1 sl st in the next sc.

Info :

Sew the hair to the top center of the head.

โ€” Puppy Security Blanket - Head :

Round 1 :

6 sc in a magic ring (6)

Round 2 :

6 inc (12)

Round 3 :

1 sc, 1 inc (18)

Round 4-6 :

18 sc (3 rounds) (18)

Info :

Change to brown yarn

Round 7 :

6 sc, 6 inc, 6 sc (24)

Round 8 :

24 sc (24)

Round 9 :

3 sc, 1 inc (30)

Round 10 :

4 sc, 1 inc (36)

Round 11-13 :

36 sc (3 rounds) (36)

Round 14 :

4 sc, 1 dec (30)

Round 15 :

3 sc, 1 dec (24)

Round 16 :

2 sc, 1 dec (18)

Round 17 :

1 sc, 1 dec (12)

Round 18 :

6 dec (6)

Round 19 :

2 dec (close with tapestry needle)

โ€” Puppy - Arms :

Info :

With white yarn

Round 1 :

6 sc in a magic ring (6)

Round 2 :

6 inc (12)

Info :

Change to brown yarn

Round 3-4 :

12 sc (2 rounds) (12)

Round 5-8 :

12 sc (4 rounds) (12)

Round 9 :

2 sc, 1 dec (8)

Round 10-12 :

8 sc (3 rounds) (8)

Round 13 :

Hold the edge flat and close with 4 sc.

โ€” Ears :

Round 1 :

6 sc in a magic ring (6)

Round 2 :

6 inc (12)

Round 3 :

1 sc, 1 inc (18)

Round 4-7 :

18 sc (4 rounds) (18)

Round 8 :

1 sc, 1 dec (12)

Round 9-11 :

12 sc (3 rounds) (12)

Round 12 :

4 sc, 1 dec (10)

Round 13-14 :

10 sc (2 rounds) (10)

Round 15 :

Hold the edge flat and close with 5 sc.

Info :

Leave a long yarn tail for sewing.

โ€” Collar :

Info :

On the round 50, mark the half of front and back sides with pins, the 7th st from the 15 stitches of each side (see photos).

Info :

Star crocheting from the back: (3 ch, 1 dc) in 1 st, 2 dc in each st until the 13th st. In the 14th st, make (1 dc, 1 hdc). In the 15th st, 1 sl st. In the 16th st (1 hdc, 1 dc). Continue with 2 dc in each st, close with sl st.

โ€” Sewing & Assembly :

Item Name (P1) :

Sew the head to the body on the round 12 of the head.

Item Name (P2) :

Sew the ears placed on the round 12 with 13 stitches between both ears.

Item Name (P3) :

Scarf: 46 ch and go back on the ch with 45 sl st.

Item Name (P4) :

Tail: 1st round: 6 sc in a magic ring (6). 2nd to 6th: 6 sc (5 rounds) (6)

Info :

Sew the pacifier on the middle, between the rounds 7 and 12. Embroider the nose and eyes as instructed. Sew the hair to the top center of the head. Attach all parts securely with tapestry needle and pins for positioning.

Assembly Instructions

  • Sew the head to the body on round 12 of the head, aligning the neck opening carefully and stitching evenly to secure it firmly.
  • Attach and pin the arms on the body between the stitches indicated, then join the edges and crochet or sew them in place following the pattern joining rounds to keep a clean seam.
  • Position the ears on round 12 of the head, spacing them with 13 stitches between both ears, then sew with a yarn tail to secure.
  • Sew the pacifier to the center front between rounds 7 and 12, then embroider the nose on round 13 by taking 2 sc and passing the needle 5-6 times for a small loop.
  • Embroider the eyes closed between rounds 14 and 15 making each eye 5 stitches wide with 6 sc separation between them, and weave in all ends.
  • Sew the hair piece to the top center of the head and trim or shape loops as desired for a finished look.

Important Notes

  • ๐Ÿ’กMake sure that the crocheting is tense so the filling is not visible โ€” use a hook 1-2 sizes smaller for amigurumi parts to achieve proper tension.
  • ๐Ÿ’กStuff firmly but not overstuff; the blanket body should remain soft while head, feet and puppy parts are firmer for structure.
  • ๐Ÿ’กChange hook sizes as instructed: use smaller hooks for amigurumi parts and a larger hook for the blanket body to keep it soft and flexible.
  • ๐Ÿ’กPlace stitch markers at the beginning of rounds and pin parts before sewing to ensure correct placement and symmetry.

This delightful Puppy Security Blanket pairs a cozy hooded blanket with a tiny amigurumi puppy companion โ€” perfect for gifts and nursery snuggles. Each detail is written round-by-round so you can follow precisely and create a beautiful, handmade keepsake. Enjoy the process and the warm smiles it will bring to a little one! ๐Ÿงถ๐Ÿ’™

You ask,

we answer.

FAQs

What size will the finished piece be?

The finished security blanket and puppy will vary with yarn and hook but typically measure about 28-35 cm for the baby blankie and 10-15 cm for the puppy when using the recommended cotton yarns and hook sizes.

Can I use different yarn weights for this pattern?

Yes, you can use different yarn weights, but this will change the final size and tension; adjust hook sizes accordingly and test gauge on small pieces before proceeding.

Do I need prior crochet experience for this pattern?

This pattern is rated intermediate, so basic knowledge of single crochet, increases, decreases, working in rounds, and front/back loop techniques is recommended for best results.

How long does this project typically take to complete?

Most crafters will spend 12-15 hours on this multi-piece project, depending on experience and how much time is spent on assembly and finishing details.