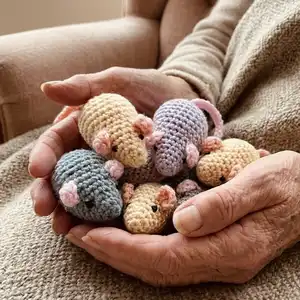
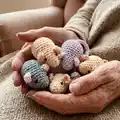
🧢 Beautiful ✨ Detailed πŸ’ Adorable

Sugar Mice Amigurumi Pattern

Sugar Mice Amigurumi Pattern
4.6β˜… Rating
2-3 Hours Time Needed
4.0K Made This
βœ‚οΈ

Beginner Friendly Level

Perfect for those just starting their crochet journey, with clear instructions and simple techniques

⏱️

Bite-Sized Project

Finishes in 2-4 hoursβ€”perfect for an afternoon of creative relaxation.

🎁

Tiny Treasure

Small, sweet, and gift-worthy creations that fit perfectly in the palm of your hand with detailed charm.

About This Sugar Mice Amigurumi Pattern

This pattern makes small, cuddly sugar mice using DK weight yarn and basic crochet stitches. You will work simple rounds to shape the body, add tiny ears and a curly tail, and sew on embroidered eyes. It is a fast, satisfying make that produces adorable little toys perfect for gifting or decorating.

Sugar Mice Amigurumi Pattern crochet pattern - detailed view of completed project

Clear UK and US terms are included so you can use your preferred stitch language. The pieces are quick to make and require only oddments of yarn.

Why You'll Love This Sugar Mice Amigurumi Pattern

I absolutely love this pattern because it transforms simple stitches into a charming little character in under a few hours. I enjoy how quickly the body comes together and how satisfying it is to add the tiny ears and curled tail by hand. The design is forgiving, so I feel creative experimenting with colours and tiny details. Every mouse feels unique and special, and I get great joy gifting them to friends and family.

Sugar Mice Amigurumi Pattern step 1 - construction progress Sugar Mice Amigurumi Pattern step 2 - assembly progress Sugar Mice Amigurumi Pattern step 3 - details and accessories Sugar Mice Amigurumi Pattern step 4 - final assembly and finishing

Switch Things Up

I love changing the contrast colour to make playful ears and tails; try pastel pinks, bright teals, or seasonal shades to change the mood of each mouse.

I often vary the yarn weight and hook size to create a size set; using a thicker DK or bulky yarn with a larger hook produces a squishier, larger mouse.

I sometimes embroider little noses or cheeks with a few satin stitches in a contrasting colour to add personality and expression.

For a different texture try using a fuzzy or boucle yarn for the body while keeping the ears and tail in smooth yarn for contrast.

I make keychain versions by inserting a small split ring into the tail base before closing the body so they become portable gifts.

If you want poseable mice, I add a length of thin craft wire into the tail or limbs (if you make limbs) and secure it well inside the stuffing.

I also like to sew tiny felt accessories like scarves or hats to make themed mice for holidays or gifts.

Try different eye techniques: black oddment embroidery, tiny safety eyes, or French knots for varied looks and safety levels.

To create a scented sachet mouse, add a little lavender inside the stuffing and seal all ends securely for a fragrant keepsake.

I recommend testing placement of ears and eyes with pins before sewing; this lets you tweak the expression until it feels right for each mouse.

Common Mistakes & How to Fix Them

βœ— Not using a stitch marker when working in continuous rounds can cause you to lose track of the start; place a marker at the final stitch of each round and move it as you progress. βœ— Overstuffing the body leads to stuffing showing through and a distorted shape; add stuffing gradually and squeeze firmly to check shape as you go, stopping before the piece becomes too tight. βœ— Skipping the instruction to tuck the contrast end inside the body can leave loose threads visible; leave the specified 15cm tail, weave it inside the body and tie or hide it securely. βœ— Placing ears without checking orientation can result in uneven placement; position the straight edge of each ear on the top of the body right side down and check symmetry before sewing through both layers.

Sugar Mice Amigurumi Pattern

Create a sweet collection of tiny sugar mice using this approachable crochet pattern. You will enjoy quick rounds, simple shaping, and charming little details like tiny ears and a curled tail. Perfect for gifts, keychains, or a playful display, this pattern uses DK yarn and clear step-by-step instructions. Make a whole family of colourful mice with minimal materials and big smiles.

Beginner Friendly 2-3 Hours

Materials Needed for Sugar Mice Amigurumi Pattern

β€” Main Fabric

  • 01
    Hayfield Bonus DK (DK weight) - Main colour, approximately 6g
  • 02
    Hayfield Bonus DK (DK weight) - Contrast colour, oddment for ears and tail
  • 03
    Hayfield Bonus Black 0965 - small oddment for embroidered eyes
  • 04
    Hi-Loft quality toy stuffing - small amount for each mouse
  • 05
    Optional: small bell or squeak to add inside body (optional for sound)

β€” Tools Required

  • 01
    3mm crochet hook
  • 02
    Wool needle for sewing
  • 03
    Scissors
  • 04
    Stitch markers
  • 05
    Tapestry needle for weaving ends
  • 06
    Pins for positioning (optional)
  • 07
    Optional: small bell or squeak

Progress Tracker

0% Complete

β€” Abbreviations (UK) :

Info :

ch – chain dc – double crochet htr – half treble inc – double crochet 2 stitches into next stitch trinc – treble crochet 2 stitches into next stitch dec – decrease over next two stitches in front loops only sl st – slip stitch f/o – fasten off by slip stitch in next stitch

Info :

Unless stated work in continuous rounds marking last stitch of each row with a stitch marker before proceeding with the next. When stuffing parts make sure that you don’t overstuff them as you don’t want the stuffing to show through when complete. Each part should be filled just enough that it can be easily squeezed when pinched firmly.

β€” Ears (x2) :

Row 1 :

Using Contrast ch2, (dc, htr, trinc, htr and dc) into 2nd st from hook. F/O leaving a short end

β€” Body :

Row 1 :

Using Main ch2, dc 6sts into 2nd st from hook (alternatively dc 6sts into magic ring) (6)

Row 2 :

(dc into next st, inc) x3 (9)

Row 3 :

dc (9)

Row 4 :

(dc into next 2sts, inc) x3 (12)

Row 5 :

dc (12)

Row 6 :

(dc into next 3sts, inc) x3 (15)

Row 7 :

dc into next 3sts, place straight edge of ear on top of body right side down, working through both layers dc into the next 3sts, then dc into next 3sts, place straight edge of ear on top of body right side down, working through both layers dc into the next 3sts, then dc into last 3sts (15)

Row 8 :

(dc into next 4sts, inc) x3 (18)

Row 9 :

(dc into next 5sts, inc) x3 (21)

Row 10 :

(dc into next 6sts, inc) x3 (24)

Rows 11 – 13 :

dc (24) (3 rows)

Row 14 :

(dc into next 2sts, dec) x6 (18)

Row 15 :

(dc into next st, dec) x6 (12) Stuff body (optional – add small bell or squeak at this stage)

Row 16 :

dec x6 (6)

Info :

Leaving a 15cm end, change to contrast and ch1, pull main colour tight and then tie ends together to join. Tuck contrast end inside body.

Row 17 :

ch15, starting in 2nd ch from hook sl st into the next14ch (14). F/O leaving a 5cm end

Info :

Tuck contrast end inside body. With main 15cm end, and using a running st through front loops, gather last 6sts tightly at the same time making sure that none of your contrast ends are showing. Sew through base of tail a couple of times to secure in place. Weave end through body and cut.

β€” Eyes :

Info :

Using black oddment sew 2 eyes 1st in length 4 rows back from the starting circle and 4sts apart. Weave ends through body and cut.

β€” Abbreviations (US) :

Info :

ch – chain sc – single crochet hdc – half double inc – single crochet 2 stitches into next stitch dcinc – double crochet 2 stitches into next stitch dec – decrease over next two stitches in front loops only sl st – slip stitch f/o – fasten off by slip stitch in next stitch

Info :

Unless stated work in continuous rounds marking last stitch of each row with a stitch marker before proceeding with the next. When stuffing parts make sure that you don’t overstuff them as you don’t want the stuffing to show through when complete. Each part should be filled just enough that it can be easily squeezed when pinched firmly.

β€” Ears (US) :

Row 1 :

Using Contrast ch2, (sc, hdc, dcinc, hdc and sc) into 2nd st from hook. F/O leaving a short end

β€” Body (US) :

Row 1 :

Using Main ch2, sc 6sts into 2nd st from hook (alternatively sc 6sts into magic ring) (6)

Row 2 :

(sc into next st, inc) x3 (9)

Row 3 :

sc (9)

Row 4 :

(sc into next 2sts, inc) x3 (12)

Row 5 :

sc (12)

Row 6 :

(sc into next 3sts, inc) x3 (15)

Row 7 :

sc into next 3sts, place straight edge of ear on top of body right side down, working through both layers sc into the next 3sts, then sc into next 3sts, place straight edge of ear on top of body right side down, working through both layers sc into the next 3sts, then sc into last 3sts (15)

Row 8 :

(sc into next 4sts, inc) x3 (18)

Row 9 :

(sc into next 5sts, inc) x3 (21)

Row 10 :

(sc into next 6sts, inc) x3 (24)

Rows 11 – 13 :

sc (24) (3 rows)

Row 14 :

(sc into next 2sts, dec) x6 (18)

Row 15 :

(sc into next st, dec) x6 (12) Stuff body (optional – add small bell or squeak at this stage)

Row 16 :

dec x6 (6)

Info :

Leaving a 15cm end, change to contrast and ch1, pull main colour tight and then tie ends together to join. Tuck contrast end inside body.

Row 17 :

ch15, starting in 2nd ch from hook sl st into the next14ch (14). F/O leaving a 5cm end

Info :

Tuck contrast end inside body. With main 15cm end, and using a running st through front loops, gather last 6sts tightly at the same time making sure that none of your contrast ends are showing. Sew through base of tail a couple of times to secure in place. Weave end through body and cut.

β€” Eyes :

Info :

Using black oddment sew 2 eyes 1st in length 4 rows back from the starting circle and 4sts apart. Weave ends through body and cut.

Assembly Instructions

  • Position each ear and sew into place by aligning the straight edge of the ear with the top of the body right side down, working through both layers of body and ear and sewing securely.
  • After Row 16 gather the last 6 stitches and switch to contrast to form the tail; leave a 15cm main end, tie contrast to join and tuck contrast end inside the body.
  • Make tail (Row 17) ch15, sl st back into chain, fasten off leaving a 5cm end; use the main 15cm end to run a gathering stitch through the front loops and sew the base of the tail to the body several times to secure.
  • Sew eyes with black oddment 4 rows back from the starting circle, spacing them 4 stitches apart and weaving the ends through the body before cutting.
  • Weave all loose ends through the body and cut them close to prevent unraveling and to keep a neat finish.

Important Notes

  • πŸ’‘Work in continuous rounds unless otherwise stated and mark the last stitch of each round with a stitch marker for accuracy.
  • πŸ’‘Stuff parts gradually and do not overfill to prevent stuffing showing through and to maintain smooth shape.
  • πŸ’‘Tuck contrast ends inside the body after joining to hide tails and secure them with knots or stitches to prevent showing.

These tiny Sugar Mice are designed to be quick, adorable makes you can personalise with colour and tiny details. Perfect for gifts, decorations, or a playful stash of pocket-sized friends. Make a handful in different shades and scatter them around for instant charm. 🐭🧢

You ask,

we answer.

FAQs

What size will the finished piece be?

The finished sugar mouse is a small amigurumi measuring only a few centimetres long depending on yarn and tension; with DK yarn and a 3mm hook it will fit comfortably in the palm of your hand.

Can I use different yarn weights for this pattern?

Yes, you can use different yarn weights, but the final size will change; use an appropriately sized hook for your chosen yarn and adjust stuffing and eye placement accordingly.

Do I need prior crochet experience for this pattern?

This pattern is beginner friendly and uses basic stitches, but familiarity with increases, decreases and working in rounds will help you follow the instructions smoothly.

How long does this project typically take to complete?

Most crocheters complete one sugar mouse in about 2-3 hours, though time may vary based on experience level and how much finishing and sewing you do.