🧢 Beautiful ✨ Detailed πŸ’ Adorable

Puppy Chip Amigurumi Pattern

Puppy Chip Amigurumi Pattern
4.3β˜… Rating
5-7 Hours Time Needed
2.6K Made This
βœ‚οΈ

Intermediate Level

Ideal for those with basic crochet experience, featuring slightly more advanced stitches and techniques to expand your skills.

⏱️

Weekend Treat

Takes 5-7 hours, making it an enjoyable project to finish over a couple of days.

🧸

Cute Companion

An adorable friend to cherish, handcrafted with love to bring comfort and joy for years to come.

About This Puppy Chip Amigurumi Pattern

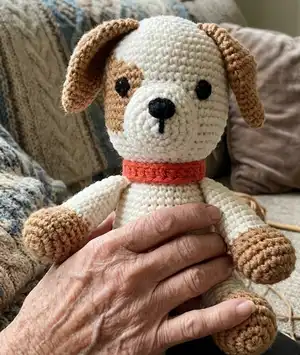
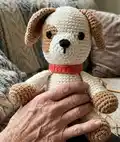
This pattern creates a sweet little Puppy Chip amigurumi worked mainly in single crochet with color patches and simple shaping. You will work the head and body in one piece, add sewn-on ears, four legs, a tail and a removable collar. The instructions are written in US terms and include stitch counts and finishing tips to help you achieve a neat, professional result.

Puppy Chip Amigurumi Pattern crochet pattern - detailed view of completed project

Ideal for crafters comfortable with working in continuous rounds and changing colors. The pattern uses Paintbox cotton aran yarn and a 3.25mm hook, and finishes at about 7 inches sitting height.

Why You'll Love This Puppy Chip Amigurumi Pattern

I absolutely love this pattern because it combines simple shaping with playful colorwork to create a characterful little dog. I enjoy the way the head and body are worked seamlessly, which makes assembly much easier and the finished toy sturdier. The carried-color spots give so much personality without complicated colorwork, and the pattern is flexible so I can swap yarns or eye sizes for different looks. Sewing the ears and paws is a satisfying finishing step that really brings Puppy Chip to life.

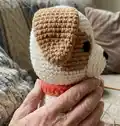
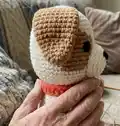
Puppy Chip Amigurumi Pattern step 1 - construction progress Puppy Chip Amigurumi Pattern step 2 - assembly progress Puppy Chip Amigurumi Pattern step 3 - details and accessories Puppy Chip Amigurumi Pattern step 4 - final assembly and finishing

Switch Things Up

I love how easy it is to customize Puppy Chip by changing colors; try pastel shades for a soft nursery friend or bold contrasts for a modern look.

To make a bigger version, use a bulkier yarn and a larger hook; for a keychain or charm, pick a smaller yarn and a smaller hook for a miniaturized result.

I often swap the safety eyes for embroidered eyes for baby-safe toys or use different sizes of safety eyes to change expression.

Try adding a little sweater or bandana by crocheting a small rectangle to fit around the neck and sewing it closed with a decorative stitch.

Add surface embroidery or felt appliques to create unique markings and facial expressions that give each Puppy Chip a distinct personality.

Change the texture of the fur by using a boucle or chenille yarn for the body while keeping smooth cotton for the paws and muzzle for an interesting contrast.

I sometimes insert a small bell or a squeaker inside the body for a toy that makes sound; be sure to secure it and avoid for very young children.

Make a whole family by adjusting color combinations and eye sizes to create siblings, parents, or a little puppy gang for display.

I like to embellish the collar with tiny charms or embroidered initials to personalize gifts and make them extra special.

Experiment with slightly different stitch counts in the finishing rounds to alter posture, for example increasing more at the base for a sturdier sitting position or reducing rounds for a slimmer silhouette.

Common Mistakes & How to Fix Them

βœ— Skipping the stitch marker when working continuous rounds leads to losing the round start; place a marker at the first stitch of every round and move it up as you go. βœ— Forgetting to stuff as you go causes lumps and uneven shaping; stuff firmly and gradually, adding fiberfill in small amounts while shaping the head and body. βœ— Changing colors without carrying the yarn creates loose strands or lots of ends; use the carry-on-the-wrong-side technique to weave the unused color and avoid cutting every time. βœ— Not counting stitches after increases or decreases can produce irregular shaping; count your stitches after each round especially during increases and decreases. βœ— Overstuffing the body makes it hard to close and can distort the shape; stuff firmly but leave a little give so the stitches can close neatly when you weave in the tail.

Puppy Chip Amigurumi Pattern

Make an adorable Puppy Chip with this detailed crochet pattern. You will work the head and body in one piece, add charming color patches, and sew on ears, legs and a tiny tail. The pattern includes full round-by-round instructions, materials list and assembly tips so you can finish a cuddly toy you will love. Perfect as a handmade gift or a sweet keepsake for your home.

Intermediate 5-7 Hours

Materials Needed for Puppy Chip Amigurumi Pattern

β€” Main Fabric

  • 01
    Paintbox Yarns cotton aran - Color A: Light Champagne (100g / 170 yd)
  • 02
    Paintbox Yarns cotton aran - Color B: Soft Fudge (50g / 93 yd)
  • 03
    Small amounts of red yarn for collar
  • 04
    Small amount of black yarn for embroidered nose and mouth
  • 05
    Pattern can be made with any sport or worsted weight yarn; size will vary with yarn and hook used

β€” Tools Required

  • 01
    Crochet hook size 3.25mm (US D/3)
  • 02
    Safety eyes 9-10mm (2 pieces)
  • 03
    Fiberfill stuffing
  • 04
    Tapestry needle for sewing and weaving ends
  • 05
    Stitch markers
  • 06
    Scissors
  • 07
    Pins or bobbin pins for positioning parts before sewing

Progress Tracker

0% Complete

β€” Head and Body :

Info :

Using the color A yarn, begin with a magic ring and and make 6 sc in the ring. Place a stitch marker, and move up with row

Round 1 :

6 sc in MR [6]

Round 2 :

(inc in each st) around [12]

Round 3 :

(sc; inc in next st) around [18]

Round 4 :

(sc in next 2 sts; inc in next st) around [24]

Round 5 :

(sc in next 3 sts; inc in next st) around [30]

Round 6 :

(sc in next 4 sts; inc in next st) around [36]

Round 7 :

(sc in next 5 sts; inc in next st) around [42]

Round 8 :

(sc in next 6 sts; inc in next st) around [48]

Round 9 :

(sc in next 7 sts; inc in next st) around [54]

Round 10 :

(sc in each st) around [54]

Info :

Attach yarn B in this round

Round 11 :

5 sc in color A; 2 sc in color B; 47 sc in color A around [54]

Round 12 :

5 sc in color A; 4 sc in color B; 45 sc in color A around [54]

Round 13 :

4 sc in color A; 7 sc in color B; 43 sc in color A around [54]

Round 14 :

3 sc in color A; 9 sc in color B; 42 sc in color A around [54]

Round 15 :

3 sc in color A; 9 sc in color B; 42 sc in color A around [54]

Round 16 :

4 sc in color A; 8 sc in color B; 42 sc in color A around [54]

Round 17 :

3 sc in color A; 10 sc in color B; 41 sc in color A around [54]

Round 18 :

2 sc in color A; 9 sc in color B; 43 sc in color A around [54]

Round 19 :

3 sc in color A; 8 sc in color B; 43 sc in color A around [54]

Round 20 :

4 sc in color A; 6 sc in color B; 44 sc in color A around [54]

Info :

F/O yarn B.

Info :

Attach safety eyes between rows 15 and 16. Count 9 sc from one eye to another. Stuff and shape the head as you work.

Round 21 :

(sc in next 7 sts; dec) around [48]

Round 22 :

(sc in next 6 sts; dec) around [42]

Round 23 :

(sc in next 5 sts; dec) around [36]

Round 24 :

(sc in next 4 sts; dec) around [30]

Round 25 :

(sc in next 3 sts; dec) around [24]

Round 26-27 :

(sc in each st) around [24]

Round 28 :

(sc in next 3 sts; inc in next st) around [30]

Round 29-30 :

(sc in each st) around [30]

Round 31 :

(sc in next 4 sts; inc in next st) around [36]

Round 32-33 :

(sc in each st) around [36]

Round 34 :

(sc in next 5 sts; inc in next st) around [42]

Round 35-36 :

(sc in each st) around [42]

Round 37 :

(sc in next 6 sts; inc in next st) around [48]

Round 38-40 :

(sc in each st) around [48]

Round 41 :

(sc in next 11 sts; inc in next st) around [52]

Round 42 :

(sc in each st) around [52]

Round 43 :

(sc in next 11 sts; dec) around [48]

Round 44 :

(sc in next 6 sts; dec) around [42]

Round 45 :

(sc in next 5 sts; dec) around [36]

Round 46 :

(sc in next 4 sts; dec) around [30]

Round 47 :

(sc in next 3 sts; dec) around [24]

Round 48 :

(sc in next 2 sts; dec) around [18]

Round 49 :

(sc in next st; dec) around [12]

Round 50 :

(dec x 6) around [6]

Info :

Fill the body with fiberfill firmly.

Info :

F/O and thread tail end of yarn onto a tapestry needle, insert the needle in and out of the remaining sts, pull tight to close and weave in end.

β€” Ears :

Info :

Make 2. Using color B yarn

Round 1 :

6 sc in MR [6]

Round 2 :

(sc; inc in next st) around [9]

Round 3 :

(sc in next 2 sts; inc in next st) around [12]

Round 4 :

(sc in each st) around [12]

Round 5 :

(sc in next 3 sts; inc in next st) around [15]

Round 6 :

(sc in next 4 sts; inc in next st) around [18]

Round 7 :

(sc in each st) around [18]

Round 8 :

(sc in next 2 sts; inc in next st) around [24]

Round 9 :

(sc in next 3 sts; inc in next st) around [30]

Round 10-11 :

(sc in each st) around [30]

Round 12 :

(sc in next 3 sts; dec) around [24]

Round 13-14 :

(sc in each st) around [24]

Round 15 :

(sc in next 4 sts; dec) around [20]

Round 16 :

(sc in each st) around [20]

Round 17 :

(sc in next 8 sts; dec) around [18]

Info :

Do not stuff the ears. Flatten the top of the ear in half, and sc in next 9 sts through both sides. F/O leaving a long tail for sewing.

β€” Hind Legs :

Info :

Make 2. Start with color B yarn

Round 1 :

6 sc in MR [6]

Round 2 :

(inc in each st) around [12]

Round 3 :

(sc; inc in next st) around [18]

Round 4 :

(sc in next 2 sts; inc in next st) around [24]

Round 5-6 :

(sc in each st) around [24]

Round 7 :

sc in next 6 sts; (sc in next 2 sts; dec)x 3 times; sc in 6 next sts around [21]

Round 8 :

sc in next 6 sts; (sc in next st; dec)x 3 times; sc in next 6 sts around [18]

Round 9 :

sc in next 6 sts; (dec)x 3 times; sc in next 6 sts around [15]

Info :

Change to color A yarn

Round 10-19 :

(sc in each st) around [15]

Info :

Stuff and shape the paw firmly, stuff the bottom of leg lightly.

First leg :

Undo one stitch from the last round. Fold the top of the leg in half, sc in the next 7 sts through both sides. F/O leaving a long tail for sewing.

Second leg :

Sc in the next 6 sts. Fold the top of the leg in half, sc in the next 7 sts through both sides. F/O leaving a long tail for sewing.

Info :

Make sure one paw points to the right and other to the left. Add or remove stitches in the last round if it is needed.

β€” Fore Legs :

Info :

Make 2. Start with color B yarn

Round 1 :

Sc in MR [6]

Round 2 :

(inc in each st) around [12]

Round 3 :

(sc; inc in next st) around [18]

Round 4 :

(sc in next 5 sts; inc in next st) around [21]

Round 5-6 :

(sc in each st ) around [21]

Round 7 :

(sc in next 5 sts; dec) around [18]

Round 8 :

(sc in next 5 sts; dec x 4 times; sc in next 5 sts) around [14]

Info :

Change to color A yarn

Round 9-19 :

(sc in each st) around [14]

Info :

Stuff and shape the paw firmly and bottom of the leg lightly.

First Leg :

Fold the top of the leg in half, sc in the next 7 sts through both sides. F/O leaving a long tail for sewing.

Second Leg :

Sc in the next 2 sts. Fold the top of the leg in half, sc in the next 7 sts through both sides. F/O leaving a long tail for sewing.

Info :

Make sure one paw points to the left and other to the right. Add or remove stitches in the last round if it’s needed.

β€” Muzzle :

Info :

Using color A yarn

Round 1 :

6 sc in MR [6]

Round 2 :

(inc in each st) around [12]

Round 3 :

(sc; inc in next st) around [18]

Round 4 :

(sc in next 2 sts; inc in next st) around [24]

Round 5 :

(sc in next 5 sts; inc in next st) around [28]

Round 6 :

(sc in each st) around [28]

Info :

Sl st in next stitch and F/O leaving a long tail for sewing.

β€” Tail :

Info :

Using color B yarn

Round 1 :

6 sc in MR [6]

Round 2 :

(sc; inc in next st) around [9]

Round 3 :

(sc in next 2 sts; inc in next st) around [12]

Round 4-9 :

(sc in each st) around [12]

Round 10 :

(sc in next 4 sts; dec) around [10]

Info :

Sl st in next stitch. Stuff the tail lightly. F/O leaving a long tail for sewing.

β€” Collar :

Info :

Using red color yarn

Round 1 :

ch 26

Round 2 :

hdc into 2nd ch from hook and across [24]

Info :

Try this on your puppy and adjust the no. of stitches if needed.

β€” Assembly :

Info :

Position the parts with bobbin pins and play around with placement before sewing them in place.

Info :

Use black yarn to embroider a nose onto the muzzle. Stuff the muzzle lightly and center it between the eyes. Sew the muzzle on neatly and carefully.

Info :

Position the ears evenly on the sides of the head. I have placed them between rows 5 and 6 starting from the top.

Info :

Sew the fore legs to the shoulders and hind legs at the sides. Make sure that the paws are in the right position. You can sew 1 or 2 stitches from under the hind legs to the body to tack the legs close to the body if they are flaring out too far.

Info :

Put the collar around the neck and join using a tapestry needle.

Info :

Sew the tail on to the back of the body.

Assembly Instructions

  • Position the parts with bobbin pins and play around with placement before sewing them in place to ensure correct balance and symmetry.
  • Use black yarn to embroider a nose onto the muzzle; stuff the muzzle lightly and center it between the eyes before sewing neatly into place.
  • Position the ears evenly on the sides of the head; I placed them between rows 5 and 6 from the top as a guide for symmetry.
  • Sew the fore legs to the shoulders and the hind legs to the sides; check paw direction and sew 1-2 stitches under the hind legs to tack them close if they flare out.
  • Put the collar around the neck and join ends using a tapestry needle for a tidy finish.
  • Sew the tail onto the back of the body, securing it firmly so it withstands play and handling.

Important Notes

  • πŸ’‘Work in continuous rounds without joining the round with a slip stitch unless directed to do so; do not turn at the end of each round.
  • πŸ’‘Use a stitch marker to keep track of the beginning of each round and move it up after completing each round.
  • πŸ’‘Head and body are worked in one piece beginning at the top of the head and working down into the body for seamless shaping.
  • πŸ’‘I recommend using invisible decrease to avoid gaps in stitches when decreasing on the shaping rounds.
  • πŸ’‘Carry the yarn on the wrong side technique is used for changing colors instead of cutting and rejoining a new strand each time.

This Puppy Chip amigurumi is a sweet handmade companion that brings joy to any handmade collection. Make it as a heartfelt gift or a cozy friend to display on a shelf. Happy crocheting and enjoy every stitch! 🧢 🐢

You ask,

we answer.

FAQs

What size will the finished piece be?

The puppy is approximately 7 inches tall (17.78 cm) when sitting using the recommended Paintbox cotton aran yarn and 3.25mm hook.

Can I use different yarn weights for this pattern?

Yes, you can use different yarn weights but the final size will change; adjust your hook accordingly and check gauge for desired proportions.

Do I need prior crochet experience for this pattern?

This pattern is rated intermediate, so basic knowledge of single crochet, increases, decreases, and working in the round is recommended.

How long does this project typically take to complete?

Most crocheters complete this project in 5-7 hours, depending on experience and how much time you spend on assembly and finishing.