🧶 Beautiful ✨ Detailed 💝 Adorable

Fried Egg Amigurumi Pattern

Fried Egg Amigurumi Pattern
4.0★ Rating
1-2 Hours Time Needed
3.6K Made This
✂️

Beginner Friendly Level

Perfect for those just starting their crochet journey, with clear instructions and simple techniques

⏱️

Quick Make

Complete in under 2 hours—lightning fast fun for instant gratification and quick gifts.

🎁

Tiny Treasure

Small, sweet, and gift-worthy creations that fit perfectly in the palm of your hand with detailed charm.

About This Fried Egg Amigurumi Pattern

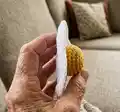
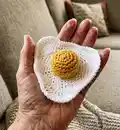
This pattern creates a cute fried egg made of two pieces: an egg white and a slightly stuffed yolk. Both parts are started with a magic ring and crocheted in a spiral for a seamless look. The yolk is stuffed lightly for a realistic rounded appearance before sewing onto the white.

Fried Egg Amigurumi Pattern crochet pattern - detailed view of completed project

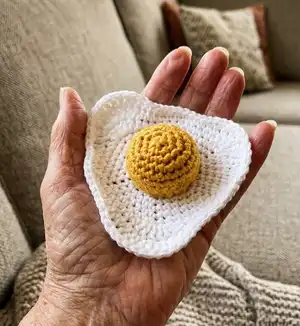
The finished piece measures approximately 4 inches and is quick to make, taking about 1.5 hours. The pattern is written in US terms and uses simple increases and basic stitches.

Why You'll Love This Fried Egg Amigurumi Pattern

I absolutely love this pattern because it turns a simple kitchen favorite into a sweet little crochet project that is fast and satisfying to make. I enjoy how the stuffed yolk gives a playful three-dimensional effect with minimal sewing. The rounds are easy to follow and great for practicing increases and basic stitches, so it feels rewarding every step of the way. I also love that it makes a perfect little gift or decor piece that always brings a smile.

Fried Egg Amigurumi Pattern step 1 - construction progress Fried Egg Amigurumi Pattern step 2 - assembly progress Fried Egg Amigurumi Pattern step 3 - details and accessories Fried Egg Amigurumi Pattern step 4 - final assembly and finishing

Switch Things Up

I love customizing this fried egg by changing yarn colors to match your kitchen or personal taste; try cream for the white or a deeper yellow for the yolk.

I sometimes make a mini version by using thinner cotton and a 2.5 mm hook to create tiny keychains and charms.

To make a chunky, cuddle-friendly version I use a bulkier cotton and a larger hook for a plush textured result.

I enjoy adding tiny embroidered details like speckles or a fried edge with surface stitching to add character.

For play food sets I create matching toast or bacon using similar yarns so the pieces look cohesive when displayed together.

I also experiment with stuffing level; less stuffing for a flatter egg or more for a puffier yolk effect to change the silhouette.

Try attaching a small magnet inside the back to create fridge magnets — perfect little gifts and practical decor.

I sometimes add a loop or a small cord to convert the egg into an ornament or a hanging decoration for kitchens.

If you want a more realistic effect, use a slightly variegated yellow yarn for the yolk so it has natural shading without extra work.

I often make sets in different sizes and group them on a tray for an eye-catching display, showing how small changes create different personalities.

Common Mistakes & How to Fix Them

✗ Skipping the magic ring start can leave a hole at the center; always begin with a tight magic ring and pull it closed before continuing. ✗ Not stuffing the yolk evenly will cause lumps or a flat shape; use small amounts of stuffing gradually and shape as you go for a smooth round result. ✗ Forgetting to count stitches on increase rounds can lead to an incorrect stitch total; count each round after completing it to ensure the right number of stitches. ✗ Tension that is too tight or too loose will change the finished size and texture; maintain consistent, moderate tension and check your gauge if needed. ✗ Sewing the yolk off-center gives an awkward final look; pin the yolk in place and check orientation before sewing with small hidden stitches.

Fried Egg Amigurumi Pattern

Make an adorable fried egg crochet piece that is quick, charming, and perfect for gifts or kitchen decor. This pattern guides you through two simple parts — the egg white and a slightly stuffed yolk — with clear rounds and assembly steps. You will enjoy a playful, portable project that finishes in about an hour and a half. Perfect for trying new stitch combinations and creating a cute handmade accent.

Beginner Friendly 1-2 Hours

Materials Needed for Fried Egg Amigurumi Pattern

— Main Fabric

  • 01
    DMC Natura Just Cotton - White (Color 1 Ibiza) - exact amount as needed (small skein)
  • 02
    DMC Natura Just Cotton - Yellow (Color 16 Tournesol) - exact amount as needed (small skein)

— Tools Required

  • 01
    Crochet hook size 3 mm
  • 02
    Toy stuffing (polyester fiberfill) for the yolk
  • 03
    2 stitch markers
  • 04
    Scissors
  • 05
    Yarn needle for sewing and weaving in ends
  • 06
    Pins for marking placement (optional)

Progress Tracker

0% Complete

— Pattern :

Info :

Note: This cute fried egg is made of two parts, which are sewn together. The yolk is additionally stuffed with some toy filling, for more realistic look. Both pieces require starting with a magic ring and crocheting in a spiral (without joining the separate rounds with a slip stitch). The finished piece measures approximately 4 inches and it takes about 1.5 hours to make. The pattern is written in US terms. Gauge : 2" = 12 sts x 13 rows in sc

— Egg white :

Round 1 :

6 sc in MR (6)

Round 2 :

inc x 6 (12)

Round 3 :

(sc, inc) x 6 (18)

Round 4 :

(2 sc, inc) x 6 (24)

Round 5 :

(3 sc, inc) x 6 (30)

Round 6 :

(4 sc, inc) x 6 (36)

Round 7 :

(5 sc, inc) x 6 (42)

Round 8 :

(6 sc, inc) x 6 (48)

Round 9 :

4 sc, 2 hdc, 3 dc inc, hdc, 3 sc, 3 hdc, 4 sc, hdc, dc, dc inc, dc, hdc, 11 sc, hdc, dc inc, dc, dc inc, hdc, 7 sc (54)

Round 10 :

3 sc, 3 hdc, dc, 3 dc inc, dc, hdc, 28 sc, hdc, dc, 3 dc inc, dc, 3 hdc, 5 sc (60)

Round 11 :

5 sl st, 11 sc, 3 sl st, 5 sc, 2 sl st, 4 sc, inc, 3 sc, 3 sl st, 8 sc, hdc, dc, 3 dc inc, dc, hdc, 3 sc, 5 sl st (64)

Info :

Fo and weave in the ends.

— Yolk :

Round 1 :

6 sc in MR (6)

Round 2 :

inc x 6 (12)

Round 3 :

(sc, inc) x 6 (18)

Round 4 :

(2 sc, inc) x 6 (24)

Round 5-7 :

sc around (24)

Round 8 :

sl st around (24)

Info :

Fo and weave in the ends.

— Assembly :

Assembly :

Choose the right spot for the yolk and sew it to the egg white. Ideally do it with your white yarn, using some hidden seam. Stuff it just before finishing the seam. Well done! You have just made your perfect fried egg :) What are you going to cook crochet next?

Assembly Instructions

  • Choose the right spot for the yolk on the egg white and pin it in place to check alignment before sewing.
  • Sew the yolk to the egg white using white yarn and a hidden seam, stitching evenly around the base of the yolk.
  • Stuff the yolk lightly with toy filling just before finishing the seam to get a smooth rounded shape.
  • Weave in all ends securely and trim any excess yarn after assembly to tidy the finished piece.

Important Notes

  • 💡Begin both pieces with a magic ring and crochet in a spiral without joining rounds with a slip stitch for a seamless finish.
  • 💡The finished piece measures approximately 4 inches; tension and yarn choice will affect final size.
  • 💡Pattern is written in US terms; check abbreviations and gauge: 2" = 12 sts x 13 rows in sc.

This cheerful fried egg pattern is a delightful quick project that adds a handmade touch to your kitchen or gift pile. It combines simple stitches with a slightly stuffed yolk for charming dimension. Try making a set for play kitchens, garlands, or quirky coasters. 🧶🍳

You ask,

we answer.

FAQs

What size will the finished piece be?

The finished fried egg measures approximately 4 inches across when using the recommended yarn and 3 mm hook.

Can I use different yarn weights for this pattern?

Yes, you can use different yarn weights but this will change the final size; select an appropriate hook size for your yarn and check gauge.

Do I need prior crochet experience for this pattern?

This pattern is beginner friendly, but you should know basic stitches like sc, hdc, dc and how to work increases and a magic ring.

How long does this project typically take to complete?

Most crocheters complete this project in about 1 to 2 hours, though time may vary depending on experience and speed.