🧢 Beautiful ✨ Detailed πŸ’ Adorable

Hoppy Spring Wreath Crochet Pattern

Hoppy Spring Wreath Crochet Pattern
4.8β˜… Rating
5-7 Hours Time Needed
4.2K Made This
βœ‚οΈ

Beginner Friendly Level

Perfect for those just starting their crochet journey, with clear instructions and simple techniques

⏱️

Weekend Treat

Takes 5-7 hours, making it an enjoyable project to finish over a couple of days.

🏑

Cozy Accent

A warm touch for your space that transforms ordinary corners into inviting nooks filled with handmade charm.

About This Hoppy Spring Wreath Crochet Pattern

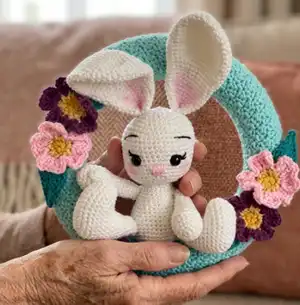
This pattern creates a minty green spring wreath decorated with five crocheted flowers, five leaves, and a scrappy bunny. The design uses worsted weight yarn and simple stitches to build texture and shape. It includes step-by-step instructions to wrap and sew a foam wreath cover and attach floral and bunny accents.

Hoppy Spring Wreath Crochet Pattern crochet pattern - detailed view of completed project

Perfect for gifting or seasonal decor, this easy-to-follow pattern is suitable for beginner to intermediate crocheters. The pattern includes clear stitch abbreviations and finishing tips for best results.

Why You'll Love This Hoppy Spring Wreath Crochet Pattern

I absolutely love this pattern because it combines simple stitch work with charming details that really pop. I enjoy the satisfaction of wrapping the wreath cover and watching the texture build row by row. The small flowers and leaves are quick, gratifying pieces that add so much personality to the finished wreath. I also love that you can personalize the colors and the bunny placement to suit your own decor or gift recipient. Making this wreath always feels like a festive mini project that brightens my craft space and my home.

Hoppy Spring Wreath Crochet Pattern step 1 - construction progress Hoppy Spring Wreath Crochet Pattern step 2 - assembly progress Hoppy Spring Wreath Crochet Pattern step 3 - details and accessories Hoppy Spring Wreath Crochet Pattern step 4 - final assembly and finishing

Switch Things Up

I love customizing this wreath by changing the color palette; try pastel shades for a soft spring look or bright jewel tones for a bold statement.

I sometimes switch yarn weight and hook size to create a chunkier wreath β€” bulky yarn with a larger hook gives a cozy, textured result.

I like adding felt leaves or sequins to the flowers for extra sparkle and dimension when I want a dressier version.

If you prefer no bunny, I will often make extra flowers and leaves to fill that space for a floral-only wreath.

I enjoy making mini versions of the flowers as garlands or ornaments using the same petal pattern and smaller yarn.

For a rustic style, I swap the acrylic paint for embroidery details and use natural twine to hang the wreath.

I sometimes add wired stems behind the flowers so they sit at different angles and create more depth on the wreath surface.

If you want a seasonal twist, I swap petal colors and add small felt eggs for an Easter theme or tiny bells for a holiday version.

I recommend experimenting with placement of the bunny β€” try centering it, tucking it into the wreath, or hanging it from a ribbon for different looks.

I like to personalize gifts by sewing a tiny initial or charm to the back of the wreath, making each piece unique and special.

Common Mistakes & How to Fix Them

βœ— Not measuring the strip length before stitching around the foam wreath can leave you short; wrap the crocheted strip around the wreath early and adjust stitch count until it fits snugly. βœ— Changing colors without finishing the previous stitch creates loose ends and uneven joins; finish the last yarn-over of the stitch with the new color to create a smooth color change. βœ— Skipping the slip stitch join when making the wreath tube can cause a visible gap; join row 99 to row 1 with slip stitches across and leave a long tail for sewing securely. βœ— Failing to match up rows when sewing the wrapped piece to the foam will make the surface look uneven; pin or align rows before sewing and check alignment as you stitch. βœ— Overstuffing or under stuffing small elements like petals or the bunny will distort shape; stuff gradually and check shape often, adding small amounts until the form looks smooth and even.

Hoppy Spring Wreath Crochet Pattern

Create a cheerful spring wreath featuring a cuddly bunny, bright flowers, and leafy accents. This approachable pattern guides you through wrapping a foam wreath, crocheting flowers and leaves, and finishing with charming hand-painted details. Perfect for gifting or adding seasonal charm to your home, you'll enjoy making a sweet wreath that celebrates spring in color and texture.

Beginner Friendly 5-7 Hours

Materials Needed for Hoppy Spring Wreath Crochet Pattern

β€” Main Fabric

  • 01
    Size 4 worsted weight yarn (#4) Light Green - for wreath (Color A)
  • 02
    Size 4 worsted weight yarn (#4) Bright Yellow - for flower centers
  • 03
    Size 4 worsted weight yarn (#4) Light Yellow - for flower inner ring
  • 04
    Size 4 worsted weight yarn (#4) Light Pink - for petals
  • 05
    Size 4 worsted weight yarn (#4) Purple - for petals/accents
  • 06
    Size 4 worsted weight yarn (#4) Teal Green - for leaves and accents
  • 07
    Red Heart Minty (used for Color A) and Big Twist yarn in other colors (as specified)
  • 08
    Fiber fill stuffing for bunny
  • 09
    Pink acrylic paint for cheeks and ears (small amount)

β€” Tools Required

  • 01
    Crochet hook size 4.0 mm
  • 02
    Needle / Scissors
  • 03
    Foam 11.75" wreath
  • 04
    Fiber fill stuffing
  • 05
    Pink acrylic paint and dry brush
  • 06
    Yarn needle for sewing pieces and weaving ends

Progress Tracker

0% Complete

β€” Materials :

Info :

Size 4 worsted weight yarn in light green, bright yellow, light yellow, light pink, purple and teal green. I used Red Heart Minty, and big twist in the other colors. Fiber fill Stuffing. 4.0 mm hook. Needle/Scissors. Foam 11.75” wreath. *Bunny Materials seen on combined additional pattern. Pink Acrylic Paint and dry brush.

β€” Terms :

Infos :

Yarn Over – YO. Stitch – ST. Chain - CH. Single Crochet – SC. Double Crochet - DC. Slip Stitch – SL ST. Half Double Crochet – HDC. Triple Crochet - TR. Magic Circle – MC. Great tutorial for MC: https://www.youtube.com/watch?v=p298HxgsO1s. Half Double Crochet Foundation Stitch - HDCFS. Great Tutorial if this is unfamiliar: https://www.youtube.com/watch?v=I9Og5cd2L0o. Bubble Stitch – BS (explained in beard section). Between * * repeat this many additional times β€œx”. End of row (Parenthesis) total number of stitches in row. Note: when changing colors work ends into stitches as you go along. This allows for less end weaving at the end of project. Also, when changing colors, always finish previous stitch with new color this makes for a smoother color change. Big Note: I’m left-handed; all pictures are shown with left handed progress unless otherwise stated. Pattern works for both left and right-handed crafters.

β€” Minty Green Wreath :

Round 1 :

With Color A - Chain 23, sc into 2nd chain from the hook and dc in next *sc, dc* repeated until the end. Ch 1, Turn (22)

Round 2 :

*sc, dc* repeat to the end, ch 1, turn (22)

Info :

This is a good time to wrap this piece around your wreath, it should wrap just right around. If not, start over and add 2 stitches, if it’s too loose, do 2 less. (Pattern made in multiples of 2)

Info :

Every row is crochet exactly as row 2. 22 stitches in each row.

Info :

This pattern is repeated in every row 97 more rows. (99 total rows)

Round 3 :

Bring ends right sides together. Put hook into each 1st st, in row 99 and row 1. Sl ST across joining ends together and making a circle. Tie off. Leave long length (45ish inches for sewing together.)

Round 4 :

Slide onto foam wreath right side out. Sew sides together around the wreath. Be sure to match up rows as you sew along. Weave end ends.

β€” Flower (Make 5) :

Round 1 :

With Bright Yellow 4mm hook - Sc 10 in MC, Pull tight, sl st in first sc. (10)

Round 2 :

Change color to light yellow. *Sc, ch 1* repeat 9x, sl st in first st (10)

Round 3 :

Change color to petal color. *Sl St in first sc, ch 3, Tr in same st, Tr in same st, DC in ch 1 space, Tr next st, Tr same st, ch 3, sl st in same st* repeat around making 5 pedals total. Tie off, leave length for sewing to wreath. Weave in ends.

β€” Leaf (Make 5) :

Round 1 :

With teal green, 4mm hook - Ch 9, sl st 2nd chain from the hook, sc, sc, hdc, dc, dc, tr, tr last, ch 3, sl st in same st.

Round 2 :

Rotate now working on the other side. Ch 3, Tr in same st, tr, dc, dc, hdc, sc, sc, sl st. tie off. Weave in ends.

β€” Finishing :

Info :

HDCFS 20, fold in half and sew ends to back/top of wreath. (Hook)

Info :

Sew flowers on either side of wreath. And one on the bottom. Sew leaves to either side of flower bunches.

Info :

Use Scrappy bunny pattern (attached) to make Bunny. Sew Bunny at his bum to the bottom edge of the wreath. It helps to omit the tail. Sew an ear to top of wreath.

Info :

Hand paint ears and cheeks with dry brush and pink acrylic paint (optional). Hang and Celebrate.

β€” Notes :

Info :

The Hoppy Spring PDF Crochet Pattern is great for gifts and is an easy project for beginner to intermediate crocheter.

Assembly Instructions

  • Slide the crocheted wreath tube onto the foam wreath right side out, then position and sew the open seam closed to form a smooth circle around the foam.
  • Bring ends right sides together and slip stitch across joining row 99 to row 1, then leave a long tail (about 45 inches) to securely sew the seam for extra strength.
  • Sew flowers in groups on either side of the wreath and place one flower at the bottom, securing with small whipstitches and leaving tails to weave in.
  • Position leaves to either side of the flower bunches and sew them into place, tucking ends under for a neat finish and weaving in all ends.
  • Make the Scrappy Bunny (see attached bunny pattern) and sew the bunny at its bum to the bottom edge of the wreath, omitting the tail if desired for a flatter attachment.
  • Sew one bunny ear to the top of the wreath, then hand paint ears and cheeks with a dry brush and pink acrylic paint if you want subtle flushed details.

Important Notes

  • πŸ’‘Wrap the crocheted strip around the foam wreath before finishing to ensure the piece is the correct length and fits snugly.
  • πŸ’‘Work color changes by finishing the last yarn-over of the stitch with the new color to reduce weaving and create smooth joins.
  • πŸ’‘Match up rows carefully when sewing the tube to the wreath so the texture remains even and the seam is not visible.
  • πŸ’‘Leave long tails when joining rows and assembling pieces so you have plenty of yarn to securely sew and fasten parts.
  • πŸ’‘Weave in ends as you go and use a yarn needle for neat finishes to avoid bulky lumps beneath the surface of the wreath.

Make a Hoppy Spring Wreath that brightens any door or wall with handmade charm and pastel cheer. This pattern is designed to be friendly and flexible so you can customize colors and accents to match your home. Create one as a gift or keep it for your own seasonal display β€” happy crocheting! 🌸🐰🧢

You ask,

we answer.

FAQs

What size will the finished wreath be?

The finished wreath fits an 11.75 inch foam wreath when using the recommended size 4 yarn and a 4.0 mm hook; overall diameter will be slightly larger once flowers and leaves are attached.

Can I use different yarn weights for this pattern?

Yes, you can use different yarn weights but it will change the final size and texture; choose an appropriate hook for your yarn and make a gauge strip to ensure the crocheted tube fits the foam wreath.

Do I need prior crochet experience for this pattern?

This pattern is beginner friendly, but familiarity with basic stitches like SC, DC, HDC, and slip stitch is helpful; tutorials are linked for magic circle and HDCFS if you need extra guidance.

How long does this project typically take to complete?

Most crafters finish this wreath in about 5-7 hours total, depending on experience level and how many embellishments you add.