🧢 Beautiful ✨ Detailed πŸ’ Adorable

Buzz Lightyear Amigurumi Pattern

Buzz Lightyear Amigurumi Pattern
4.2β˜… Rating
5-7 Hours Time Needed
3.8K Made This
βœ‚οΈ

Intermediate Level

Ideal for those with basic crochet experience, featuring slightly more advanced stitches and techniques to expand your skills.

⏱️

Weekend Treat

Takes 5-7 hours, making it an enjoyable project to finish over a couple of days.

🧸

Cute Companion

An adorable friend to cherish, handcrafted with love to bring comfort and joy for years to come.

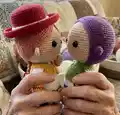
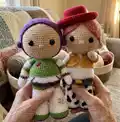
About This Buzz Lightyear Amigurumi Pattern

This pattern creates a cuddly, pocket-sized Buzz Lightyear amigurumi with accurate costume details and fun colorwork. You will crochet the head, body, legs, arms, and small accessories, then assemble and embroider the emblem and facial details. The instructions include step-by-step rounds and photos for tricky parts like the purple head detail and emblem embroidery. Ideal for making a handmade Toy Story keepsake.

Buzz Lightyear Amigurumi Pattern crochet pattern - detailed view of completed project

The pattern uses cotton yarn and a small hook to achieve a neat, firm fabric with crisp color changes. Clear abbreviations and materials are listed so you can gather supplies before you begin.

Why You'll Love This Buzz Lightyear Amigurumi Pattern

I absolutely love this pattern because it captures Buzz Lightyear's playful character with simple shaping and delightful colorwork. I enjoyed designing the little emblem and purple head detailβ€”they add so much personality with minimal effort. The pattern balances straightforward amigurumi construction with a few creative techniques that keep the process fun and rewarding. I find the finished size perfect for display or gifting, and the small details allow you to personalize each doll.

Buzz Lightyear Amigurumi Pattern step 1 - construction progress Buzz Lightyear Amigurumi Pattern step 2 - assembly progress Buzz Lightyear Amigurumi Pattern step 3 - details and accessories Buzz Lightyear Amigurumi Pattern step 4 - final assembly and finishing

Switch Things Up

I love how easy it is to customize this pattern by changing yarn colors to create unique versions of Buzz or original space characters.

I sometimes use a thicker yarn and a larger hook to make a chunkier, cuddlier doll that is great for playtime.

To make a miniature keychain version I use a thinner yarn and a smaller hook and reduce stuffing for a lightweight result.

I often swap safety eyes for embroidered eyes if the toy is meant for very young children to make it safer.

You can add wire inside the arms for posability or make a tiny cape using leftover yarn for extra drama.

I like to embroider alternate emblems or initials on the chest to personalize a gift for friends and family.

Try using variegated yarn for the suit stripes to create an interesting, painterly effect without many color changes.

For a themed set, change the hair and accessory colors to match other characters and display them together as a collection.

If you prefer a softer look, use a brushed or plush yarn for the body while keeping cotton for the head for good stitch definition.

I recommend testing a small swatch when changing yarn or hook sizes so you can predict final size and adjust the pattern accordingly.

Common Mistakes & How to Fix Them

βœ— Not leaving long sewing tails on small pieces; always leave a long tail for sewing so you can attach parts securely without reworking the piece. βœ— Forgetting to insert eyes at the recommended rows; insert safety eyes between rows 15-16 to get the correct facial position and symmetry. βœ— Cutting the thread off after making the second leg will break the body join; do not cut off the thread on the second leg and continue crocheting the body to join legs neatly. βœ— Changing colors without catching in yarn ends can leave gaps at joins; change colors neatly and weave in ends as you go to avoid loose stitches and visible gaps.

Buzz Lightyear Amigurumi Pattern

Create your own adorable Buzz Lightyear amigurumi with this clear, photo-led crochet pattern. You will work simple rounds, color changes, and small sewn details to bring this Toy Story favorite to life. The pattern is friendly but detailed, guiding you through head shaping, limbs, and embroidery so your finished toy looks polished. Perfect for gifting or adding to your handmade toy collection.

Intermediate 5-7 Hours

Materials Needed for Buzz Lightyear Amigurumi Pattern

β€” Main Fabric

  • 01
    Alize Cotton Gold - 126 (skin color)
  • 02
    Alize Cotton Gold - 152 (accent/hat or other color)
  • 03
    Alize Cotton Gold - 55 (accent color)
  • 04
    Drops Love You 7 - 10 (green shades for suit)
  • 05
    Drops I Love You 7 - 04 (white/other suit color)
  • 06
    Fiber filling (polyester stuffing) for stuffing head and body

β€” Tools Required

  • 01
    Crochet hook size 2.0 mm (Hook size β„–2)
  • 02
    Tapestry needle for sewing
  • 03
    Scissors
  • 04
    Safety eyes 7-8 mm (2 pieces)
  • 05
    Stitch markers
  • 06
    Polyester stuffing (fiber filling)
  • 07
    Pins for assembly (optional)

Progress Tracker

0% Complete

β€” Head :

Round 1 :

6 sc in mr

Round 2 :

6 inc (12)

Round 3 :

(1 sc, inc) x 6 (18)

Round 4 :

(2 sc, inc) x 6 (24)

Round 5 :

(3 sc, inc) x 6 (30)

Round 6 :

(4 sc, inc) x 6 (36)

Round 7 :

(5 sc, inc) x 6 (42)

Round 8 :

(6 sc, inc) x 6 (48)

Round 9 :

(7 sc, inc) x 6 (54)

Round 10-19 :

54 sc

Info :

Between the 15-16 rows insert safety eyes, 7-8 mm in diameter.

Round 20 :

(7 sc, dec) x 6 (48)

Round 21 :

(6 sc, dec) x 6 (42)

Info :

Stuff

Round 22 :

(5 sc, dec) x 6 (36)

Round 23 :

(4 sc, dec) x 6 (30)

Round 24 :

(3 sc, dec) x 6 (24)

Round 25 :

(2 sc, dec) x 6 (18)

Round 26 :

(1 sc, dec) x 6 (12)

Info :

Stuff

β€” Detail for head :

Round 1 :

6 sc in mr

Round 2 :

6 inc (12)

Round 3 :

(1 sc, inc) x 6 (18)

Round 4 :

(2 sc, inc) x 6 (24)

Round 5 :

(3 sc, inc) x 6 (30)

Round 6 :

(4 sc, inc) x 6 (36)

Round 7 :

(5 sc, inc) x 6 (42)

Round 8 :

(6 sc, inc) x 6 (48)

Round 9 :

(7 sc, inc) x 6 (54)

Round 10-16 :

54 sc

Round 17 :

(hdc, 2 dc, 2 inc (dc), 2 dc, hdc, 2 sc) x 2, 34 sc (58)

Round 18 :

(hdc, dc x 8, hdc, 2 sc) x 2, 34 sc (58)

Round 19 :

22 hdc, 36 sc (58)

Round 20 :

58 sc

Info :

Leave a long tail for sewing

Info :

Sew the detail on the head

β€” Ears (x2) :

Round 1 :

6 sc in mr

Info :

Leave a long tail for sewing

β€” Start forming head :

Info :

Between the 16-17 rows sew on ears. Distance from ears to eyes 5-6 sc.

Info :

Embroider nose.

Info :

Start forming eyes: Embroider eyes: insert the white threaded needle on bottom of the eye and thread it to the bottom as shown in the picture. Bring the thread out near the second eye and repeat the same steps.

Info :

Toned cheeks

β€” Legs (x2) :

Round 1 :

6 sc in mr

Round 2 :

6 inc (12)

Round 3 :

(1 sc, inc) x 6 (18)

Round 4 :

(2 sc, inc) x 6 (24)

Round 5 :

(3 sc, inc) x 6 (30)

Round 6 :

BLO 30 sc

Round 7 :

30 sc

Round 8 :

Change yarn color to the white color: 30 sc

Round 9 :

(8 sc, dec) x 3 (27)

Round 10-11 :

27 sc

Round 12 :

(7 sc, dec) x 3 (24)

Round 13 :

24 sc

Round 14 :

(6 sc, dec) x 3 (21)

Round 15-16 :

21 sc

Round 17 :

(5 sc, dec) x 3 (18)

Round 18 :

18 sc

Round 19 :

(4 sc, dec) x 3 (15)

Info :

Stuff

Info :

Crochet second leg the some way and continue crocheting the body.

Info :

Do not cut off the thread on the second leg and continue crocheting the body. The gap between the legs should be 3 ch:

Round 1 :

15 sc on the leg, 3 sc on the chain, 15 sc on the leg, 3 sc on the chain (36)

Round 2 :

36 sc

Round 3 :

Change yarn color to the green color: 36 sc

Round 4 :

36 sc

Round 5 :

Change yarn color to the grey color: 36 sc

Round 6-7 :

36 sc

Round 8 :

Change yarn color to the white color: BLO (5 sc, inc) x 6 (42)

Round 9 :

(6 sc, inc) x 6 (48)

Round 10 :

(7 sc, inc) x 6 (54)

Round 11 :

Change yarn color to the green color: 54 sc

Round 12-13 :

54 sc

Round 14 :

(7 sc, dec) x 6 (48)

Round 15 :

(6 sc, dec) x 6 (42)

Round 16 :

(5 sc, dec) x 6 (36)

Round 17 :

(4 sc, dec) x 6 (30)

Info :

Stuff

Round 18 :

30 sc

Round 19 :

(3 sc, dec) x 6 (24)

Round 20-21 :

24 sc

Info :

Stuff

β€” Hands :

Round 1 :

6 sc in mr

Round 2 :

(1 sc, inc) x 3 (9)

Round 3-5 :

9 sc

Round 6 :

Change yarn color to the purple color: 9 sc

Round 7 :

Change yarn color to the white color: 9 sc

Round 8-9 :

9 sc

Round 10 :

Change yarn color to the green color: 9 sc

Round 11 :

9 sc

Round 12 :

Change yarn color to the white color: 9 sc

Round 13-14 :

9 sc

Round 15 :

Change yarn color to the green color: 9 sc

Round 16-17 :

9 sc

Info :

Stuff

Info :

Sew the hands to the body.

Info :

Sew the head to the body

Info :

Embroider emblem with blue and red thread

Assembly Instructions

  • Attach the ears between rows 16-17 on the head, spacing each ear 5-6 stitches from the eyes for correct placement.
  • Insert safety eyes between rows 15-16 before stuffing the head, then stuff firmly and continue shaping the head as instructed.
  • Sew the two legs into the body gap by chaining 3 between legs and crocheting across: 15 sc on leg, 3 sc chain, 15 sc on leg, 3 sc chain, then continue rounds to join legs and form body.
  • Sew the head to the body securely using the long tail left when finishing the head; adjust stuffing and alignment before closing.
  • Sew the hands to the sides of the body at a height that looks natural (refer to photos), and secure with several stitches so hands are stable.
  • Embroider the emblem on the chest using blue and red thread after the body is joined and stuffed, following the photo reference for placement and stitch direction.

Important Notes

  • πŸ’‘Leave a long tail for sewing on small pieces like the purple head detail and ears to make attachment easier and neater.
  • πŸ’‘Do not cut off the thread after finishing the second leg; continue crocheting the body to join legs seamlessly with a 3-chain gap.
  • πŸ’‘Insert safety eyes between rows 15-16 to ensure correct eye placement before stuffing the head and continuing with decreases.
  • πŸ’‘Stuff firmly but not overstuffed when instructed; add stuffing gradually while shaping the head and body to keep smooth curves.

This Buzz Lightyear amigurumi pattern brings a little bit of Toy Story magic to your crochet hook! The pattern blends neat shaping, color changes, and embroidered details so you can craft a delightful handmade keepsake. Grab your yarn and start making a special friend today πŸ§Άβœ¨πŸš€

You ask,

we answer.

FAQs

What size will the finished piece be?

The finished amigurumi measures approximately 18-22 cm tall when using the recommended yarn and hook size, depending on tension.

Can I use different yarn weights for this pattern?

Yes, you can use different yarn weights, but this will affect the final size. Choose an appropriate hook for your yarn and expect a larger or smaller finished doll.

Do I need prior crochet experience for this pattern?

This pattern is rated intermediate; basic knowledge of single crochet, increases, decreases, and color changes is recommended for best results.

How long does this project typically take to complete?

Most crocheters complete this project in 5-7 hours, though time may vary based on experience level, details added, and working pace.