🧢 Beautiful ✨ Detailed πŸ’ Adorable

Manatee Friend Amigurumi Pattern

Manatee Friend Amigurumi Pattern
3.9β˜… Rating
2-3 Hours Time Needed
2.4K Made This
βœ‚οΈ

Beginner Friendly Level

Perfect for those just starting their crochet journey, with clear instructions and simple techniques

⏱️

Bite-Sized Project

Finishes in 2-4 hoursβ€”perfect for an afternoon of creative relaxation.

🧸

Cute Companion

An adorable friend to cherish, handcrafted with love to bring comfort and joy for years to come.

About This Manatee Friend Amigurumi Pattern

This pattern teaches you how to crochet a small, chubby manatee amigurumi using single crochet shaping. It uses DK weight yarn and a 4mm hook by default but gives options for different yarns and hooks. Ideal for gifting or making a cute desk buddy, the pattern includes clear rounds and finishing instructions.

Manatee Friend Amigurumi Pattern crochet pattern - detailed view of completed project

Includes step-by-step rounds for the body and fins, plus placement and assembly tips. Suitable for crocheters looking for a quick, satisfying amigurumi make.

Why You'll Love This Manatee Friend Amigurumi Pattern

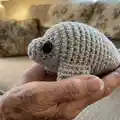
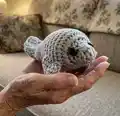
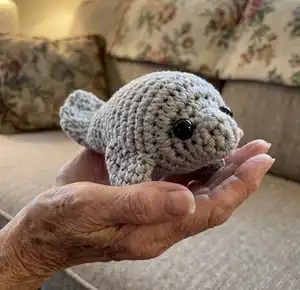
I absolutely love this pattern because it captures the sweet, squishy charm of manatees with minimal pieces. I enjoy how quickly a finished buddy appears using simple single crochet shaping. I love that you can easily tweak yarn and hook to make different sizes and personalities. I find it very satisfying to see the face form as you add the snout and eyes, and sewing the fins on always makes me smile.

Manatee Friend Amigurumi Pattern step 1 - construction progress Manatee Friend Amigurumi Pattern step 2 - assembly progress Manatee Friend Amigurumi Pattern step 3 - details and accessories Manatee Friend Amigurumi Pattern step 4 - final assembly and finishing

Switch Things Up

I love changing up the yarn to create different textures β€” try a plush chenille yarn for a super soft manatee that feels like a toy, or a cotton DK for a firmer, more detailed finish.

To make a mini keychain version, use fingering weight yarn and a 2.5-3mm hook; add a small keyring when sewing the tail seam closed.

If you want a larger cuddle buddy, switch to chunky yarn and a 5mm hook and stuff loosely for a squishier look.

I often embroider different mouth expressions for variety β€” a small curved stitch makes a smiling manatee while a straight stitch gives a neutral look.

Try safety eyes of different sizes to change the personality; larger eyes look cuter and more whimsical, while smaller eyes create a subtler expression.

You can add a tiny crocheted heart or flower to the side to make a gift-ready keepsake with minimal extra work.

Experiment with pastel colors for a nursery-friendly toy or bright colors for a fun, stylized creature that stands out.

For a poseable version, consider inserting a short length of wire into the fins before sewing them in place to allow gentle shaping of the fins.

I sometimes stuff the head a little firmer than the body to give the face more definition and to help the snout stand out nicely.

Make a family set by varying yarn weight and hook size β€” a trio of tiny, medium, and large manatees looks adorable displayed together.

Common Mistakes & How to Fix Them

βœ— Skipping the instruction to place the eyes between rounds 3 and 4 can misplace the eyes; insert the safety eyes between rounds 3 and 4, approximately 3 stitches apart and centered within the increases. βœ— Forgetting to stuff gradually causes uneven shaping in the head and tail; stuff firmly from round 18 onwards, adding small amounts of stuffing as you shape to keep the surface smooth. βœ— Using recommended yarn with a much larger hook will make stitches loose and holes obvious; size down your hook 0.5mm-1.0mm from the yarn recommendation if you want tight stitches. βœ— Not flattening and shaping the tail will leave it floppy and unstable; after round 22 stuff firmly and flatten the tail before closing to achieve the correct tail shape. βœ— Neglecting to sew the fins symmetrically results in a lopsided manatee; pin both fins in place and check placement against the photo before sewing securely.

Manatee Friend Amigurumi Pattern

Create a chubby, happy manatee pal with this easy-to-follow crochet pattern. Perfect as a gift or a cuddly companion, this pattern uses simple single crochet shaping. You can customize yarn weight and hook size to change the final size and personality of your manatee.

Beginner Friendly 2-3 Hours

Materials Needed for Manatee Friend Amigurumi Pattern

β€” Main Fabric

  • 01
    Grey yarn - cotton DK recommended (as used in sample photos)
  • 02
    Chunky yarn (optional for a larger, squishier manatee)
  • 03
    2 x safety eyes (size not specified in pattern)
  • 04
    Stuffing - polyester fiberfill or similar

β€” Tools Required

  • 01
    Crochet hook 4mm (recommended)
  • 02
    Crochet hook 3mm (alternative for smaller item)
  • 03
    Crochet hook 5mm (alternative for larger item)
  • 04
    2 x safety eyes
  • 05
    Stuffing (polyester fiberfill)
  • 06
    Yarn needle for sewing fins and weaving in ends
  • 07
    Scissors

Progress Tracker

0% Complete

β€” Pattern notes :

Infos :

The number in brackets at the end of each round indicates the total number of stitches. You can use whatever method you like to start your amigurumi, I prefer to chain 2 and work into the first stitch but if you like a magic circle you go right ahead. I used cotton DK yarn and a 4mm hook for this manatee, but I've also made them using chunky yarn for an extra squishy pal. You can use whatever yarn you have to hand, I'd suggest sizing down your hook 0.5mm - 1.0mm from the recommended size to ensure your stitches are tight. DK yarn and a 3mm hook will result in a smaller item and chunky yarn and a 5mm hook will obviously be larger. But remember, all manatees are beautiful.

β€” Supplies :

Info :

Grey yarn. 2 x safety eyes. Stuffing.

β€” Abbreviations :

Infos :

CH: Chain. DEC: SC the next 2 ST together. FO: Fasten off. INC: 2SC in the next ST. SC: Single crochet. SS: Slip stitch. ST: Stitch/es. *___*: Repeat instructions from * to * as many times as stated.

β€” Body :

Info :

CH2, 6SC in second chain from hook.

Round 1 :

*SC, INC* x 3 (9)

Round 2 :

*SC* x 9 (9)

Round 3 :

*2SC, INC* x 3 (12)

Round 4 :

3SC, *INC* x 6, 3SC (18)

Round 5 :

3SC, *INC* x 12, 3SC (30)

Round 6-8 :

*SC* x 30 (30)

Info :

Insert eyes between rounds 3 and 4, approx. 3 stitches apart and centred within the increases.

Round 9 :

*13SC, DEC* x 2 (28)

Round 10 :

6SC, DEC, 12SC, DEC, 6SC (26)

Round 11 :

*11SC, DEC* x 2 (24)

Round 12 :

5SC, DEC, 10SC, DEC, 5SC (22)

Round 13 :

*9SC, DEC* x 2 (20)

Round 14 :

4SC, DEC, 8SC, DEC, 4SC (18)

Round 15-16 :

*SC* x 18 (18)

Round 17 :

*7SC, DEC* x 2 (16)

Round 18 :

*SC* x 16 (16)

Info :

Stuff firmly from here onwards.

Round 19 :

3SC, DEC, 6SC, DEC, 3SC (14)

Round 20 :

*SC* x 14 (14)

Round 21 :

*5SC, DEC* x 2 (12)

Round 22 :

12SC + 1 additional stitch to bring you to the edge of your manatee.

Info :

Stuff firmly and flatten the tail.

Round 23 :

SS closed (6) CH1, turn

Round 24 :

INC, 4SC, INC (8) CH1, turn

Round 25 :

8SC (8) CH1, turn

Round 26 :

INC, 6SC, INC (10) CH1, turn

Round 27-28 :

10SC (10) CH1, turn

Round 29 :

1SC, DEC, 4SC, DEC, 1SC (8) CH1, turn

Round 30 :

1SC, DEC, 2SC, DEC, 1SC (6) CH1, turn

Round 31 :

1SC, *DEC* x 2, 1SC (4)

Round 32 :

4SC

Info :

Fasten off and weave in your end.

β€” Fin :

Info :

Make two.

Info :

CH2, 6SC in second chain from hook.

Round 1 :

*INC* x 6 (12)

Round 2-5 :

*SC* x 12 (12)

Round 6 :

Hold your fin flat and SS closed (6)

Info :

Fasten off and sew to the side of your manatee using the photo as a guide.

Info :

And you're done! You have a new little manatee pal to look after you. Feel free to sell your finished items but please credit me as the designer. Remember to tag me on social media @manatee_squares because I love to see these little guys pop up! Please do not recreate this pattern in any way.

Assembly Instructions

  • Insert the safety eyes between rounds 3 and 4, approximately 3 stitches apart and centered within the increases, before stuffing the head fully.
  • Stuff the body firmly from round 18 onwards, adding stuffing gradually to shape the head, body, and tail evenly.
  • Flatten the tail after round 22 by stuffing firmly and bringing the edges together, then continue the tail shaping rounds to close.
  • Make two fins, hold each fin flat and close with a slip stitch, then sew each fin to the sides of the manatee using the photos as a guide for placement.
  • Weave in all ends securely and sew any remaining openings closed; check placement and symmetry before final stitching.

Important Notes

  • πŸ’‘Place safety eyes between rounds 3 and 4 and ensure they are centered within the increases for a balanced face.
  • πŸ’‘Stuff firmly from round 18 onwards to maintain shape; add stuffing in small amounts for even shaping and a smooth finish.
  • πŸ’‘Flatten and shape the tail after round 22 to achieve the correct silhouette before completing the tail rounds.
  • πŸ’‘Make both fins the same size and pin them in place prior to sewing to ensure symmetrical placement.

This little manatee pal is a joyful, squishy companion perfect for gifting or keeping. Make one in your favorite grey yarn or experiment with colors for a playful twist. 🐾 Share your finished manatees and tag @manatee_squares so the designer can see your creations! 🧢

You ask,

we answer.

FAQs

What size will the finished piece be?

The finished amigurumi measures approximately 10-12 cm tall when using DK yarn and a 4mm hook; exact size depends on yarn and tension.

Can I use different yarn weights for this pattern?

Yes, you can use different yarn weights; using thinner yarn and a smaller hook will give a smaller manatee, while chunky yarn with a larger hook will produce a larger, squishier version.

Do I need prior crochet experience for this pattern?

This pattern is beginner friendly, so basic knowledge of single crochet, increases, and decreases is sufficient to complete the manatee.

How long does this project typically take to complete?

Most crocheters complete this project in 2-3 hours, though time may vary depending on experience level and the yarn/hook you choose.