🧢 Beautiful ✨ Detailed πŸ’ Adorable

Any-Size Square Container Crochet Pattern

Any-Size Square Container Crochet Pattern
4.6β˜… Rating
2-4 Hours Time Needed
2.8K Made This
βœ‚οΈ

Beginner Friendly Level

Perfect for those just starting their crochet journey, with clear instructions and simple techniques

⏱️

Bite-Sized Project

Finishes in 2-4 hoursβ€”perfect for an afternoon of creative relaxation.

🏑

Cozy Accent

A warm touch for your space that transforms ordinary corners into inviting nooks filled with handmade charm.

About This Any-Size Square Container Crochet Pattern

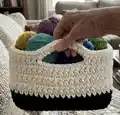
This easy-to-make container features a square base worked in rounds and straight sides you can build to any height. You can make it with or without handles and customize colors for a unique look. The instructions use both American and British terms and include alternatives for techniques like the magic loop.

Any-Size Square Container Crochet Pattern crochet pattern - detailed view of completed project

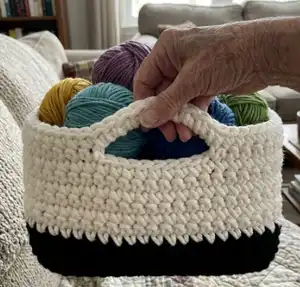
Perfect for thick yarns, cotton cord or non-stretchy fibres, this project is ideal for using leftover yarn. Follow the clear round-by-round instructions to create a sturdy, attractive storage basket.

Why You'll Love This Any-Size Square Container Crochet Pattern

I absolutely love this pattern because it turns simple stitches into a functional, beautiful storage solution that suits any room. I enjoy how versatile it is β€” you can change yarn, hook size, or colors to make something totally new every time. The method of working the base in rounds and then building the sides keeps shaping straightforward and predictable. It is rewarding to see how quickly the container takes shape, and I appreciate that it uses accessible techniques so many crocheters can enjoy it.

Any-Size Square Container Crochet Pattern step 1 - construction progress Any-Size Square Container Crochet Pattern step 2 - assembly progress Any-Size Square Container Crochet Pattern step 3 - details and accessories Any-Size Square Container Crochet Pattern step 4 - final assembly and finishing

Switch Things Up

I love how many ways you can customize this container: change colours for stripes, blocks, or a two-tone base and body contrast.

You can make the container larger or smaller by adding or removing base rounds β€” simply stop increasing when the base reaches the width you want.

To make a chunkier, sturdier version use bulkier cord or double up your yarn and work with a larger hook for an ultra-rigid finish.

Want a softer basket? Use a lighter worsted yarn and a slightly larger hook for a more pliable, squidgy container perfect for blankets or toys.

Try adding a fabric lining by sewing a simple square base and sides to fit inside, then glue or stitch it in place for a polished interior.

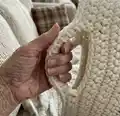
Change the handle shape by making multiple small hand holes, or create a single large opening across one side for easy access to contents.

I often decorate the outside with appliques, crocheted flowers, or embroidered labels to make the basket into a gift-ready piece.

Experiment with stitch patterns: replace rounds of sc with textured stitches like the puff or bobble for extra visual interest and structure.

If you want posability, insert a cardboard base cut to size between the lining and the outer fabric to keep the basket square and upright.

I recommend testing fabric stiffener on a small swatch before treating the whole piece so you can control the stiffness and finish.

Common Mistakes & How to Fix Them

βœ— Skipping stitch markers at the corners can lead to uneven sides and misplaced increases; place markers between the two sc (dc) at each corner and move them up each round to keep your sides straight. βœ— Not checking your stitch count on each side will cause handles or corners to become lopsided; count the sts per side before making handles and adjust so each side has equal stitches. βœ— Using a very loose tension will make the container floppy and unable to hold its shape; use a smaller hook or tighter tension and consider a non-stretchy fibre or fabric stiffener to firm the piece. βœ— Forgetting to fasten off or secure ends neatly makes the inside untidy and may cause fraying; if using yarn weave in ends on the inside, and if using thick cord glue ends neatly on the inside so they stay secure.

Any-Size Square Container Crochet Pattern

Make a sturdy, customizable square storage container that you can size to fit any shelf or stash. This pattern walks you through creating a solid base, building straight sides, and optional handles so you can personalize the finished basket. It is perfect for using up thick yarn or cord and makes a practical, stylish storage solution for your home.

Beginner Friendly 2-4 Hours

Materials Needed for Any-Size Square Container Crochet Pattern

β€” Main Fabric

  • 01
    Thick yarn (aran weight or thicker) or non-stretchy fibre such as raffia, cotton or jute for a robust container
  • 02
    Bobbiny 5mm recycled cotton cord in Black (amount as needed)
  • 03
    Bobbiny 5mm recycled cotton cord in Natural (amount as needed)
  • 04
    Leftover bulky yarns or chunky cotton for color banding

β€” Tools Required

  • 01
    Crochet hook 8mm (US L/11) - recommended
  • 02
    The smallest comfortable crochet hook for your chosen yarn to create dense stitches
  • 03
    Stitch markers to mark corners and side starts/ends
  • 04
    Tapestry needle for weaving in ends
  • 05
    Glue for finishing if using thick cord that cannot be sewn
  • 06
    Scissors
  • 07
    Fabric stiffener (optional) for extra rigidity

Progress Tracker

0% Complete

β€” Intro :

Info :

This pattern uses both American and British crochet terms; the American term is given first with the British term afterwards in brackets. The container is worked in rounds from the base up and can be made with or without the handles.

Info :

Gauge: The container in the photo has a gauge of 9 sts x 10 rounds = 10 x 10cm; gauge is not critical, the important thing is that your stitches are dense enough to produce a relatively stiff container.

Colour changes :

Colour changes are optional. If you wish to change colours do so on the ss join at the end of a round.

Alternative to magic loop :

The base begins with a magic loop. If you don't know this technique ch 4, join with a ss into the 1st ch, ch 1, then work round 1 into this loop instead of into a magic loop.

Joining :

At the end of every round join by working a ss into the 1st sc (dc) of the round.

β€” Base :

Round 1 :

[sc (dc), ch 2] 4 times into a magic loop. Join.

Round 2 :

ch 1 and turn, sc (dc) into every sc (dc) and CR into every ch-2 sp. Join.

Round 3 :

Repeat round 2 until the base is the size you want (e.g. total of 9 rounds).

β€” Sides :

Round A :

ch 1 and turn, sc (dc) in every sc (dc) and 2 sc (dc) in every ch-2 sp, placing a st marker between the 2 sc (dc) at each corner. Join. Move the markers up on each round - they mark where each side starts/ends.

Round B :

ch 1 and turn, sc (dc) in every sc (dc). Join.

Round C :

Repeat round B until the container is the height you want before the handles begin (e.g. repeat 9 times, changing colour after the 2nd repeat).

Info :

(If you are not making the handles, continue until the container is the full height you want then fasten off.)

Info :

The last round will be on the outside of the container, so if it's currently on the inside turn the container inside out now.

β€” Handles :

Info :

Count how many sts you have on each side. Each handle should be about half the width of one side, and you need to have the same number of sts to the left and right of it (e.g. the container in the photo has 19 sts on each side. The handle is 9 sts wide, with 5 sts to the left and 5 sts to the right).

Step 1 :

Ch 1 and turn, sc (dc) in every sc (dc) until you reach the first marker.

Handle side :

sc (dc) the number of sts to the right of the handle, ch the number of sts for the handle and skip the same number of sc (dc), then sc (dc) the number of sts to the left of the handle (e.g. 5 sc (dc), ch 9, skip 9 sc (dc), 5 sc (dc)).

Step 2 :

Sc (dc) in each sc (dc) along the next side.

Step 3 :

Repeat the handle side.

Step 4 :

Sc (dc) in every sc (dc) until the end of the round. Join.

Step 5 :

Ch 1 and turn, sc (dc) in every sc (dc) and, in the space created by each handle, sc (dc) the same number of sts as there are ch in the handle (e.g. 9 sc (dc)). Join then fasten off.

β€” Finishing :

Finishing :

If you have used yarn sew in the ends on the inside, or if you have used a thick cord which can't be sewn glue the ends neatly on the inside.

Finishing 2 :

If your fabric isn't as stiff as you had hoped, try painting the inside and/or the outside with fabric stiffener.

Assembly Instructions

  • If you made handles, count stitches carefully and place them symmetrically so each handle has the same number of stitches on either side before ch-ing the handle opening.
  • Securely join rounds with a slip stitch into the first sc (dc) of the round and fasten off neatly to avoid gaps in the join.
  • Weave in yarn ends on the inside using a tapestry needle; if using thick cord that cannot be sewn, glue ends neatly on the inside so they are hidden and secure.
  • If needed apply fabric stiffener to the inside and/or outside to give the container extra rigidity and help it hold shape.

Important Notes

  • πŸ’‘Use stitch markers at each corner and move them up every round so you always know where each side starts and ends.
  • πŸ’‘If you are changing colours do so on the slip stitch join at the end of a round for the neatest transition.
  • πŸ’‘Check stitch counts before creating handles so each side has the same number of stitches and handles are centered.
  • πŸ’‘Turn the container inside out if necessary so the final round sits on the outside as intended.

This versatile Any-Size Square Container is perfect for storing yarn, toys, or everyday bits and bobs. Customize colors and height to match your decor and use thick yarn or cord for a sturdy finish. Have fun making it your own and enjoy a prettier, tidier home! 🧢🏠

You ask,

we answer.

FAQs

What size will the finished piece be?

The finished size depends on your base rounds and side repeats; the cover photo container is 24cm wide and 15cm tall when using the recommended cord and gauge.

Can I use different yarn weights for this pattern?

Yes, you can use different yarn weights, but this will change the final size and stiffness; a thicker yarn or cord will give a sturdier basket while lighter yarn will produce a softer fabric.

Do I need prior crochet experience for this pattern?

No advanced skills are required, but basic knowledge of single crochet and double crochet (or the British equivalents) and working in rounds is helpful β€” this pattern is beginner friendly.

How long does this project typically take to complete?

Most crocheters complete a medium sized container in 2-4 hours, though time will vary depending on size, yarn weight, and experience.