Make a cosy, personalised baby blanket with textured post stitches and bobbles. This pattern walks you through Diamond Waffle, Cable, Chevron and Plump Post sections plus letter charts for custom names. Youll enjoy mixing colours and mastering front post techniques to create a beautiful heirloom blanket.
Progress Tracker
0% Complete
— Pattern :
Foundation Row :
Using 4.5mm hook and yarn A, ch 108
— Diamond Waffle Section :
Row 1 :
sc in 2nd ch from hook and every st across (107 st's here and throughout). Note, in subsequent repeats of this row: ch 1, turn, sc in every st across.
Row 2 :
ch 2 (counts as dc), turn, dc next st and every st across
Row 3 :
ch 1, turn, fptr around the 4th sc from last sc row (be careful to not count the starting ch 1 as a sc here), sc in the next 4 st's (make sure to sk the st that the fptr would have gone into!), fptr2tog using the same 4th sc from last sc row that you just went into, sk the next 4 st's from last sc row and place the second half of the fptr2tog around the 5th st, sc in the next 4 st's (remember NOT to work into the st that would have been the fptr st), *fptr2tog using the same st from last sc row that you just went into, sk the next 4 st's from last sc row and place the second half of the fptr2tog in the 5th st, sc in next 4 st's; repeat from * to last 2 st's, fptr using same st from last sc row, sc in top of ch 2 from starting ch of previous row. Don't worry, this is the most difficult row of the entire pattern!
Row 4 :
ch 2 (counts as dc), turn, dc next st and every st across
Row 5 :
ch 1, turn, sc in first 3 st's (this gets your hook directly above the bottom "peak" of the diamond/triangle), fptr2tog using the first fptr post of row before last for the first half of this fptr2tog and the 2nd AND 3rd post for the second half of this fptr2tog, sc in next 4 st's (remember NOT to work into the st that would have been the fptr st), *fptr2tog around both posts from prior peak on row before last for first half of fptr2tog and around both posts of next peak on row before last for second half of fptr2tog, 4 sc's; rep from * to last 4 st's, fptr2tog around both posts from prior peak on row before last for first half of fptr2tog and around the last post of row before last for second half of fptr2tog, 3 sc's with the last sc in the top of starting ch 2.
Row 6 :
ch 2 (counts as dc), turn, dc next st and every st across
Row 7 :
ch 1, turn, fptr around both posts of the first 'peak' from the row before last, sc in the next 4 st's (make sure to sk the st that the fptr would have gone into, which in this instance would have been the first st of the row), *fptr2tog around both posts from prior peak on row before last (again) for first half of fptr2tog and around both posts of next peak on row before last for second half of fptr2tog, 4 sc's; rep from * to last 2 st's, fptr around both posts of last peak from row before last, sc in top of ch 2 from starting ch of previous row.
Row 8 :
ch 2 (counts as dc), turn, dc in next st and every st across.
Row 10 :
ch 1, turn, sc in first st and every st across.
— Filet Border Section :
Row 11 :
change to yarn B, ch 1, turn, sc in first st and every st across.
Row 12 :
ch 3 (counts as dc and ch 1), turn, sk 1, dc, *ch 1, sk 1, dc; rep from * to end
Row 13 :
ch 1, turn, sc in first st, *sc in 1 ch sp, sc; rep from * to end.
— Cable Section :
Row 14 :
Change to yarn C, ch 2 (counts as dc), turn, dc in next st and every st across
Row 15 :
ch 2 (counts as dc), turn, make 1 dc in each of the next 2 st's, *pftr around next corresponding dc from last dc row, sk 1, 2 fptr's around following 2 dc's from last dc row, fptr back around skipped dc from last dc row, fptr around next dc from last dc row, 3 dc's (you will have skipped working in to the top of 5 st's between these 3 dc's and the last 3 dc's); rep from * to end.
Row 16 :
ch 1, turn, sc in first st and every st across
Row 17 :
ch 2 (counts as dc), turn, make 1 dc in each of the next 2 st's, *fptr around corresponding fptr from last fptr row, sk 1 fptr from last fptr row, 2 fptr's around following 2 fptr's from last fptr row, fptr back around skipped fptr from last fptr row, fptr around next fptr from last fptr row, 3 dc's (you will have skipped 5 sc's from last row between these 3 dc's and the last 3 dc's); rep from * to end.
Row 21-23 :
change to yarn B, rep filet border section (rows 11-13)
— Chevron Section :
Row 24 :
Change to yarn A, ch 1, turn, sc in first st and every st across
Row 25 :
ch 2 (counts as dc), turn, 4 dc's, *ch 1, sk 1, 5 dc's; rep from * to end (this creates multiple 5 st sections)
Row 26 :
ch 1, turn, sc in 1st st and next 4 st's, *ch 1, sk 1, 5 sc's; rep from * to end.
Row 27 :
ch 1, turn, yarn over twice, fptc around 3rd dc from last dc row, 3 dc's into 2nd, 3rd and 4th sc of previous row (under the fptc just made), fptc again around 3rd dc from last dc row BUT don't complete the st, just yarn over and pull through 2 loops twice, leaving 2 loops still on the hook, dc in the 5th sc with the 2nd yarn over and pull through going through all 3 loops on hook (this is a fptcdctog), ch 1, sk 1, yarn over and insert hook into 1st sc of 5 st section from previous row, yarn over and pull up a loop, yarn over and pull through 2 loops leaving 2 loops on hook, yarn over twice, fptc around 3rd dc from last dc 5 st section with the 3rd yarn over and pull through going through all 3 loops on hook (this is a dcfptctog), 3 dc's into 2nd, 3rd and 4th sc of previous row (under the dcfptctog just made), fptcdctog around 3rd dc with the dc in the 5th, *ch 1, sk 1, dcfptctog, 3 dc's into 2nd, 3rd and 4th sc, fptcdctog; rep from * to end.
Row 32 :
ch 1, turn, sc in 1st and next 4 st's, sc in 1 ch sp, 5 sc's, *sc in 1 ch sp, 5 sc's; rep from * to end.
Row 33-35 :
Change to yarn B, rep filet border section (rows 11-13)
— Plump Posts Section :
Row 36 :
Change to yarn D, ch 1, turn, sc in first st and every st across
Row 37 :
ch 2 (counts as dc), turn, dc in next st and every st across.
Row 38 :
ch 1, turn, sc in first st and every st across
Row 39 :
ch 2 (counts as dc), turn, dc in next 2 st's, *dfpdc (double front post double crochet) around the corresponding dc from the last dc row, 3 dc's; rep from * to end.
Row 40 :
ch 1, turn, sc in first st and every st across
Row 41 :
ch 2 (counts as dc), turn, *dfpdc around the corresponding dc from the last dc row, 3 dc's; rep from * to last 2 st's, dfpdc around the corresponding dc from the last dc row, dc in last st.
Row 42 :
ch 1, turn sc in first st and every st across
Row 44 :
ch 1, turn, sc in first st and every st across
Row 45-47 :
Change to yarn B, rep filet border section (rows 11-13)
— Diamond Waffle Section :
Row 48 :
Change to yarn A, ch 1, turn, sc in first st and every st across
Row 49-53 :
rep rows 1-5 of diamond waffle section
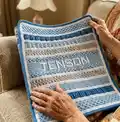
— Personalisation Section :
Row 54-57 :
continuing with yarn A, ch 1, turn, sc in first st and every st across
Row 58-70 :
using 4mm hook, yarn A and B, make personalisation rows (see next page)
Row 71-74 :
ch 1, turn, sc in first st and every st across
Info :
Tip, using a size smaller hook on these rows helps keep the edges straight to achieve a professional and neat finish. Bobbles are worked in yarn B on the wrong side and separated by 1 sc (in yarn A) in between bobbles and a row of sc (in yarn A) on the right side after each wrong side bobble row. Carry yarn B through bobble stitch and carry yarn A through sc's as needed. Majority of letters are 5 bobbles across (9 st's including sc spaces) and 7 bobbles high (13 st's including sc rows on rights side). There are 3 sc's in between each letter. Calculation example: 107 (total st's) - 69 (st's for required name) = 38 st's remaining; 38/2 = 19 st's before name personalisation section & 19 st's after.
— Diamond Waffle Section :
Row 75-79 :
cont. with yarn A, rep rows 1-5 of diamond waffle section
Row 80 :
ch 1, turn, sc in first st and every st across
Row 81-83 :
Change to yarn B, rep filet border section (rows 11-13)
Row 84-92 :
Change to yarn D, rep rows 36-44 of plump posts section
Row 93-95 :
Change to yarn B, rep filet border section (rows 11-13)
Row 96-104 :
Change to yarn A, rep rows 24-32 of chevron section
Row 105-107 :
Change to yarn B, rep filet border section (rows 11-13)
Row 108-114 :
Change to yarn C, rep rows 14-20 of cable section
Row 115-117 :
Change to yarn B, rep filet border section (rows 11-13)
Row 118 :
Change to yarn A, ch 1, turn, sc in first st and every st across
Row 119-128 :
rep rows 1-10 of diamond waffle section. Fasten off.
— Border :
Info :
Tip, using a size smaller crochet hook for the edging helps achieve a neat, flat border without ruffling. This border firstly creates a filet border sections all around and then rounds 4, 5 & 6 create a simple rib border which makes the blanket lay flat and square.
Round 1 :
With the right side of blanket facing you, using a 4mm hook, join yarn B anywhere along the edge, ch 1, pick up and sc all around the edge of the blanket. Ensure you pick up the right amount of st's along each side so your blanket lays flat. Too many st's will create ruffling and too few will create pulling. As a guide, you should have roughly 125 st's along each left and right side with the below stitch count guide per section. Make 1 sc, ch 2, 1 sc in each corner and sl st to first sc to join. Tip, crochet over the tail ends on this row to avoid sewing them all in at the end.
Round 2 :
ch 3 (counts as dc + 1 ch), sk 1, *dc, ch 1, sk 1; rep from * all around the edge. In each corner 2 ch sp make 1 dc, ch 2, 1 dc. Sl st to ch 2 of starting ch 3 to join.
Round 3 :
ch 1, sc in same st and every st and 1 ch sp around. In each corner 2 ch sp make 1 sc, 2 ch's, 1 sc. Sl st to first st to join.
Round 4 :
change to yarn C, join yarn anywhere around the edge, ch 2 (counts as dc), dc in every st around. In each corner 2 ch sp make 1 dc, 2 ch's, 1 dc. Sl st to first dc (not the starting ch 2) to join.
Round 5 :
ch 2, *fpdc, bpdc; repeat from * all round. In each corner 2 ch sp, make 1 dc, 2 ch's, 1 dc. Always begin with a fpdc after each corner, and it doesn't matter if you end with a front or back post before the 2 ch sp. Sl st to first fpdc (not the starting ch 2) to join.
Round 6 :
ch 2, *fpdc around each fpdc from previous round, bpdc around each bpdc from previous round; repeat from * all round. In each corner 2 ch sp make 1 dc, 2 ch's, 1 dc. Sl st to first fpdc (not the starting ch 2) to join. Fasten off.
Info :
Sew in all loose ends.
This personalised post and bobble blanket pattern brings texture, colour and a heartfelt name panel together in one heirloom project. The mix of diamond waffle, chevrons, cables and plump posts makes a tactile, beautiful blanket you can treasure. Personalise with any name using the included charts and enjoy creating a truly special gift. 🧶✨