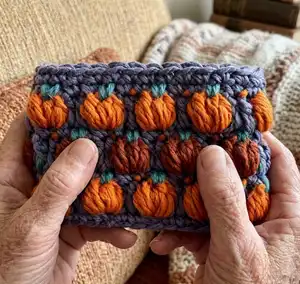
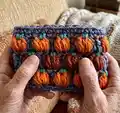
Create a festive Pumpkin Cup Cozy to brighten your warm drinks this season. This pattern uses a fun pumpkin puff stitch and contrasting stems for a playful, textured look that fits 12–16oz cups. Youll get clear written instructions plus an explained version and photo guides to master the pumpkin and stem techniques. Perfect for gifting or a cozy seasonal make.
Progress Tracker
0% Complete
— Notes :
Info :
1. Written in US terms with a UK conversion chart. 2. Tension and patience is key. If you crochet tight go up a hook size or increase pumpkin amount. This project has minimal positive ease (stretch) due to the tension from the pumpkins. 3. Photo guides for the Pumpkin and Stem portion are found below the written portion.
— Materials :
Infos :
4 x Worsted Weight - Blue Sky Fibers Organic Cotton. Colour A - Black - INK (BASE) 10.25yds/9.35m (7g). Colour B - Orange - PUMPKIN (PUMPKIN) 10.5yds/9.6m (7g). Colour C - Green - JASPER (STEM) 3.4yds/3.1m (2g). Colour D - Orange - SPICEBERRY (PUMPKIN) 5.3yds/4.8m (7g). 5mm Hook.
— Video Links :
Info :
Pumpkin/Stem Stitch Link: Covers how to do the pumpkin and stem colour changes.
— Abbreviation Chart :
Infos :
US / UK abbreviations and special stitch notes: YO: Yarn over hook (YOH: Yarn over hook). CH-#: Chain said # of stitches. SL ST: Slip Stitch (SS: Slip Stitch). SC: Single Crochet (DC in UK). DC: Double Crochet (TR in UK). PUFF: *YO, insert in ST, YO, pull up a loop. Rep 2 more times from *. YO, pull through 6 loops. Leaving the 7th loop on the hook. ST(S): Stitch(es).
Info :
Special Stitch: PUMPKIN STITCH: 3 PUFF STS in the same space. Keep the last loop from each puff on the hook for a total of 4 loops on hook. Using the ST closest to your hook pull through all STS to close off the pumpkin.
Info :
STEM: Insert hook into the middle of pumpkin, under 6 loops (3 STS). Pull up Colour C, YO and pull through with Colour A. Carry through Colour C.
— Written (US): Simplified :
Info :
Increase/Decrease by 3 STS to change the length by 1". The colour in brackets is stated before the ST.
Info :
Start with Colour A. Loosely CH-24
ROW 1 :
SL ST into the first chain. SC around. SL ST into first SC. (24)
ROW 2 :
Pumpkin Stitch (Page 7) CH-3. (Counts as ST) 1 DC. (Colour B) *PUMPKIN, (Colour A) 2 DC, REP from * 7 more times finishing with PUMPKIN in the last ST. (Colour A) SL ST into top of CH-3. (24 ST/8 Pumpkins)
Info :
Warping is normal at this point
ROW 3 :
Push your pumpkins to face outwards. 1 SC, (Colour C) *STEM, (Colour A) 2 SC, REP from * 7 more times. (Colour C) STEM, (Colour A) 1 SC. (24)
ROW 4 :
CH-2, (Colour D) *PUMPKIN, (Colour A) 2 DC, REP from * 7 more times ending with 1 DC. SL ST into top of CH-2. Push pumpkins to face outwards. (24)
ROW 5 :
(Colour C) *STEM, (Colour A) 2 SC, REP from * 7 more times ending with 2 SC. SL ST into first ST. (24)
ROW 6 :
CH-3. (Counts as ST) 1 DC. (Colour B) *PUMPKIN, (Colour A) 2 DC, REP from * 7 more times finishing with the PUMPKIN in the last ST. (Colour A) SL ST into top of CH-3. (24 ST/8 Pumpkins)
ROW 7 :
1 SC, (Colour C) *STEM, (Colour A) 2 SC, REP from * 7 more times. (Colour C) STEM, (Colour A) 1 SC. SL ST into first SC. (24)
ROW 8 :
SC around, SL ST into first SC. (24)
Infos :
Pop pumpkins out again as they’re probably inverted at this point! Sew in loose ends. This fits the average 12 - 16oz cups! If your SC is too tight in the beginner try loosely chaining, increase hook size or increase the total ST count if you find the overall has no stretch. You can even try a foundation SC if the foundation is still too tight.
— Written (US): Explained - Part 1 :
Info :
Increase/Decrease by 3 STS to change the length by 1".
Info :
Start with Colour A. Loosely CH-24
ROW 1 :
SL ST into the first chain. SC around. SL ST into first SC. (24)
ROW 2 :
CH-3. (Counts as ST) 1 DC. Pumpkin Stitch (Page 7) YO with Colour B. Carry Colour A through. *3 PUFF STS in next ST. Keep the last loop from each PUFF ST and the DC before on your hook (4 Loops total). Using the ST closest to your hook pull through all 4 loops to close off the pumpkin. YO with Colour A. Carry Colour B through. 2 DC, REP from * 7 more times finishing with a PUMPKIN in the last ST. SL ST into top of CH-3 with Colour A. (24 ST/8 Pumpkins)
Info :
Warping is normal at this point
ROW 3 :
Push your pumpkins to face outwards. 1 SC, Stem (Page 8) *Insert hook into the middle of pumpkin, under 6 loops. Pull up Colour C, YO and pull through with Colour A. Carry through Colour C. SC in next 2 STS. Rep from * 7 times. 1 more STEM, 1 SC. (24)
ROW 4 :
CH-2, Pumpkin Stitch (Page 7) YO with Colour D. Carry Colour A through. *3 PUFF STS in next ST. Keep the last loop from each PUFF ST and the DC before on your hook (4 Loops total). Using the ST closest to your hook pull through all 4 loops to close off the pumpkin. YO with Colour A, 2 DC, REP from * 7 more times ending with 1 DC. SL ST into top of CH-2. Push pumpkins to face outwards. (24 ST/8 Pumpkins)
ROW 5 :
(Colour C) *STEM, (Colour A) 2 SC, REP from * 7 more times ending with 2 SC. SL ST into first ST. (24)
— Written (US): Explained - Part 2 :
ROW 6 :
CH-3, 1 DC, Pumpkin Stitch (Page 7) YO with Colour B. Carry Colour A through. *3 PUFF STS in next ST. Keep the last loop from each PUFF ST and the DC before on your hook (4 Loops total). Using the ST closest to your hook pull through all 4 loops to close off the pumpkin. YO with Colour A. Carry Colour B through. 2 DC, REP from * 7 more times. Finish with 1 PUMPKIN. (Colour A) SL ST into CH-3. (24 ST/8 Pumpkins)
ROW 7 :
1 SC, Stem (Page 8) *Insert hook into the middle of pumpkin, under 6 loops. Pull up Colour C, YO and pull through with Colour A. Carry through Colour C. SC in next 2 STS. REP from * 7 more times. 1 more STEM, finish with 1 SC. SL ST into first SC. (24)
ROW 8 :
SC around, SL ST into first SC. (24)
— Pumpkin Stitch Photo Guide :
Info :
NOTE: These photos are from another make which is why the pumpkins are stacked on top of each other. Video Link. With Colour A already on your hook, YO with Colour B. Start PUFF ST in next ST.
Info :
PUFF: *YO, insert in ST, YO, pull up a loop. Rep 2 more times from *. YO, pull through 6 loops. Leaving the 7th loop on the hook.
Info :
Repeat PUFF ST 2 more times in the same space. (3 PUFF STS/4 Loops on hook.)
Info :
Using the ST closest to your hook pull through all 4 loops to close off the pumpkin.
Info :
YO with Colour A. DC in the next 2 stitches. Repeat from the top to continue building your line of pumpkins till the last mentioned STS in the pattern.
— Stem Photo Guide :
Info :
NOTE: These photos are from another make which is why the pumpkins are stacked on top of each other. Video Link. With Colour A already on your hook insert hook into middle of pumpkin, under 3 stitches (6 loops). YO with Colour C. Pull up a loop with Colour C.
Info :
YO with Colour A and pull through. SC in next 2 STS with Colour A. Repeat from top till last number of STS mentioned in pattern.
This Pumpkin Cup Cozy brings a playful autumn touch to your daily cup and fits most 12–16oz tumblers. The pumpkin puff and tiny stem details add a burst of texture and seasonal charm to each cozy. Make a set in multiple colors to gift friends and family this fall. 🎃🧶