🧢 Beautiful ✨ Detailed πŸ’ Adorable

Ollie the Lion Amigurumi Pattern

Ollie the Lion Amigurumi Pattern
4.0β˜… Rating
5-7 Hours Time Needed
3.1K Made This
βœ‚οΈ

Intermediate Level

Ideal for those with basic crochet experience, featuring slightly more advanced stitches and techniques to expand your skills.

⏱️

Weekend Treat

Takes 5-7 hours, making it an enjoyable project to finish over a couple of days.

🧸

Cute Companion

An adorable friend to cherish, handcrafted with love to bring comfort and joy for years to come.

About This Ollie the Lion Amigurumi Pattern

This pattern creates Ollie the Lion, a sweet amigurumi toy with a ruffled mane and detailed tail ruffles. You will crochet separate piecesβ€”head, body, arms, legs, ears, mane and tailβ€”and assemble them with step-by-step guidance. The design uses simple amigurumi techniques plus a small ruffle/ruffles section to add personality.

Ollie the Lion Amigurumi Pattern crochet pattern - detailed view of completed project

Includes full materials list, abbreviations, clear round-by-round instructions and assembly notes. Photos are provided to guide placement and finishing.

Why You'll Love This Ollie the Lion Amigurumi Pattern

I absolutely love this pattern because it combines classic amigurumi shaping with a playful ruffled mane that gives Ollie so much personality. I enjoyed designing the ruffles and tail details β€” they add texture without being difficult to make. I love how compact and gift-ready Ollie is, measuring approximately 16 cm tall when made with the recommended materials. I hope making Ollie brings you the same joy I had designing it and inspires you to try small textural techniques in other projects.

Ollie the Lion Amigurumi Pattern step 1 - construction progress Ollie the Lion Amigurumi Pattern step 2 - assembly progress Ollie the Lion Amigurumi Pattern step 3 - details and accessories Ollie the Lion Amigurumi Pattern step 4 - final assembly and finishing

Switch Things Up

I love how easy it is to change the mood of Ollie by switching yarn colors for the mane; try pastel tones for a soft, nursery-friendly lion.

I often change yarn weight and hook size to make different sizes β€” bulky yarn with a larger hook gives a chunky, cuddle-ready version.

I like to embroider different facial expressions by changing nose shape and mouth placement to give Ollie a sleepy or surprised look.

You can swap the safety eyes for embroidered eyes for a fully baby-safe toy suitable for young children.

Try making the mane less ruffled by reducing dc clusters if you prefer a sleeker look rather than the full frill.

I sometimes add tiny crocheted accessories like a scarf or tiny hat to personalize Ollie for gifts and seasonal themes.

For a poseable version, I add thin wire into the arms before closing and sewing, which helps create more characterful poses.

If you want a suitcase-friendly mini, make a tiny keyring version by using finer yarn and a 1.5–1.75 mm hook and skipping large mane rounds.

I recommend experimenting with textured yarn for the mane to get a fluffy effect; keep the body in smooth cotton for a nice contrast.

Don't be afraid to mix fibers: a wool-blend mane with cotton body creates a warm, tactile finish and different drape in the ruffles.

Common Mistakes & How to Fix Them

βœ— Forgetting to stuff pieces as you go will create lumps and make shaping difficult; stuff gradually and evenly while following the rounds. βœ— Skipping stitch markers during round work can lead to misplaced increases and decreases; use a marker at the start of each round to keep count. βœ— Not inserting safety eyes at the recommended rounds will make placement inaccurate; insert the eyes between Round 16 and 17 of the head as directed for correct spacing. βœ— Pulling yarn too tightly on the mane or ruffle rows can distort the head shape; maintain a relaxed, consistent tension while making ruffles and sew them gently. βœ— Closing feet and legs without flattening properly can leave a gap; flatten the piece and crochet through both layers to securely close the opening.

Ollie the Lion Amigurumi Pattern

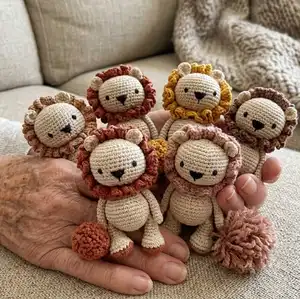
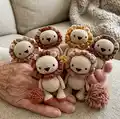
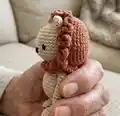
Make your own charming Ollie the Lion with this detailed crochet amigurumi pattern. You will follow clear round-by-round instructions, helpful photos, and assembly tips to create a 16 cm tall handmade lion. Perfect for gifting or keeping as a cute decorative companion. Enjoy the ruffled mane and soft shapes as you crochet this delightful toy.

Intermediate 5-7 Hours

Materials Needed for Ollie the Lion Amigurumi Pattern

β€” Main Fabric

  • 01
    100% combed and mercerised cotton Schachenmayr Catania Originals (50 g, 125 m) - Color Code 0404 (main body)
  • 02
    100% combed and mercerised cotton Schachenmayr Catania Originals (50 g, 125 m) - Color Code 0437 (mane and accent)
  • 03
    Small amounts of contrast yarn for paw/foot tips if desired

β€” Tools Required

  • 01
    Crochet hook size 2.20 mm (or a hook that fits your yarn)
  • 02
    Safety eyes 6 mm (1 pair)
  • 03
    Polyester fiberfill stuffing
  • 04
    Scissors
  • 05
    Stitch marker
  • 06
    Tapestry needle for sewing
  • 07
    Embroidery thread for nose

Progress Tracker

0% Complete

β€” NOTES :

Info :

Do not forget to stuff the pieces as you move forward. Use stitch markers or a piece of yarn to follow the rounds neatly.

Info :

*Ollie the Lion will be 16 cm tall from ears to toe if using similar materials. The measurement would change if you choose different weight yarns or hook size.

β€” ARMS :

Round 1 :

5sc in a mr (5)

Round 2 :

2sc in all sts around (10)

Round 3-19 :

(17rnds) Sc in all sts around (10)

Round 20 :

Flatten the piece and close the opening by making sc stitches through both layers of remaining sts (5)

Info :

** Crochet the second arm in the same way. ** DO NOT stuff the arms.

β€” FEET AND LEGS :

Info :

** Start with color code 0437

Round 1 :

5sc in a mr (5)

Round 2 :

2sc in all sts around (10)

Round 3 :

(1sc,1inc)- 5 times (15)

Round 4 :

(2sc,1inc)- 5 times (20)

Round 5 :

(3sc,1inc)- 5 tekrar (25)

Round 6 :

(4sc,1inc)- 5 times (30)

Round 7 :

WORK BLO: Sc in all sts around (30)

Info :

** Change to Color Code 0404

Round 8-10 :

(3 rnds) Sc in all sts around (30)

Round 11 :

9sc, 6dec, 9sc (24)

Round 12 :

9sc, 3dec, 9sc (21)

Round 13 :

8sc, 2dec, 7sc, 1dec (18)

Round 14-19 :

(6 rnds) Sc in all sts around (18)

Round 20 :

Flatten the piece and close the opening by making sc stitches through both layers of remaining sts (9)

Info :

** Crochet the second piece in the same way. ** Sew the legs between Round 9 and 10 on the body. Please look through the pictures below ☺

β€” BODY :

Round 1 :

6sc in a mr (6)

Round 2 :

2sc in all sts around (12)

Round 3 :

(1sc,1inc)- 6 times (18)

Round 4 :

(2sc,1inc)- 6 times (24)

Round 5 :

(3sc,1inc)- 6 times (30)

Round 6 :

(4sc,1inc)- 6 times (36)

Round 7 :

(5sc,1inc)- 6 times (42)

Round 8 :

(6sc,1inc)- 6 times (48)

Round 9 :

(7sc,1inc)- 6 times (54)

Round 10-18 :

(9 rnds) Sc in all sts around (54)

Round 19 :

11sc, (1dec,4sc x 5 times), 1dec, 11sc (48)

Round 20 :

Sc in all sts around (48)

Round 21 :

11sc, (1dec,3sc x 5 times), 1dec, 10sc (42)

Round 22 :

Sc in all sts around (42)

Round 23 :

11sc, (1dec,2sc x 5 times), 1dec, 9sc (36)

Round 24 :

Sc in all sts around (36)

Round 25 :

11sc, (1dec,1sc x 5 times), 1dec, 8sc (30)

Round 26 :

Sc in all sts around (30)

Round 27 :

(3sc,1dec)- 6 times (24)

Round 28-29 :

(2 rnds) Sc in all sts around (24)

Info :

** Break the yarn leaving a long tail for sewing.

β€” HEAD :

Round 1 :

7sc in a mr (7)

Round 2 :

2sc in all sts around (14)

Round 3 :

(1sc,1inc)- 7 times (21)

Round 4 :

(2sc,1inc)- 7 times (28)

Round 5 :

(3sc,1inc)- 7 times (35)

Round 6 :

(4sc,1inc)- 7times (42)

Round 7 :

(5sc,1inc)- 7 times (49)

Round 8 :

(6sc,1inc)- 7 times (56)

Round 9 :

(7sc,1inc)- 7 times (63)

Round 10-22 :

(13 rnds) Sc in all sts around (63)

Round 23 :

(7sc,1dec)- 7 times (56)

Round 24 :

(6sc,1dec)- 7 times (49)

Round 25 :

(5sc,1dec)- 7 times (43)

Round 26 :

(4sc,1dec)- 7 times (35)

Round 27 :

(3sc,1dec)- 7 times (28)

Round 28 :

(5sc,1dec)- 4 times (24)

Info :

** Break the yarn short and fasten off. We will not use this end to sew.

Info :

NOTE: Insert the safety eyes between Round 16 and 17 with a distance of 13 sts (visible 10 sts) ☺

β€” EARS :

Round 1 :

6sc in a mr (6)

Round 2 :

2sc in all sts around (12)

Round 3 :

(1sc,1inc)- 6 times (18)

Round 4-5 :

(2 rnds) Sc in all sts around (18)

Round 6 :

(1sc,1dec)- 6 times (12)

Round 7 :

6dec (6)

Info :

** DO NOT stuff the ears. ** Sew the ears between rounds 6 and 8. Please look through the pictures below.

β€” MANE :

Round 1 :

Ch64 and and join with a sl st into the first ch st to form a ring.

Round 2 :

Ch2; 3dc in each st around and sl st into the first st of the round.

Round 3 :

Ch2; 1hdc in each st around and sl st into the first st of the round.

Round 4 :

Ch3 and 1sc into the same st that we made sl st, (3sc, ch3 and 1sc into the same st) repeat until the end of the round.

Info :

** Break the yarn leaving a long tail for sewing.

β€” TAIL :

Round 1 :

6sc in a mr (6)

Round 2 :

Work BLO; sc in all sts around (12)

Round 3 :

Work BLO; (1sc,1inc)- 6 times (18)

Round 4-5 :

(2 rnds) Work BLO; Sc in all sts around (18)

Round 6 :

Work BLO; (1sc,1dec)- 6 times (12)

Round 7 :

Work BLO; (1dec)- 6 times (6)

Round 8-27 :

(20 rnds) Sc in all sts around (6)

Info :

**Break the yarn leaving a long tail for sewing.

β€” RUFFLES OF THE TAIL :

Info :

** Using the yarn with color code 0437; starting from the second round of the tail and using the remaining loops of sts (we will work into the BLO sts between Rounds 2 and 7 of the tail): work 2hdc in each st between Round 2 and 7 (including Round 7) After completing hdc sts, ch2 and turn, this time we will work 3dc sts into each hdc st from the previous rounds.

Info :

** Sew the tail between Round 11 and 12 on the body.

Assembly Instructions

  • Insert safety eyes between Round 16 and 17 on the head, spacing them 13 stitches apart (visible 10 sts), then embroider the nose and mouth as shown in the photos.
  • Sew the ears between rounds 6 and 8 on the head, positioning them symmetrically and using the long tails to secure them neatly.
  • Sew the legs between Round 9 and 10 on the body, aligning them evenly so the doll can sit or stand correctly.
  • Sew the tail between Round 11 and 12 on the body and attach the ruffles to the tail using the instructions from the ruffles section before final sewing.
  • Use the long tail left on the mane to sew the mane around the head opening, arranging ruffles evenly and securing all ends inside the head.

Important Notes

  • πŸ’‘Use stitch markers to keep track of your rounds, especially during increases and decreases for accurate shaping.
  • πŸ’‘Stuff the pieces gradually as you crochet to maintain smooth, even shaping without lumps.
  • πŸ’‘Do not stuff the arms or ears; leave them flat and close the openings as instructed to keep proportions correct.
  • πŸ’‘Break the yarn leaving a long tail for sewing on parts that will be attached (body, mane, tail) to make assembly easier.

Thank you for choosing this Ollie the Lion pattern β€” I hope he brings you lots of joy and cuddles. Make one for yourself or as a thoughtful gift for someone special; each Ollie is unique when handmade. Happy crocheting and share your photos if you like β€” I love to see finished makes! 🧢🧡

You ask,

we answer.

FAQs

What size will the finished piece be?

The finished amigurumi measures approximately 16 cm tall from ears to toe when using the recommended yarn and 2.20 mm hook.

Can I use different yarn weights for this pattern?

Yes, you can use different yarn weights, but the final size will change. Use an appropriate hook for your chosen yarn and expect changes in detail and mane texture.

Do I need prior crochet experience for this pattern?

This pattern is rated intermediate, so basic amigurumi skills (magic ring, single crochet, increases and decreases) plus experience with working in rounds are recommended.

How long does this project typically take to complete?

Most crocheters complete this project in 5-7 hours, though it may take longer if you add extra detailing or make multiple color changes.