🧢 Beautiful ✨ Detailed πŸ’ Adorable

Pride Rainbow Gnome Amigurumi Pattern

Pride Rainbow Gnome Amigurumi Pattern
4.1β˜… Rating
8-10 Hours Time Needed
1.6K Made This
βœ‚οΈ

Intermediate Level

Ideal for those with basic crochet experience, featuring slightly more advanced stitches and techniques to expand your skills.

⏱️

All-Day Adventure

Requires 8-10 hours, ideal for a full day of immersive crocheting.

🧸

Cute Companion

An adorable friend to cherish, handcrafted with love to bring comfort and joy for years to come.

About This Pride Rainbow Gnome Amigurumi Pattern

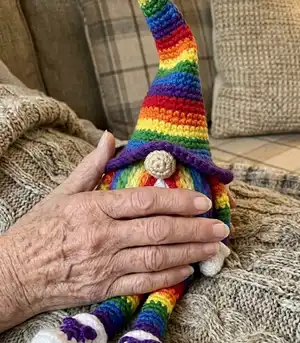
This pattern makes a tall Pride Rainbow Gnome featuring a striped rainbow hat, colorful limbs, and a full yarn beard. Youll use a worsted weight yarn with frequent color changes to create the vibrant stripes and texture. The pattern provides complete round-by-round instructions for each part so you can follow along easily.

Pride Rainbow Gnome Amigurumi Pattern crochet pattern - detailed view of completed project

Includes hat, body, nose, two arms, two legs, cuffs and full assembly instructions. Photos and small technique notes are referenced throughout to help with tricky steps.

Why You'll Love This Pride Rainbow Gnome Amigurumi Pattern

I absolutely love this pattern because the rainbow stripes are so joyful and satisfying to crochet; color changes keep the work exciting as you go. The tall hat and long beard give the gnome so much personality and make the finished piece a wonderful display item. I enjoy how the pattern balances simple shaping with small finishing touches like the cuff and shoelaces. It is a great way to practice consistent tension and small sewing skills while ending up with a handmade keepsake.

Pride Rainbow Gnome Amigurumi Pattern step 1 - construction progress Pride Rainbow Gnome Amigurumi Pattern step 2 - assembly progress Pride Rainbow Gnome Amigurumi Pattern step 3 - details and accessories Pride Rainbow Gnome Amigurumi Pattern step 4 - final assembly and finishing

Switch Things Up

I love how many ways you can customize this gnome; swap the rainbow order or use a self-striping yarn for a quicker striped effect.

You can change yarn weight and hook size to make a smaller keychain version or a giant cozy gnome; just be aware the stitch counts and shaping will change.

I often experiment with different beard styles β€” try a shorter beard, ombre yarn, or even faux fur for a different look.

For a softer, less structured hat try using a slightly larger hook or a lighter gauge yarn to give the hat a droopier shape.

Want a modern twist? Use neutral tones with a single rainbow accent stripe on the hat for a subtler design.

I like adding tiny accessories like mini buttons, a heart patch, or a tiny crocheted flag to personalize gifts.

To make posable limbs, consider adding thin craft wire inside the arms and legs before stuffing for adjustable poses.

You can turn this pattern seasonal by swapping the rainbow colors for holiday palettes or pastels for a spring-themed gnome.

If you prefer less sewing, crochet the hat and brim in one piece and attach directly, or glue the beard base for speedier assembly.

I recommend trying contrasting cuffs and boot colors to highlight the shoes and add more visual interest; small embroidery details also look lovely.

Common Mistakes & How to Fix Them

βœ— Skipping color changes without fastening tails securely; secure and weave in color change tails as you go to prevent unraveling. βœ— Not inserting the cardboard base for stability; cut and insert cardboard at the indicated round so the gnome sits flat and stable. βœ— Forgetting to stuff gradually while shaping the body and head; stuff in small amounts to avoid lumps and to maintain the intended silhouette. βœ— Not using front loops to attach the hat can make the seam bulky; use the specified front loops for sewing the hat to the body for a neat finish. βœ— Ignoring BLO/FLO instructions when specified can change the look of the brim or cuff; pay attention to BLO and FLO rounds and work in the correct loop.

Pride Rainbow Gnome Amigurumi Pattern

Create a colorful Pride Rainbow Gnome with this step-by-step crochet pattern. Youll work simple amigurumi techniques and frequent color changes to build a tall, whimsical gnome full of personality. The pattern includes full rounds for the hat, body, nose, arms, legs, cuffs and assembly tips so you can finish a striking, display-ready gnome. Perfect for gifting or seasonal decor.

Intermediate 8-10 Hours

Materials Needed for Pride Rainbow Gnome Amigurumi Pattern

β€” Main Fabric

  • 01
    Red Heart Super Saver (worsted weight #4) - purple (approx 50-100g)
  • 02
    Red Heart Super Saver (worsted weight #4) - blue (approx 50-100g)
  • 03
    Red Heart Super Saver (worsted weight #4) - green (approx 50-100g)
  • 04
    Red Heart Super Saver (worsted weight #4) - yellow (approx 50-100g)
  • 05
    Red Heart Super Saver (worsted weight #4) - orange (approx 50-100g)
  • 06
    Red Heart Super Saver (worsted weight #4) - red (approx 50-100g)
  • 07
    Red Heart Super Saver (worsted weight #4) - white or beige for hands, boots and nose (approx 50g)
  • 08
    Premium Polyester Fiber Fill stuffing - amount to fill a 17 inch (43 cm) gnome
  • 09
    Cardboard - one piece cut to size for the bottom of the body

β€” Tools Required

  • 01
    Crochet hook size C/2 - 2.75 mm
  • 02
    Tapestry needle for sewing and weaving ends
  • 03
    Scissors
  • 04
    Stitch markers (recommended)
  • 05
    Polyester stuffing (Premium Fiber Fill)
  • 06
    Piece of cardboard for the bottom of the body
  • 07
    Small brush or comb for beard separation

Progress Tracker

0% Complete

β€” Materials and tools :

Infos :

Yarn (I used Red Heart Super Saver) - purple, blue, green, yellow, orange, red, white or beige. Crochet hook - I used C/2 - 2.75 mm. Tapestry needle. Stuffing (I used Premium Polyester Fiber Fill). Scissors. Piece of cardboard (for the bottom of the body to make it flat).

β€” Abbreviations :

Infos :

st - stitch. sc - single crochet. hdc - half double crochet. inc - increase (2 single crochet in same stitch). dec - decrease (single crochet 2 stitches together front loop only). BLO - back loop only. FLO - front loop only. (24) - number of stitches in a round. (sc, inc) x n - repeat n times. Crab stitch (reverse single crochet) - optional.

β€” Hat :

Info :

Start crocheting hat with red yarn.

Round 1 :

6 sc in magic circle (6)

Round 2 :

sc in each st (6)

Info :

Change to orange.

Round 3 :

sc in each st (6)

Round 4 :

(sc, 1 inc) x 3 (9)

Info :

Change to yellow.

Round 5-6 :

sc in each st (9)

Info :

Change to green.

Round 7 :

(2 sc, 1 inc) x 3 (12)

Round 8 :

sc in each st (12)

Info :

Change to blue.

Round 9 :

sc in each st (12)

Round 10 :

(3 sc, 1 inc) x 3 (15)

Info :

Change to purple.

Round 11-12 :

sc in each st (15)

Info :

Change to red.

Round 13 :

(4 sc, 1 inc) x 3 (18)

Round 14 :

sc in each st (18)

Info :

Change to orange.

Round 15 :

sc in each st (18)

Round 16 :

(5 sc, 1 inc) x 3 (21)

Info :

Change to yellow.

Round 17-18 :

sc in each st (21)

Info :

Change to green.

Round 19 :

(6 sc, 1 inc) x 3 (24)

Round 20 :

sc in each st (24)

Info :

Change to blue.

Round 21 :

sc in each st (24)

Round 22 :

(7 sc, 1 inc) x 3 (27)

Info :

Change to purple.

Round 23-24 :

sc in each st (27)

Info :

Change to red.

Round 25 :

(8 sc, 1 inc) x 3 (30)

Round 26 :

sc in each st (30)

Info :

Change to orange.

Round 27 :

sc in each st (30)

Round 28 :

(9 sc, 1 inc) x 3 (33)

Info :

Change to yellow.

Round 29 :

sc in each st (33)

Round 30 :

(10 sc, 1 inc) x 3 (36)

Info :

Change to green.

Round 31 :

(11 sc, 1 inc) x 3 (39)

Round 32 :

(12 sc, 1 inc) x 3 (42)

Info :

Change to blue.

Round 33 :

(13 sc, 1 inc) x 3 (45)

Round 34 :

(14 sc, 1 inc) x 3 (48)

Info :

Change to purple.

Round 35 :

FLO (7 sc, 1 inc) x 6 (54)

Round 36 :

(8 sc, 1 inc) x 6 (60)

Round 37-38 :

sc in each st around (60)

Round 39 :

crab stitch (reverse single crochet) in each st around (60) (see pictures 1-8) - Optional (you can do single crochet in each stitch around (60)).

Info :

Slip stitch in next stitch, fasten off, cut yarn.

β€” Body :

Info :

Start crocheting the body from the bottom with blue yarn.

Round 1 :

6 sc in magic circle (6)

Round 2 :

inc x 6 (12)

Round 3 :

(1 sc, 1 inc) x 6 (18)

Round 4 :

(2 sc, 1 inc) x 6 (24)

Round 5 :

(3 sc, 1 inc) x 6 (30)

Round 6 :

(4 sc, 1 inc) x 6 (36)

Round 7 :

(5 sc, 1 inc) x 6 (42)

Round 8 :

(6 sc, 1 inc) x 6 (48) (Cut out circle of cardboard to the size of your work). (see picture 9)

Round 9 :

BLO sc in each st (48)

Round 10-24 :

sc in each st (48)

Info :

Change to beige color. Insert cardboard. (see picture 10)

Round 25 :

BLO (6 sc, 1 dec) x 6 (42) (We're going to use front loops to sew hat to the body).

Round 26 :

(5 sc, 1 dec) x 6 (36)

Round 27 :

(4 sc, 1 dec) x 6 (30)

Round 28 :

(3 sc, 1 dec) x 6 (24)

Round 29 :

(2 sc, 1 dec) x 6 (18) - stuff body (see picture 11)

Round 30 :

(1 sc, 1 dec) x 6 (12)

Round 31 :

(1 dec) x 6 (6)

Info :

Fasten off, cut yarn, weave in yarn. (see picture 12)

β€” Nose :

Info :

Start crocheting with beige yarn.

Round 1 :

6 sc in magic circle (6)

Round 2 :

(sc, 1 inc) x 3 (9)

Round 3 :

(2 sc, 1 inc) x 3 (12)

Round 4 :

sc in each st around (12)

Round 5 :

(2 sc, 1 dec) x 3 (9)

Info :

Fasten off, cut yarn (leave long enough yarn to sew nose to body).

β€” Arm (make 2) :

Info :

Start crocheting the hand with white yarn.

Round 1 :

6 sc in magic circle (6)

Round 2 :

(1 sc, 1 inc) x 3 (9)

Round 3 :

(2 sc, 1 inc) x 3 (12)

Round 4 :

sc in each st (12)

Round 5 :

(2 sc, 1 dec) x 3 (9)

Info :

Change to purple. (Don't cut white yarn, leave it in front of work - see pictures 13-17).

Round 6 :

BLO (1 sc, 1 dec) x 3 (6)

Round 7 :

sc in each st (6)

Info :

Change to blue.

Round 8-9 :

sc in each st (6)

Info :

Change to green.

Round 10-11 :

sc in each st (6)

Info :

Change to yellow.

Round 12-13 :

sc in each st (6)

Info :

Change to orange.

Round 14-15 :

sc in each st (6)

Info :

Change to red.

Round 16 :

sc in each st (6)

Info :

Fold in half and crochet the edges together (3 sc). (see pictures 18-21).

Info :

Fasten off, cut yarn (leave long enough yarn for sewing arm to body).

Info :

Go back to round 5.

Info :

Cuff:

Round 1 :

Chain 1 with white yarn that was left in front of work through the first front loop holding leg upside down. sc in first loop (same loop you did the chain), (1 inc, 1 sc) x 4, 1 inc, 1 sc (16) (see pictures 22-24).

Info :

Slip stitch in next stitch, fasten off, cut yarn, weave in yarn.

β€” Leg (make 2) :

Info :

Start crocheting the boot with white yarn. Chain 5.

Round 1 :

sc in 2. stitch from hook, 2 sc, 3 sc in last stitch, 2 sc, 2 sc in last st (10) (see pictures below on next page for Rnd 1-3)

Round 2 :

3 sc, 1 inc, 3 hdc in next st, 1 inc, 3 sc, 3 sc in last st (16) (see picture below)

Round 3 :

5 sc, 1 inc, 1 hdc inc (2 hdc in same st), 1 hdc inc, 1 inc, 5 sc, 2 inc (22) (see picture below)

Round 4 :

BLO sc in each st (22)

Round 5 :

sc in each st (22)

Round 6 :

5 sc, 4 dec, 9 sc (18)

Round 7 :

4 sc, 3 dec, 8 sc (15)

Round 8 :

4 sc, 2 dec, 5 sc, 1 dec (12)

Round 9 :

sc in each st (12)

Round 10 :

(sc, 1 dec) x 4 (8)

Info :

Stuff boot.

Info :

Change to purple. (Don't cut white yarn, leave it in front of work). (see pictures 13-17 for arm)

Round 11 :

BLO sc in each st (8)

Round 12 :

sc in each st (8)

Info :

Change to blue.

Round 13-14 :

sc in each st (8)

Info :

Change to green.

Round 15-16 :

sc in each st (8)

Info :

Change to yellow.

Round 17-18 :

sc in each st (8)

Info :

Change to orange.

Round 19-20 :

sc in each st (8)

Info :

Change to red.

Round 21-22 :

sc in each st (8)

Info :

Change to purple.

Round 23-24 :

sc in each st (8)

Info :

Change to blue.

Round 25-26 :

sc in each st (8)

Info :

Change to green.

Round 27-28 :

sc in each st (8)

Info :

Change to yellow.

Round 29-30 :

sc in each st (8)

Info :

Change to orange.

Round 31-32 :

sc in each st (8)

Info :

Change to red.

Round 33 :

sc in each st (8)

Info :

Fold in half and crochet the edges together (4 sc). (see pictures 18-21 for arm)

Info :

Fasten off, cut yarn (leave long enough yarn for sewing leg to body).

Info :

Go back to round 11.

Info :

Cuff:

Round 1 :

Chain 1 with white yarn that was left in front of work through the first front loop holding leg upside down. 2 sc in first loop (same loop you did the chain), 7 inc (2 sc in each st around) (16) (see pictures 22-23 for arm)

Info :

Slip stitch in next stitch, fasten off, cut yarn, weave in yarn.

β€” Assembly :

Info :

Sew nose on body.

Info :

Sew hands on both sides of body (approx. 5 stitches from nose on each side).

Info :

Sew hat on body.

Info :

Sew legs to the bottom of the body. Add shoe laces.

Info :

Beard: cut about 15 pieces of yarn about 10 inches long. Tie yarn pieces on both sides of the nose (about 4 on each side) and under the nose (about 6-7 pieces). Separate yarn threads and comb with a brush.

Info :

Sew on any decorations you'd like to (buttons, embellishments, etc.).

Assembly Instructions

  • Sew nose on body using the long tail left from the nose; secure firmly so it sits centered on the beige front area.
  • Sew hands on both sides of the body approximately 5 stitches from the nose on each side, angling slightly for a natural pose.
  • Sew hat to the top of the body using the front loops left from Round 25 of the body for a neat seam and secure attachment.
  • Sew legs to the bottom of the body, spacing them evenly for stability and add shoelaces to the boots if desired.
  • Create the beard by cutting about 15 yarn pieces ~10 inches long, tie them to both sides and under the nose (about 4 each side and 6-7 under), then comb out.
  • Add any additional decorations such as buttons or small embellishments sewn securely in place.

Important Notes

  • πŸ’‘Use the front loops (FLO/BLO) as specified when attaching brim or hat to ensure a flat, neat join.
  • πŸ’‘Cut and insert a cardboard circle at the base (Round 8 of the body) to keep the gnome sitting flat and stable.
  • πŸ’‘Stuff the body graduallyβ€”stuff firmly but evenly to keep a smooth shape and avoid lumps.
  • πŸ’‘Leave long tails when fastening off small parts like nose, arms and legs to make sewing them in place easier.
  • πŸ’‘Keep color-change tails tidy as you go to avoid a large weaving-in task at the end.

This Pride Rainbow Gnome pattern brings joyful color and playful charm to your crafting table. 🌈 The tall striped hat and flowing yarn beard make it a standout handmade gift or decor piece. I hope this pattern inspires you to celebrate color and creativity with every stitch. 🧢✨

You ask,

we answer.

FAQs

What size will the finished piece be?

The finished gnome is approximately 17 inches (43 cm) tall when using the recommended yarn and hook size.

Can I use different yarn weights for this pattern?

Yes, you can use different yarn weights, but this will change the final size; adjust hook size accordingly and expect different stitch counts to affect shaping.

Do I need advanced crochet skills to make this gnome?

This pattern is rated intermediate and uses basic amigurumi techniques plus frequent color changes, BLO/FLO and simple sewing; basic experience with single crochet, increases and decreases is recommended.

How long does this project usually take?

Most crafters finish this project in about 8-10 hours, depending on experience, speed, and time spent on assembly and beard finishing.