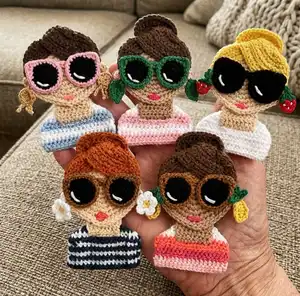
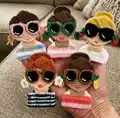
Create a charming crochet girl portrait applique you can attach to bags, jackets, or display as wall art. This beginner-friendly pattern walks you through the face, neck, shirt, hair, sunglasses and a variety of bonus earrings and sunglass styles. You can customize colors, hair and accessories to make each portrait uniquely yours. Ideal for quick handmade gifts or personalizing accessories.
Progress Tracker
0% Complete
— Face :
Info :
With desired skin color, make a magic loop.
Round 1 :
Work 6 sc into ring - 6 sts. Do not join, continue in a spiral.
Round 2 :
(2 sc) in each st —12 sts
Round 3 :
[(2 sc) in next sc, sc in next sc]— 18 sts
Round 4 :
[(2 sc) in next sc, sc in next 2 sc]— 24 sts
Round 5 :
[(2 sc) in next sc, sc in next 3 sc]— 30 sts
Round 6 :
[(2 sc) in next sc, sc in next 4 sc]— 36 sts
Round 7 :
[(2 sc) in next sc, sc in next 5 sc]— 42 sts
Round 8 :
[(2 sc) in next sc, sc in next 6 sc]— 48 sts
Round 9 :
[(2 sc) in next sc, sc in next 7 sc]— 54 sts
Round 10 :
[(2 sc) in next sc, sc in next 8 sc] — 60 sts
Round 11 :
[(2 sc) in next sc, sc in next 9 sc]— 66 sts
Round 11 :
[(2 sc) in next sc, sc in next 10 sc]— 72 sts
Info :
Fasten off and weave in ends.
— Neck :
Info :
With the same skin color from the face, ch 9
Row 1 :
Sc in the 2nd chain from the hook, sc in each sc across, ch 1 and turn - 8 sc
Row 2-9 :
Sc in each stitch across - 8 sc
Info :
Fasten off and weave ends.
— Shirt :
Info :
With desired shirt color, chain 20
Row 1 :
Hdc in 3rd ch from hook, hdc in each ch across, turn — 18 hdc
Row 2 :
Ch 2, hdc in each hdc across, turn.
Row 3 :
Ch 2, hdc in each hdc across, turn.
Row 4 :
Ch 2, hdc in the next 5 hdc, chain 8, rejoin, hdc in last 5 hdc, turn.
Row 4 (continued) :
Ch 2, hdc in the next 5 hdc, hdc 8 into chain, hdc in last 5 hdc, turn.
Rows 5-10 :
Ch 2, hdc in each sc across, turn.
Info :
Fasten off and weave ends.
Info :
Use tapestry needle and make french knots in various locations for the shirts' polka-a-dot pattern. You can also leave in plain or repeat pattern changing colors every other row for a striped shirt.
Info :
Fold the top corners on shirt backwards to make shoulders.
— Hair :
Info :
With desired hair color chain 27 and fasten off. Repeat that 11 more times and by the end you will have 12 strands of hair.
Info :
Place the chains on the left side of the head first in a straight diagonal line from the top center of the scalp to the middle of the left side of the head. Hot glue the chain closest to the center of the face first and then add more going away from the center of the face. Fold the excess chain behind the head and glue it down.
Info :
Do the right side of the head next. Make a curved, swooping bang from about three stitches left of the top center chain to the middle of the right side of the head. Glue more and more going away from the center of the face, folding the excess behind.
Info :
Really place the chains close to one another so the skin doesn't show in between the strands of hair.
— High Bun :
Info :
With hair color, make an oval.
Round 1 :
Chain 8, hdc in the third chain from the hook, hdc 4, 3 hdc in the last chain and rotate your work so you are working on the other side of the chain. 4 more hdc across the bottom of the original chain, 2 more hdc in the first chain. Now you have 3 hdc on each end separated by 4 hdc. (14 hdc)
Round 2 :
Do not join. Make 2 hdc in the first hdc from round one. 1 hdc in the next 4 hdc, 2 hdc in each of the next three stitches, hdc 4, 2 hdc in the next 2 stitches. (20 hdc)
Round 3 :
Do not join. 1 hdc in the first stitch, 2 hdc in the next, hdc in the next 4 stitches, *2 hdc in the next stitch, 1 hdc in the next stitch*repeat from *-* two more times. Hdc in the next 4 stitches, 2 hdc in the next 1 hdc in the next. Repeat from *—* one more time. Finish off and weave ends. (26 hdc)
— Side Low Bun :
Round 1 :
Work 6 sc into ring— 6 sts. Do not join, continue in spiral.
Round 2 :
(2 sc) in each st —12 sts
Round 3 :
[(2 sc) in next sc, sc in next sc] — 18 sts
Round 4 :
[(2 sc) in next sc, sc in next 2 sc] — 24 sts
Round 5 :
[(2sc)in next sc, sc in next3sc] —30sts
Round 6 :
[(2 sc) in next sc, sc in next 4 sc] — 36 sts
— Pearls :
Info :
Using white yarn, 6 sc into magic ring. Pull tight and finish. Make as many as desired. Place earrings on side of head and necklace along top of shirt. Use hot glue or tapestry needle and yarn to put in place.
— Sunglasses (MAKE 2) :
Info :
With lens color—- either brown or black
Round 1 :
Work 6 sc into ring— 6 sts. Do not join, continue in spiral.
Round 2 :
(2 sc) in each st —12 sts
Round 3 :
[(2 sc) in next sc, sc in next sc] — 18 sts
Round 4 :
[(2 sc) in next sc, sc in next 2 sc] — 24 sts
Info :
Change to desired sunglass color with a slip stitch anywhere in the last round.
Round 5 :
7sc, hcd in next 2 sc, 2dc in next 2 sc, hdc in next 2 sc, sc in the rest of the stitches. Finish off.
— Sunglass Bridge :
Info :
With Sunglass color, chain 6, sc in second chain from hook, finish off chain with sc. Finish off and weave ends.
— Hair Ribbon :
Info :
With desired ribbon color, chain 15
Row 1 :
Sc in 2nd ch from hook, sc in each ch across, turn — 12 sc
Row 2 :
Ch 1, sc in each sc across, do not turn.
Row 3 :
Chain 5, sc in 2nd chain from hook, sc back toward ribbon and sc into ribbon between rows 1 and 2
Row 4 :
Chain 5, sc in the 2nd chain from hook, sc back toward ribbon, sl st into row 1 and fasten off, weave ends.
— Lashes and lips :
Info :
Use a tapestry needle and black yarn to stitch on lashes. Use picture as guide. Use tapestry needle and desired lip color to stitch lips. Use picture as guide.
— Assembly :
Info :
Use a hot glue gun to attach all the pieces together. You could sew as well but hot glue allows for a cleaner look and saves a lot of time!
Info :
Attach your girl to a bag, a jacket or make it into a wall decoration!
— Heart Sunglasses :
Info :
Materials: Lense color and frame color, 5mm crochet hook
Lense - Round 1 :
Make a magic loop, chain 3. (in magic loop) 3 tr, 3 dc, chain 1, 1 tr, chain 1, 3 dc, 3 tr, chain 2, slip stitch into magic loop. Pull tight.
Lense - Round 2 :
Sc into chain 3 from previous round, single crochet in the top of the original chain 3. 1 sc and 1 hdc in the first trc from previous round. 2 hdc in the next trc, 1 hdc, 1 sc in the next stitch, 1 hdc, 1 sc in the next 4 sts. Chain 1, dc in the center tr from previous round, chain 1, 1 sc in the next 4 sts, 1 sc, 1 hdc in the next, 2 hdc in the next, 1 hdc in the next, 1 sc in the next, sc in the chain 2 from previous round. Slip stitch into center and finish off.
Frame :
With desired frame color, 2 sc into chain 3 from beginning of round 2. 1 sc in each stitch going around. 2 sc in the chain 2 from previous round. Finish off. Weave ends.
Bridge (Heart) :
With frame color: chain 6, 5 sc across, chain 1, 5 sc across, finish off. Weave ends.
— Reading Glasses :
Info :
Materials: desired frame color, 5mm crochet hook
Info :
*Chain 12, 11 sc across. Chain 20, attach chain to beginning with a slip stitch.* Finish off. Repeat from *-* chain 3 and attach to other frame with the slip stitch, this chain 3 will be the bridge. Finish off and weave ends.
Info :
Carefully manipulate on face before gluing or sewing. Use sewing pins and spray with starch on a foam block, allow to dry and then place on face.
— Aviators :
Info :
Materials: desired frame color, 5mm crochet hook. MAKE 2 with lens color
Round 1 :
Work 6 sc into ring— 6 sts. Do not join, continue in spiral.
Round 2 :
(2 sc) in each st —12 sts
Round 3 :
[(2 sc) in next sc, sc in next sc] 12 times — 18 sts
Round 4 :
[(2 sc) in next sc, sc in next 2 sc] 18 times — 24 sts
Round 5 :
[(2 sc) in next sc, sc in next 3 sc] 24 times — 30 sts
Round 6 :
Continue with same color, 10 sc, 4 hdc, (2 hdc) in next stitch, 4 hdc, 5 sc, (25 stitches total) switch to frame color and sc all the way around. (31 stitches total) Finish off.
Info :
You will repeat this again but when you are about to finish off chain 5 and connect to inner corner of the other frame in order to make the bridge and connect frames. Then chain 7 and place that chain underneath the frames a few stitches below the other bridge when glueing onto the face. Use photo above as a guide.
— Statement Earrings (Earring #1) :
Info :
Make 2. Materials: Earring color, 4.5mm crochet hook.
Part 1 :
9 sc into magic ring. Finish off.
Part 2 :
Chain 11, connect to make a ring, leave a tail for sewing. Sew ring to back of first circle made, on the bottom. Attach same color to center of chain 11, chain 3, 6 trc, chain 3, sl st into chain. Finish off.
— Earring #2 :
Info :
Materials: Earring color, 4.5mm crochet hook.
Part 1 :
9 sc into magic ring. Slip stitch into first sc, chain 8. Finish off. Weave end.
Part 2 :
Make heart: Make magic ring chain 3, 3 tr, 3 dc, chain 1, tr, chain 1, 3 dc, 3 tr, chain 3. Slip stitch into ring. Finish off and pull ring tightly closed. Weave ends.
Info :
Attach heart (with either a tapestry needle and yarn or hot glue) to the chain 7 from part 1. Have two or three chains exposed between circle of part 1 and heart.
— Earring #3 :
Info :
Materials: Earring color, 5mm crochet hook.
Part 1 :
9 sc into magic ring. Slip stitch into first sc, chain 10. Finish off. Weave end.
Part 2 :
9 dc into magic ring. Finish off. Weave end.
Part 3 :
9 tr into magic ring. Finish off. Weave end.
Info :
Attach part 2 and part 3 to the chain 10 from part 1. Attach part 2 and part 3 to the chain 10 from part 1. Sew or glue as desired.
— Flower Earrings (Bonus #1) :
Post :
5 sc into a magic loop, slip stitch into first sc, chain 5 and finish off. Cut a really short tail or just weave in.
The flower :
With yellow, 5 sc into a magic loop, finish off and weave ends. Attach white to any single crochet and *chain 2, 3 dc in the same stitch, slip stitch into the same stitch to finish one petal.* Slip stitch into the next yellow stitch and repeat from *-* until you have five petals total. Finish off and weave ends.
— Palm Leaf Earrings (Bonus #2) :
Info :
With pink: 5 sc into a magic loop, slip stitch into first sc, chain 5 and finish off. Cut a really short tail or just weave in.
The Palm :
Chain 7, tr in the third chain from the hook, dc, hdc, sc, sl st in the last chain, chain 1 and turn so that now you are working back up the other side of the chain. Sl st in the first stitch, sc, hdc, dc, tr, chain 2 and sl st to the very beginning. Finish off and weave ends.
— Raffia Earrings (Bonus #3) :
Info :
With raffia and 5mm hook: 8 sc into a magic loop, slip stitch into first sc, chain 5 and finish off. Cut a really short tail or just weave in.
Bigger circle :
Into a magic loop, 10 dc, finish off and weave ends. Pick three dc from the bigger circle that you will make the tassels. Slip stitch the raffia into the stitch and finish off, leave two short tails. Repeat that two more times to make three tassels.
This Crochet Girl Portrait Pattern is a sweet and stylish applique you can attach to bags, jackets or display as wall art. Customize hair, sunglasses and earrings to make a unique collection of portraits. Quick to make and endlessly customizable for gifts or personal fashion. 🧶✨🎀