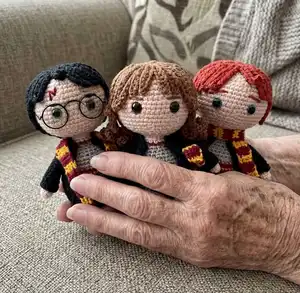
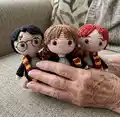
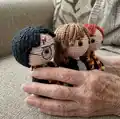
Make your own trio of tiny wizard friends with this charming amigurumi pattern. You'll create Harry, Ron and Hermione with detailed instructions for bodies, heads, hair, capes, sleeves and scarves. The pattern includes full row-by-row guidance, color notes and assembly tips so you can finish three 12 cm dolls. Perfect for gifting or collecting.
Progress Tracker
0% Complete
— Materials & Stitches Used :
Info :
The dolls measure 12 cm approximately using the following materials: Cotton Scheepjes, catona (50 gr. = 125 m). Hook n° 2 or 2,5. Filler. Markers. Row counter. (Advisable). Darning needle and scissors. A button for each the bottom of each doll. (2,5 or 3 cm). Security eyes 8 mm.: Green (Harry), blue (Ron) and browm (Hermione). Amigurumi glasses 5 cm. (Harry). Pins. Textile glue for the dolls hair. A round stick 8 cm for holding the head (optional).
Infos :
Colours used: 106 (white). 505 (beige, skin colour) or 255 (light pink). 242 (dark grey). 74 (light grey). 208 (yellow). 517 (ruby). 110 (black). 388 (rust)( Ron's hair). 157 (Brown)(Hermione's hair). To make the 3 dolls, 25 gr. of each colour will be enough, except for the skin colour and the black between 25 and 50 gr will be needed. (You will only need a little white, just a row of 12sc, so if you have a little at home you will not need to buy it)
Info :
Stitches used: ch ...... Chain. sc ........single crochet. inc. .....increase (two stitches in the same stitch). dec .....Decrease. sl.st .......slip stitch. hdc ......half double crochet. dc .......double crochet. BLO ......Work in the Back loop only.
— Body of Harry & Ron :
Info :
With black yarn, make 6sc in a magic ring.
Row 2 :
(1sc, 1 inc) x 6... (18)
Row 3 :
(2sc, 1 inc) x 6 ... (24)
Row 4 :
(1st row of the body): 24sc. (instructions 1st row of the body page 4)
Row 6 :
Using Dark grey yarn: (3sc, 1 inc.) x 6... (30)
Row 7 :
(2sc, 1 inc, 2sc) x 6... (36)
Row 8 :
(5sc, 1 inc) x 6... (42)
Info :
Sew the button onto the base.
Row 9 to 11 :
42sc in each row.
Row 12 & 13 :
(Using Ruby yarn): 142sc in each row.
Vuelta 14 :
(light grey) (5 sc and 1 dec) x 6 ... (36)
Info :
Work backstitch in yellow yarn between rows 12 & 13 (See instructions on page 5)
Row 16 :
(2sc, 1 dec, 2sc) x 6 ... (30)
Row 18 :
(3sc and 1 dec.) x 6 ... (24)
Row 20 :
(2sc and 1 dec.) x 6 ... (18)
Row 21 :
1sc in each stitch..... (18)
Info :
Fill the body. When working the next rows finish filling firmly.
Row 22 :
(white yarn): (1sc, 1 dec) x 6... (12)
Row 23 & 24 :
(skin colour): 12sc in each row.
Info :
Using Ruby yarn make back stitch between rows 21 & 22
— Body of Hermione :
Info :
With black yarn, make 6sc in a magic ring.
Row 2 :
(1sc, 1 inc) x 6... (18)
Row 3 :
(2sc, 1 inc) x 6 ... (24)
Row 4 :
(1st row of the body): 24sc. (instructions 1st row of the body page 4)
Info :
Cut the yarn and change to skin colour
Row 6 :
BLO (in the back loop only): (3sc, 1 inc) x 6... (30)
Row 7 :
(2sc, 1 inc, 2sc) x 6 ... (36)
Info :
Sew the button to the bottom of the base.
Row 8 :
(Dark grey): (5sc, 1 inc) x 6 ... (42)
Row 9 to 11 :
42sc in each row.
Row 12 & 13 :
(Ruby yarn): 1sc in each stitch... (42)
Row 14 :
(Light grey yarn): (5sc, 1 dec) x 6 ... (36)
Info :
Work backstitch in yellow between rows 12 and 13 (See instructions on page 5)
Row 16 :
(2sc, 1 dec, 2sc) x 6 ... (30)
Row 18 :
(3sc and 1 dec.) x 6 ... (24)
Row 20 :
(2sc and 1 dec.) x 6 ... (18)
Info :
Fill the body. When working the next rows finish filling firmly.
Row 22 :
(white yarn): (1sc, 1 dec) x 6... (12)
Row 23 & 24 :
(skin colour): 12sc.
Info :
Using Ruby yarn make back stitch between rows 21 & 22
— Head (THE SAME FOR ALL 3 DOLLS) :
Row 26 :
(3sc, 1 inc) x 6... (30)
Row 27 :
(2sc, 1 inc, 2sc) x 6... (36)
Row 28 :
(5sc, 1 inc) x 6... (42)
Row 29 :
(3sc, 1 inc, 3sc) x 6... (48)
Row 30 :
(7sc, 1 inc) x 6... (54)
Row 31 to 39 :
54sc in each row (place a marker between rows 34 & 35 for the position of the eyes for Harry, and between rows 35 & 36 for Ron and Hermione) (Place them after row 39) (leave 7 stitches between the eyes )
Row 40 :
(7sc, 1 dec) x 6... (48)
Row 41 :
(3sc, 1 dec, 3sc) x 6... (42)
Row 42 :
(5sc, 1 dec) x 6... (36)
Row 43 :
(2sc, 1 dec, 2sc) x 6... (30)
Row 44 :
(3sc, 1 dec) x 6... (24)
Info :
Put in the stick and fill the head (if you don't use the stick fill the neck very firmly.)
Row 45 :
(2sc, 1 dec) x 6... (18)
Row 46 :
(1sc, 1 dec) x 6... (12)
Info :
Cut thread and close the remaining stiches of the head using a darning needle.
— Eyebrows and Facial Details :
Info :
In hair colour make the eyebrows as seen in photographs: Using Brown (Hermione) and Black (Harry): 1 stitch above the eye: Make a long stitch over 3 stitches. Using Rust colour (Ron): 2 stitches above the eye: make a long stitch over 3 stitches to one side and 1 stitch down. Then, in ruby make Harry's scar as seen in the photograph.
— Hair (General instructions) :
Info :
HAIR: (recommended: use crochet of 1/2 more number). Start by crocheting a 24-stitch circle as indicated for each character, then make the indicated number and lengths of strands and attach them to the 24 stitches circle. Hold strands with pins before gluing. Do not glue over the top of the scar for Harry.
— Hair: Harry (colour black) :
Info :
6sc in a magic ring. (1 inc) x 6..... (12sc). (1 inc) x 12..... (24sc)
Info :
Start to make hair strands, make in total 24 strands
Strands :
11 strands of 16ch. 1 strands of 14ch. 1 strand of 13ch. 1 strand of 12ch. 7 strands of 8ch. (fringe) 1 strand of 12ch. 1 strand of 13ch. 1 strand of 14ch.
Info :
Starting in the last stitch of the 24 single crochets make (16ch for the first strand). Starting in the 2nd chain from the hook crochet, make 1sc in each chain. Remove the marker from the first stitch from the first stitch and make a sl.st. Make the next strand in the next stitch as shown (16ch second lock). Then repeat the previous step. Continue making the strand with the indicated number of stitches until the circle is full. Total 24 strands.
Info :
Hold the hair in place with pins.: Place the 1st pin on the top of the hair, to match the centre of the head. Then count eight stitches on each side of the eyes and position the first strand of 12ch. Place all the strands as in the (right photo)
Info :
Finally place the 4 strands of the fringe on one side and 3 to the other. Now careful lift each lock and glue it with special textile glue. (Do not glue the strand over the top of the scar. Also only glue strands of 12ch, 13ch and 14ch to the level of the fringe and then a little at the bottom so that the arms of the glasses can fit through.)
— Hair: Ron (rust colour) :
Info :
6sc in a magic ring. (1 inc) x 6..... (12sc). (1 inc) x 12..... (24sc)
Info :
Start to make hair strands, make in total 24 strands
Strands :
12 strands of 16ch. 2 strands of 14ch. 8 strands of 9ch. (fringe) 2 strands of 14ch.
Info :
Starting in the last stitch of the 24 single crochets make (16ch for the first strand). Starting in the 2nd chain from the hook crochet, make 1sc in each chain. Close the row with a sl.st. Make the next strand in the next stitch as shown. Continue making the strands until the circle is full. Hold hair in place with pins and glue the lifted strands with textile glue as needed. Place the 1st strand of the fringe 6 stitches above the eye. Work the same on the other side so the fringe will have 4 strands on each side.
— Hair: Hermione (colour brown) :
Info :
6sc in a magic ring. (1 inc) x 6..... (12sc). (1 inc) x 12..... (24sc)
Info :
Start to make hair strands, make in total 24 strands
Strands :
12 strands of 22ch. 1 strand of 20ch. 1 strand of 19ch. 1 strand of 13ch. 1 strand of 11ch. 4 strands of 7ch. (for the middle of the fringe). 1 strand of 11ch. 1 strand of 13ch. 1 strand of 19ch. 1 strand of 20ch.
Info :
How to work the strands for Hermione: The longest strands (22, 20 & 19 chain): Make the chains as indicated and starting in the 2nd chain from the hook, work 3sc in the next 3ch and then 1sc in each chain until the end. The shortest strands (13, 11 & 7 chain) working from the second chain from the hook, make 1sc in each chain to the end. At the end of the 24sc: 1) Make 22ch. 2) Starting in the 2nd chain from the hook, make 3sc in the next 3ch. Continue making 1sc in each stitch until the end of the initial 24ch. Close with a sl.st. Repeat the previous steps with the indicated number of stitches until the end of the row.
Info :
To place the hair on the doll, put a pin through the centre of the 24sc circle and the top centre of the dolls head. Now place the 4 strands of the fringe in the front as seen in the photos below, and the 19ch strands (one on each side of the eyes), on the 5th stitch from each eye. Place strands on the back of the head and finally hold the two sides of the fringe. Once placed, lift slowly and glue them carefully with textile glue.
— Cape :
Info :
End each row with 1ch and turn.
Info :
Using black yarn: Leave a long thread for using to sew the body and make 19ch, starting in the 2nd chain from the hook:
Row 2 :
5sc, 1 inc., 6sc, 1 inc, 5sc..... (20sc.)
Row 2 (alt) :
10sc, 1 inc., 9sc..... (21sc.)
Row 5 :
(2sc, 1 inc) x 3, 3sc (1 inc, 2sc) x 3..... (27sc.)
Row 7 :
(3sc, 1 inc) x 6, then 3sc. ....(33sc)
Row 8 to 15 :
33sc in each row
Info :
Cut the yarn and cast off.
Info :
Place the cape just below the line of ruby stitching on the jersey (you can hold it in place with pins). Using the long thread left at the start or with black yarn stitch around to hold it to the body.
— Sleeves :
Info :
Colour black: Make 8ch and close in a cycle with a sl.st. (Leave a long thread for sewing to the body.)
Row 1 & 2 :
8sc in each row
Row 3 :
(3sc, 1 inc.) x 2 ....(10sc)
Row 4 & 5 :
10sc in each row
Row 6 :
(4sc, 1 inc.) x 2 ....(12sc)
Row 9 :
(5sc, 1 inc.) x 2 ....(14sc)
Row 10 & 11 :
14sc in each row
Info :
Cut the yarn and cast off.
— Arms :
Info :
Using skin colour: Make 4sc in a magic ring.
Row 2 to 9 :
8sc in each row
Info :
Cut the thread and cast off. Pass the arm through the sleeve of the cape. Using the hook to help. Using the long thread left at the start of the arm to the arm make a couple of stitches so that it does not "escape". Place the cape on the body find the correct position for the sleeves and sew them in place.
— Scarf :
Info :
Using colours yellow and ruby: Make a simple scarf, the colour changes are made in the same way as when making the dolls: when closing the last stitch.
Info :
Start using (Ruby yarn): Make 4ch:
Row 1 :
From the 2nd ch from the hook, work 1sc in each stitch (3sc) 1ch and turn.
Row 2 :
3sc and change to yellow, 1ch (in the new colour) and turn.
Info :
Repeat the 2 rows in yellow, carrying the ruby thread behind. Continue repeating 2 rows of each colour, always carrying the other colour thread behind until it is the required length (about 18 cm)
Info :
Cast off and sew in the ends. The dolls are finished!!!
Create a delightful set of tiny wizard friends that make a perfect handmade gift or collectible. These dolls combine simple shaping with charming details—jersey stitching, hair strands and tiny accessories—to bring personality to each character. Happy crocheting and enjoy giving them a new home! 🧶✨