🧢 Beautiful ✨ Detailed πŸ’ Adorable

Mini Flower Basket & Flowers Amigurumi Pattern

Mini Flower Basket & Flowers Amigurumi Pattern
4.5β˜… Rating
5-7 Hours Time Needed
3.0K Made This
βœ‚οΈ

Intermediate Level

Ideal for those with basic crochet experience, featuring slightly more advanced stitches and techniques to expand your skills.

⏱️

Weekend Treat

Takes 5-7 hours, making it an enjoyable project to finish over a couple of days.

🏑

Cozy Accent

A warm touch for your space that transforms ordinary corners into inviting nooks filled with handmade charm.

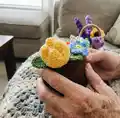
About This Mini Flower Basket & Flowers Amigurumi Pattern

This pattern creates a tiny, decorative flower basket with matching mini flowers including lavender, sunflower, tulip, rose and forget-me-not. The design uses a combination of small hooks and thin yarn for delicate detail and wired stems for posable flowers. It is perfect for gifting, table decoration, or a sweet crafty display. You will assemble the basket, sew a lace trim and insert wired blooms to finish.

Mini Flower Basket & Flowers Amigurumi Pattern crochet pattern - detailed view of completed project

Techniques include crocheting in the round, working with wire inside stitches, and simple sewing to shape flowers. Pattern includes full rows/rounds for every component and clear assembly tips.

Why You'll Love This Mini Flower Basket & Flowers Amigurumi Pattern

I absolutely love this pattern because it brings so much personality into a tiny handmade piece that fits anywhere. I enjoy the variety β€” each flower uses different basic stitches but combines into a cohesive arrangement. Working with wire for stems adds a fun, slightly crafty technique that lets you pose the flowers just how you like. It is satisfying to see small parts come together into a lovely finished basket that makes an instant gift.

Mini Flower Basket & Flowers Amigurumi Pattern step 1 - construction progress Mini Flower Basket & Flowers Amigurumi Pattern step 2 - assembly progress Mini Flower Basket & Flowers Amigurumi Pattern step 3 - details and accessories Mini Flower Basket & Flowers Amigurumi Pattern step 4 - final assembly and finishing

Switch Things Up

I love how easy it is to customize this pattern by swapping colors for a totally different vibe; try pastel shades for a soft spring arrangement or jewel tones for a dramatic display.

I sometimes make a full set of one flower type to create a themed bouquet β€” for example, all lavender spikes for a calming look.

Want a miniature wedding bouquet? Use metallic or pearlized thread for subtle shine and tie with a tiny ribbon.

Change yarn weight and hook size to scale the whole project up or down; bulky yarn with larger hooks makes a chunky statement piece while fine thread creates dainty minis.

I often add embroidered veins to the leaves for extra detail β€” a couple of backstitches with contrasting thread will do the trick.

For more poseable stems, twist two wires together before inserting into the flower for added stability and flexibility.

If you prefer a glued base, add a small piece of felt inside the basket and secure stems with hot glue rather than pushing them through stuffing.

I like to make matching tiny tags or gift cards when giving these away β€” a scrap of cardstock and a bit of handwriting makes it special.

To create a table centerpiece, make several baskets in coordinated colors and glue them to a small tray for stable display.

Try adding beads or tiny buttons as flower centers for a different texture and a touch of sparkle.

Common Mistakes & How to Fix Them

βœ— Skipping the instruction to put the wire on at the start of a round will prevent you from creating secure wired stems; follow the (put wire on) step exactly and catch the wire with the yarn when you pull through the stitch. βœ— Forgetting to sew the basket lace on the edge of Round 8 before Round 9 can make attaching the cover awkward; sew the lace onto the edge of Round 8 as instructed for a neat finish. βœ— Not stuffing the basket body halfway through sewing leads to uneven shape and lumps; stuff gradually and finish stuffing while you sew the pieces together. βœ— Working with inconsistent tension when making the small flowers produces irregular petals and shapes; maintain an even, slightly tight tension for small motifs to keep consistent size and shape.

Mini Flower Basket & Flowers Amigurumi Pattern

Create a charming mini flower basket filled with tiny crocheted blooms. This pattern walks you through making a basket, lace trim, handle and a variety of miniature flowers with wired stems. You will love the sweet finished arrangement that makes a perfect gift or a delightful home accent. Clear instructions and helpful photos guide you through every step.

Intermediate 5-7 Hours

Materials Needed for Mini Flower Basket & Flowers Amigurumi Pattern

β€” Main Fabric

  • 01
    Basket: #3 light 5ply yarn (pick colors you like) - used for basket body, handle and lace
  • 02
    Flowers: #2 fine 4ply yarn (pick colors you like) - used for lavender, forget-me-not, sunflower, rose, tulip and leaves
  • 03
    Suggested colors shown: brown, beige, green, white, purple, yellow, pink (select amounts according to number of flowers)

β€” Tools Required

  • 01
    Crochet hook size 3.0mm and 3.5mm (for basket components)
  • 02
    Crochet hook size 2.0mm and 2.5mm (for flowers and leaves)
  • 03
    Stitch markers
  • 04
    Tapestry needle
  • 05
    Scissors
  • 06
    Wire 0.3-0.5mm diameter (to be used as flower stems)
  • 07
    Polyester stuffing

Progress Tracker

0% Complete

β€” Basket Cover :

Round 1 :

14dc in magic loop (14st)

Round 2 :

14dc inc (28st)

Round 3 :

14[dc, dc inc] (42st)

β€” Basket Lace :

Row 1 :

45ch, 44sc, turn (44st)

Row 2 :

11[ch, dc, dc inc, dc, ch, ss] (66st)

β€” Basket Body :

Round 1 :

14dc in magic loop (14st)

Round 2 :

14dc inc (28st)

Round 3 :

14[dc, dc inc] (42st)

Round 4 :

42dc blo (42st)

Round 5-8 :

21[dc, dc flo] (42st)

Info :

Sew the basket lace on the edge of Round 8 before starting Round 9.

Round 9 :

42sc (42st)

Info :

Crochet the basket cover and the body together while crocheting Round 9, or sew them together after you finish Round 9. Stuffing the basket body halfway through sewing.

β€” Basket Handle :

Row 1 :

32ch, (put wire on) 31sc (31st)

β€” Mini Leaf :

Round 1 :

7ch, (put wire on) sc, hdc, 2dc, hdc, (3sc), hdc, 2dc, hdc, sc (13st)

β€” Mini Lavender :

Row 1 :

26ch, 10[sc, 3ch, ss-in the 3rd ch], 10[sc, 4ch, ss-in the 4th ch], 5[sc, 5ch, ss-in the 5th ch]

Info :

Wrap the fabric around a wire with the right side facing out.

β€” Mini Forget-Met-Not :

Round 1 :

5[3ch, dc, 3ch, ss] in magic loop

Info :

Make a stamen. 1. Wrap yarn around a wire about 1cm. 2. Bend it into a circle. 3. Insert the wire into the center of the flower.

β€” Mini Sunflower :

Round 1 :

6sc in magic loop (6st)

Round 2 :

6inc (12st)

Info :

Make one each with brown and green yarn.

Round 3 :

11[(3ch, dc, 3ch), ss]

Info :

Make the 2 round pieces' wrong sides facing each other, work into any 2 parallel stitches of them, and crochet Round 3 with yellow yarn. Insert a wire in the center of the flower.

β€” Mini Rose :

Row 1 :

28ch, work into the 4th chain-12[(3dc), ch, sk], (3dc), turn (51st)

Row 2 :

13[ch, dc, dc inc, dc, ch, ss] (78st)

Info :

Roll the fabric into the shape of a rose, and keep it in shape by sewing. Insert a wire in the center of the flower.

β€” Mini Tulip :

Round 1 :

6sc in magic loop (6st)

Round 2 :

6inc (12st)

Round 3 :

6[sc, inc] (18st)

Round 4-8 :

18sc (18st)

Info :

Leave some yarn and sew a cross on the last round. Insert a wire in the center of the flower.

β€” Finished Pieces :

Info :

Insert flowers into the basket.

Assembly Instructions

  • Sew the basket lace onto the edge of Round 8 of the basket body before beginning Round 9 to ensure the lace is attached neatly.
  • Join the basket cover and the basket body together while crocheting Round 9, or crochet them separately and sew them together securely after finishing Round 9.
  • Attach the handle by positioning it across the basket opening and sewing the ends into the basket body where the handle naturally aligns, hiding wires and tails inside.
  • Insert and secure wired stems: slide the wire into the center of each flower (as instructed) then arrange and insert the wired stems into the stuffed basket base to create your bouquet.
  • Pin and sew flowers and leaves into place as desired; stuff the basket body halfway through sewing for best shape and finish stuffing as you complete the join.

Important Notes

  • πŸ’‘Put the wire on at the beginning of a designated round and crochet with the wire for that round so the wire is securely caught by the yarn.
  • πŸ’‘Sew the basket lace before starting Round 9 to avoid trouble attaching the lace after the basket is closed.
  • πŸ’‘Stuff the basket body gradually and finish stuffing while sewing the basket cover and body together for an even, rounded shape.
  • πŸ’‘Wrap the lavender fabric around a wire with the right side facing out so the finished lavender spike displays the correct surface.
  • πŸ’‘Leave a length of yarn on the tulip and sew a cross on the last round to shape the bloom neatly.

This tiny Mini Flower Basket is a delightful little project that fits perfectly on a shelf or table and makes a lovely handmade gift. The set includes lavender, sunflower, tulip, rose, forget-me-not and leaves with wired stems for arranging. It uses small hooks and fine yarn to create intricate miniature flowers that bring big charm into small spaces. 🌸🧢

You ask,

we answer.

FAQs

What size will the finished piece be?

The finished mini basket measures approximately 6-9 cm across depending on yarn tension and number of flowers used; flowers are small and vary by design.

Can I use different yarn weights for this pattern?

Yes, but the pattern is written for #3 light 5ply yarn for the basket and #2 fine 4ply yarn for the flowers; changing yarn weight will alter final size and require an appropriate hook change.

Do I need special skills to work with the wire?

No special skills are required; follow the (put wire on) instructions to catch wire with the yarn, bend extra wire down to avoid interference, and secure stems inside the basket.

How long does this project typically take to complete?

Most crocheters complete this project in 5-7 hours, though time will vary based on experience and how many flowers you make.