🧢 Beautiful ✨ Detailed πŸ’ Adorable

Potion Amigurumi Pattern

Potion Amigurumi Pattern
4.2β˜… Rating
5-7 Hours Time Needed
3.0K Made This
βœ‚οΈ

Intermediate Level

Ideal for those with basic crochet experience, featuring slightly more advanced stitches and techniques to expand your skills.

⏱️

Weekend Treat

Takes 5-7 hours, making it an enjoyable project to finish over a couple of days.

🧸

Cute Companion

An adorable friend to cherish, handcrafted with love to bring comfort and joy for years to come.

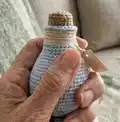
About This Potion Amigurumi Pattern

This pattern guides you through crocheting a whimsical potion bottle amigurumi with a rounded head, tiny limbs and sweet facial details. It uses simple amigurumi techniques and clear round-by-round instructions to shape each element. You will learn how to change colors, work into BLO/FLO, and finish with needle sculpting for expression.

Potion Amigurumi Pattern crochet pattern - detailed view of completed project

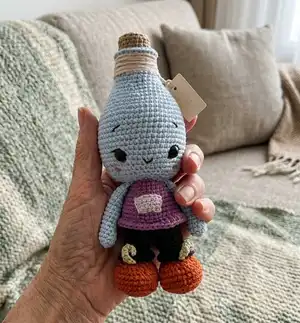
Includes materials list, abbreviations, and finishing instructions to make assembly easy. Perfect for intermediate crocheters who enjoy small character toys.

Why You'll Love This Potion Amigurumi Pattern

I absolutely love this pattern because it turns simple stitches into a delightful character full of personality. I enjoy how a small set of yarn colors and basic shaping creates a charming silhouette that feels magical. The needle-sculpting step always brings the face to life and makes each piece unique. I also love that the pattern is compact and makes a lovely gift or shelf friend. I find assembling and adding tiny details like the pocket and boot veins very satisfying.

Potion Amigurumi Pattern step 1 - construction progress Potion Amigurumi Pattern step 2 - assembly progress Potion Amigurumi Pattern step 3 - details and accessories Potion Amigurumi Pattern step 4 - final assembly and finishing

Switch Things Up

I love how easy it is to customize this pattern by changing yarn colors; try pastel hues for a soft, dreamy potion or bright neons for a playful look.

I often change the eye style too; substitute safety eyes with embroidered eyes for a baby-safe toy or smaller eyes for a cuter expression.

If you want a larger version, use a thicker yarn and a larger hook β€” this creates a chunky potion that makes a fun shelf buddy.

To make a keychain version, use thinner yarn and a smaller hook, omit stuffing or use a tiny amount, and attach a keyring to the top.

I sometimes add wire inside the limbs for a posable figure β€” just insert floral wire before closing and wrap securely with yarn to hide the wire ends.

Embellish with accessories: tiny crocheted bows, a stitched label on the pocket, or a small crocheted cork to top the bottle for extra charm.

Try embroidering freckles or blush with pink yarn or pastel chalk to create personality and variation between toys.

You can alter the boot veins by crocheting longer chains or adding contrasting color embroidery to create different shoe styles.

I recommend experimenting with eyelash yarn or boucle for a textured skin effect β€” it adds character but requires slightly looser tension.

Finally, make a whole set of potions in different sizes and colors to create a mini potion collection; they make a delightful handmade gift set.

Common Mistakes & How to Fix Them

βœ— Skipping the instruction to work into back loops only when indicated; always switch to BLO as stated to get the correct neck/head shaping. βœ— Not installing the safety eyes at the recommended rounds and spacing; place eyes between rounds 30-31, 13sc apart to match the pictured expression. βœ— Cutting the yarn too early when joining the legs; follow the instruction to cut yarn on the second leg but keep the working yarn to continue across and join both legs securely. βœ— Forgetting to stuff gradually while shaping the head and body; stuff a little at a time and use a chopstick to push filling into tight areas to avoid lumps and maintain form.

Potion Amigurumi Pattern

Create a charming potion bottle amigurumi with this detailed crochet pattern. You'll follow step-by-step rounds to shape the head, body, arms, legs and cute accessories. The pattern includes materials, abbreviations and finishing tips so you can complete a polished toy. Perfect for gifting or keeping as a whimsical handmade friend.

Intermediate 5-7 Hours

Materials Needed for Potion Amigurumi Pattern

β€” Main Fabric

  • 01
    Yarn Art Jeans - colors: 75, 72, 85, 19, 05 (as listed on pattern)
  • 02
    Black fine yarn for eyelashes embroidery
  • 03
    Polyester toy stuffing (for body/head/limbs)
  • 04
    Black plastic safety eyes 10-12mm (2 pcs)

β€” Tools Required

  • 01
    Crochet hook size 1.75 mm
  • 02
    10-12mm black plastic eyes (2 pcs)
  • 03
    Scissors
  • 04
    Needle for joining pieces and embroidering
  • 05
    Chopstick for stuffing
  • 06
    Pins
  • 07
    Stitch marker

Progress Tracker

0% Complete

β€” Head :

Info :

BEGIN CROCHETING IN GREY

Round 1 :

6SC INTO MR

Round 2 :

6INC (12)

Round 3 :

(1SC, INC)*6 (18)

Info :

WORK INTO BACK LOOPS ONLY

Round 4 :

18SC

Round 5-7 :

18SC

Info :

SWITCH TO BLUE YARN AND WORK INTO BACK LOOPS ONLY

Round 8 :

(2SC, INC)*6 (24)

Round 9-12 :

24SC

Round 13 :

(3SC, INC)*6 (30)

Round 14-15 :

30SC

Round 16 :

(4SC, INC)*6 (36)

Round 17 :

(5SC, INC)*6 (42)

Round 18 :

42SC

Round 19 :

(6SC, INC)*6 (48)

Round 20-21 :

48SC

Round 22 :

(7SC, INC)*6 (54)

Round 23-34 :

54SC

Round 35 :

(7SC, DEC)*6 (48)

Round 36 :

BLO (6SC, DEC)*6 (42)

Round 37 :

(5SC, DEC)*6 (36)

Round 38 :

(4SC, DEC)*6 (30)

Round 39 :

(3SC, DEC)*6 (24)

Info :

RETURN TO ROUND 8, WORK ACROSS THE FRONT LOOPS

Info :

INSTALL EYES BETWEEN ROUNDS 30-31, 13SC APART

β€” Legs and Body :

Round 1 :

CHAIN 7, STARTING TO THE 2ND ST FROM HOOK WORK 5SC, 4SC TO 1 ST, 4SC, INC (13)

Round 2 :

INC, 4SC, 4INC, 4SC, 2INC (22)

Round 3 :

1SC, INC, 4SC, (1SC, INC)*4, 4SC, (1SC, INC)*2 (29)

Round 4 :

2SC, INC, 4SC, (2SC, INC)*4, 4SC, (2SC, INC)*2 (36)

Round 5-7 :

36SC

Round 8 :

12SC, 6DEC HDC, 12SC (30)

Round 9 :

(3SC, DEC)*6 (24)

Round 10 :

3SC, DEC, (1SC, DEC)*5, 4SC (18)

Round 11 :

2SC, DEC, (4SC, DEC)*2, 2SC (15)

Info :

CHANGE YARN COLOR

Round 12 :

15SC

Info :

WORK INTO BACK LOOPS ONLY

Round 13 :

15SC

Round 14-17 :

15SC

Info :

RETURN TO ROUND 13 AND WORK 15DC

Info :

WORK 5SC ADDITIONALLY ACROSS THE SECOND LEG

Info :

CUT YARN ON THE SECOND LEG, BUT DO NOT BREAK YARN ON THE SECOND ONE, GO ON WORKING ACROSS LEG #1: 15SC AND THEN ACROSS LEG #2: 15SC

Round 19 :

(4SC, INC)*6 (36)

Round 20 :

36SC

Info :

CHANGE YARN COLOR

Round 21 :

36SC

Info :

WORK INTO BACK LOOPS ONLY

Round 22 :

36SC

Round 23-25 :

36SC

Round 26 :

(4SC, DEC)*6 (30)

Round 27 :

30SC

Round 28 :

(3SC, DEC)*6 (24)

Round 29-31 :

24SC

Info :

RETURN TO ROUND 22, WORK 36DC

β€” Arms :

Round 1 :

6SC INTO MR

Round 2 :

6INC (12)

Round 3 :

12SC

Round 4 :

10SC, DEC (11)

Round 5 :

9SC, DEC (10)

Round 6-14 :

10SC

Info :

A ROW THROUGH BOTH EDGES WORK

β€” Veins on the boots :

Info :

10CH, TURN AND STARTING TO THE 2ND ST FROM HOOK WORK 9 SL ST

β€” Pocket :

Row 1 :

5CH, TURN YOUR WORK

Row 2 :

INC, 2SC, INC (6SC) TURN YOUR WORK

Row 3 :

6SC

Info :

SEW IT ON THE BELLY

β€” Face & Finishing :

Info :

MAKE FACE NEEDLE SCULPTING, SEND YOUR NEEDLE FROM BELOW THE NECK TO THE PLACE UNDER ONE OF THE EYES, AND GO BACK DOWN 1 ST AWAY, PULL. REPEAT THE STEPS ABOVE FOR THE SECOND EYE. PULL AND TIE KNOTS

Info :

EMBROIDER BROWS AND A SMILE.

Assembly Instructions

  • Install black plastic safety eyes between rounds 30-31 of the head, spaced 13 single crochet stitches apart, before closing the head and after stuffing sufficiently.
  • Sew the head to the body securely by aligning the neck opening to the top of the body and using a whipstitch with the tail from the last round; reinforce with several passes for durability.
  • Attach arms to the sides of the body at the level of the chest by pinning in place, then sew with ladder stitch; ensure both arms are symmetrical and angle slightly forward for a natural pose.
  • Join legs to the bottom of the body ensuring even spacing, sew firmly and secure yarn ends; add the boot veins with nine slip stitches chain pieces glued or sewn onto boots as shown.
  • Sew the pocket onto the belly, centering it on the front of the torso; embroider brows and mouth after positioning facial features and completing needle sculpting.

Important Notes

  • πŸ’‘Use stitch markers to keep track of the beginning of each round, especially during increases, decreases and color changes.
  • πŸ’‘Stuff firmly but gradually with polyester stuffing and use a chopstick to push filling into narrow areas and around the neck for a smooth shape.
  • πŸ’‘Pin parts in place before sewing to ensure correct positioning and symmetry; check photos for reference on placement.

This little potion amigurumi brings a touch of handmade magic to your home or gift pile. It combines cute shaping with simple finishing techniques so you can make something special in a weekend. Share your finished friend online and tag the designer to show off your creation! 🧢✨

You ask,

we answer.

FAQs

What size will the finished piece be?

The finished toy size with the materials recommended above is about 19 cm, though final size depends on your tension and yarn weight.

Can I use different yarn weights for this pattern?

Yes, you can use different yarn weights but the final size and look will change; adjust your hook size accordingly to maintain proper stitch definition.

Do I need prior crochet experience for this pattern?

This pattern is rated intermediate, so basic knowledge of amigurumi techniques, single crochet, increases and decreases is recommended.

How long does this project typically take to complete?

Most crocheters complete this project in 5-7 hours, though time may vary based on experience level, finishing details and assembly pace.