🧶 Beautiful ✨ Detailed 💝 Adorable

Free Crochet Hat Pattern

Free Crochet Hat Pattern
4.3★ Rating
2-4 Hours Time Needed
3.8K Made This
✂️

Beginner Friendly Level

Perfect for those just starting their crochet journey, with clear instructions and simple techniques

⏱️

Bite-Sized Project

Finishes in 2-4 hours—perfect for an afternoon of creative relaxation.

🧣

Snug Essential

Everyday comfort with practical charm, designed for both functionality and style through changing seasons.

About This Free Crochet Hat Pattern

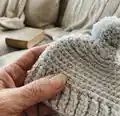
This pattern creates a simple ribbed crochet hat worked from the bottom up. The ribbing is worked flat, folded and joined, then the body is worked in the round with back-loop-only stitches for a stretchy textured brim. It includes instructions for making a small pom-pom to attach to the top.

Free Crochet Hat Pattern crochet pattern - detailed view of completed project

Ideal for using worsted weight yarn in your favorite colors, and sized to coordinate with the Snowman Friends pattern. Clear round-by-round directions make following the shaping easy.

Why You'll Love This Free Crochet Hat Pattern

I absolutely love this pattern because it is quick to make and uses very simple stitches that yield a polished, professional-looking hat. I enjoy how the ribbing works up flat and transforms into a stretchy brim when joined — it is both functional and pretty. Making a small pom-pom to finish the top always adds a playful touch that I find irresistible. This pattern is perfect for using leftover worsted yarn, and I love gifting finished hats to friends and family.

Free Crochet Hat Pattern step 1 - construction progress Free Crochet Hat Pattern step 2 - assembly progress Free Crochet Hat Pattern step 3 - details and accessories Free Crochet Hat Pattern step 4 - final assembly and finishing

Switch Things Up

I love changing up the color to create different looks; try a two-tone brim and body by switching colors when you join the ribbing.

I often use bulky yarn and a larger hook to make an oversized, squishy beanie—just adjust the number of rounds for the crown if needed.

I sometimes swap the pom-pom for a crocheted flower or button for a more subtle finish that is toddler-friendly.

I recommend trying variegated or speckled worsted yarn to add visual interest without extra colorwork effort.

I have made mini versions using fingering yarn and a smaller hook to create doll hats and keychain accessories.

I like to embroider a small initial on the brim for personalization—use contrasting yarn and a yarn needle to stitch letters neatly.

I sometimes fold the brim twice for a thicker cuff; to do this, make your ribbing longer and fold it up once more before attaching the crown.

I suggest adding a soft lining for extra warmth—cut a small circle of fleece and hand stitch it into the hat’s interior for a cozy feel.

I occasionally change the decrease rounds to shape a more rounded crown; experiment with decreasing intervals to get a slightly different silhouette.

I also enjoy making matching sets by crocheting a small scarf or mittens using the same BLO ribbing technique for cohesion.

Common Mistakes & How to Fix Them

✗ Skipping the turning chain note can throw off your row counts; remember that the turning chain does not count as a stitch and adjust your placement accordingly. ✗ Working the ribbing in the round instead of flat will give the wrong texture; follow the instructions to work the ribbing flat, fold and slip stitch the edges together before continuing in the round. ✗ Not working into the back loop only when instructed will flatten the ribbed texture; be sure to insert your hook into the BLO for the rounds specified to maintain stretch. ✗ Fastening off too early will make joining the ribbing difficult; do not fasten off after row 30 — fold and slip stitch row 1 to row 30 together before continuing. ✗ Pulling the closing tail too tight when cinching the crown can distort the top; gently pull and adjust stuffing or stitches as you close for a neat finish.

Free Crochet Hat Pattern

Make a cozy ribbed crochet hat with this easy-to-follow pattern. Youll work a flat ribbing band, join it to work in the round, then shape the crown using back-loop stitches for a neat finish. Perfect for gifting or matching your Snowman Friends set, this pattern uses simple stitches and clear instructions so you can finish a cute beanie in an afternoon.

Beginner Friendly 2-4 Hours

Materials Needed for Free Crochet Hat Pattern

— Main Fabric

  • 01
    Worsted weight yarn (#4), approximately 50 yds per hat
  • 02
    Paintbox Yarns Simply Aran - Stormy Grey (used in samples)
  • 03
    Paintbox Yarns Simply Aran - Blush Pink (used in samples)

— Tools Required

  • 01
    Crochet hook size 3.25 mm
  • 02
    Crochet hook size 3.75 mm
  • 03
    Tapestry needle
  • 04
    Scissors
  • 05
    Pom Pom maker (optional)

Progress Tracker

0% Complete

— Ribbing :

Info :

Using the 3.25 mm hook, ch 5

Row 1 :

sc in the second ch from the hook and in each ch across, Ch 1 and turn [4sc]

Row 2 :

sc BLO in each st across. Ch 1 and turn [4sc]

Row 3-30 :

Repeat row 2

Info :

Do not fasten off. Fold in half, sl st row 1 and row 30 together to join the ribbing. Turn inside out, so the seam is on the inside and the working loop is on the top. The pattern will now be worked in the round.

— Top of the Hat :

Info :

Using the 3.75 mm hook

Round 1 :

ch 1, work 30 sc evenly around the ribbing, sl st to the first sc [30 sc]

Round 2-5 :

ch 1, sc BLO in each st around, sl st to the first sc [30]

Round 6 :

ch 1, (sc BLO in next 3 sts, sc2tog BLO) around, sl st to the first st [24]

Round 7 :

ch 1, (sc BLO in next 2 sts, sc2tog BLO) around, sl st to the first st [18]

Round 8 :

ch 1, (sc BLO in next st, sc2tog BLO) around, sl st to the first st [12]

Round 9 :

ch1, (sc2tog BLO) around [6]

Info :

Fasten off yarn leaving a tail. Thread tail end of yarn onto a tapestry needle, insert the needle through the front loop of the remaining sts and pull tight to close.

Info :

Make a small Pom Pom and attach to the top of the hat.

Assembly Instructions

  • Fold the ribbing in half and slip stitch Row 1 to Row 30 together to form the brim, ensuring the seam is neat and secure.
  • Turn the joined ribbing inside out so the seam sits on the inside and the working loop is on top before continuing to work in the round.
  • Work the crown rounds onto the joined brim as instructed, then fasten off leaving a long tail to close the top.
  • Thread the tail onto a tapestry needle and pass through the front loops of the remaining stitches, pull tight to close the crown neatly and weave in the tail.
  • Make a small pom-pom and securely sew it to the top center of the hat, anchoring through several strands so it does not come loose.
  • Weave in all loose ends on the inside of the hat and trim excess yarn for a tidy finish.

Important Notes

  • 💡Use the 3.25 mm hook for the ribbing and the 3.75 mm hook for the body of the hat for correct gauge and fit.
  • 💡The hat is crocheted from the bottom up; the ribbing is worked flat, folded, joined, and then the body is worked in the round.
  • 💡The turning chain does not count as a stitch; always begin rounds/rows as directed without adding an extra stitch for the turning chain.
  • 💡Do not fasten off after the ribbing rows; fold and join the ribbing first to continue working in the round.

This cosy ribbed hat is designed to be quick, practical and totally giftable. 🧶 Use your favourite worsted yarn colors to make matching sets or to use up scraps. 🎁 The finished hat pairs perfectly with the Snowman Friends pattern or stands alone as a lovely beanie.

You ask,

we answer.

FAQs

What size will the finished piece be?

The finished hat is sized to fit the Snowman Friends pattern; dimensions will depend on your yarn and tension but it is made with worsted weight yarn for a small child/adult depending on gauge.

Can I use different yarn weights for this pattern?

Yes, but changing yarn weight will affect the final size; if you choose a different weight, adjust hook sizes and re-check gauge to achieve the intended fit.

Do I need prior crochet experience for this pattern?

This pattern is rated beginner friendly and requires basic knowledge of single crochet, working into the back loop only (BLO), and simple decreases (sc2tog).

How long does this project typically take to complete?

Most crocheters finish this hat in 2-4 hours, depending on experience and whether you make a pom-pom by hand or with a maker.