🧢 Beautiful ✨ Detailed πŸ’ Adorable

Elephant Amigurumi Pattern

Elephant Amigurumi Pattern
4.0β˜… Rating
5-7 Hours Time Needed
2.3K Made This
βœ‚οΈ

Intermediate Level

Ideal for those with basic crochet experience, featuring slightly more advanced stitches and techniques to expand your skills.

⏱️

Weekend Treat

Takes 5-7 hours, making it an enjoyable project to finish over a couple of days.

🧸

Cute Companion

An adorable friend to cherish, handcrafted with love to bring comfort and joy for years to come.

About This Elephant Amigurumi Pattern

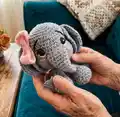
This pattern creates a little elephant amigurumi approximately 10cm tall using a 2.5mm hook. You will crochet the head and body as one piece, then make trunk, ears, legs, arms, tail and a ribbon to finish. The instructions include full round-by-round details, assembly guidance and photo-backed shaping tips.

Elephant Amigurumi Pattern crochet pattern - detailed view of completed project

Designed with clear rounds and helpful images to guide placement of eyes, shaping and sewing. Perfect for makers who enjoy small toy projects with expressive faces.

Why You'll Love This Elephant Amigurumi Pattern

I absolutely love this pattern because it captures a lot of personality in a very small amigurumi. I enjoy the shaping techniques used on the trunk and face that let you create expressive features with simple stitches. The construction (head and body in one piece) makes assembly neat and quick, which I appreciate when I'm making multiple gifts. I also love how easy it is to customize the ribbon and blush to give each elephant its own unique charm.

Elephant Amigurumi Pattern step 1 - construction progress Elephant Amigurumi Pattern step 2 - assembly progress Elephant Amigurumi Pattern step 3 - details and accessories Elephant Amigurumi Pattern step 4 - final assembly and finishing

Switch Things Up

I love to change colors to make different personalities for this elephant; try pastel grey with mint ears for a softer look.

I often make the elephant larger by using a thicker yarn and a larger hook for a plush, huggable version.

For a miniature keychain version, use fingering weight yarn and a 2.0 mm hook and attach a keyring to the top.

I sometimes embroider freckles or tiny spots on the trunk to give a unique expression to each elephant I make.

You can swap the ribbon color or style β€” a darker bow gives a classic look while a bright one feels playful and modern.

I recommend experimenting with eye types: safety eyes for durability, or embroidered eyes for a soft, toy-safe option.

If you want posable limbs, add thin wire inside the arms and legs before stuffing, taking care to wrap the wire securely.

Try using variegated yarn for a whimsical textured finish; it gives a delightful mottled effect without extra sewing.

I sometimes add tiny accessories like a crochet flower or mini scarf to create seasonal themed elephants.

Feel free to adjust stuffing levels to change the firmness and silhouette β€” a slightly firmer head helps keep features defined.

Common Mistakes & How to Fix Them

βœ— Skipping stitch markers during rounds can lead to losing the start of row; always place a marker at the first stitch and move it each round. βœ— Forgetting to leave long yarn tails for sewing will make assembly harder later; leave long tails on parts you will sew and use them to attach pieces securely. βœ— Overstuffing the head or limbs makes shaping difficult and can distort the silhouette; stuff gradually and check shape frequently while closing.
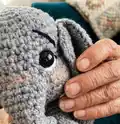
 βœ— Placing safety eyes too late can result in poor positioning; follow the instruction to place eyes in Round NΒΊ10 on the sides of the opening to get the correct expression. βœ— Not shaping the ears before sewing reduces the final look; pin the top to shape each ear and secure it before stitching to the head for best results.

Elephant Amigurumi Pattern

Make a sweet mini elephant amigurumi with clear step-by-step instructions, perfect for gifting or keeping. This pattern guides you through every round, assembly step, and finishing touch so your project turns out adorable. Use basic crochet stitches and simple shaping to create a cuddly little companion you will love.

Intermediate 5-7 Hours

Materials Needed for Elephant Amigurumi Pattern

β€” Main Fabric

  • 01
    Cotton or wool thread: Grey
  • 02
    Cotton or wool thread: White
  • 03
    Cotton or wool thread: Black
  • 04
    Cotton or wool thread: Pink
  • 05
    Fiberfill or padding of your choice for stuffing
  • 06
    Plastic eyes NΒΊ10

β€” Tools Required

  • 01
    Crochet hook no. 2.5mm
  • 02
    Wool needle (yarn needle) for sewing and embroidering
  • 03
    Plastic eyes NΒΊ10 (2 pieces)
  • 04
    Fiberfill or stuffing
  • 05
    Pins for positioning parts
  • 06
    Small brush or makeup to apply blush (optional)

Progress Tracker

0% Complete

β€” Head + Body :

Info :

weave spiral. Grey

Round 1 :

Magic ring 6sc (6)

Round 2 :

1inc at all stitches (12)

Round 3 :

(1sc, 1inc) x6 (18)

Round 4 :

(2sc, 1inc) x6 (24)

Round 5 :

(3sc, 1inc) x6 (30)

Round 6 :

(4sc, 1inc) x6 (36)

Round 7-11 :

36sc (36)

Round 12 :

9sc, (1inc) x3, 3sc, 6ch (leave 6 free stitches), 3sc, (1inc) x3, 9sc (42)

Round 13-15 :

42sc (42)

Round 16 :

(5sc, 1dec) x6 (36). Place eyes in Round NΒΊ10, on the sides of the opening made.

Round 17 :

(4sc, 1dec) x6 (30)

Round 18 :

(3sc, 1dec) x6 (24)

Round 19 :

(2sc, 1dec) x6 (18). Fill

Round 20 :

(1sc, 1dec) x6 (12)

Round 21 :

(1sc, 1inc) x6 (18)

Round 22 :

(2sc, 1inc) x6 (24)

Round 23-28 :

24sc (24)

Round 29 :

(2sc, 1dec) x6 (18). Fill

Round 30 :

(1sc, 1dec) x6 (12)

Round 31 :

(1dec) x6 (6). Fasten off

β€” Trunk :

Info :

Grey

Round 1 :

Magic ring 4sc (4)

Round 2 :

(1sc, 1inc) x2 (6)

Round 3 :

6sc (6)

Round 4 :

(2sc, 1inc) x2 (8)

Round 5 :

8sc (8)

Round 6 :

(3sc, 1inc) x2 (10)

Round 7 :

10sc (10)

Round 8 :

(4sc, 1inc) x2 (12). Do not fill

Info :

Leave a long yarn for sewing. Join the edge of the trunk as shown in the images.

Info :

Join the trunk to the face in the opening that we left previously.

β€” Ears (x2) :

Info :

Grey

Round 1 :

Magic ring 6sc (6)

Round 2 :

1inc at all stitches (12)

Round 3 :

(1sc, 1inc) x6 (18)

Round 4 :

(2sc, 1inc) x6 (24)

Round 5 :

(3sc, 1inc) x6 (30)

Round 6 :

(1dec) x2, 1sc, (3sc in the same stitch) x22, 1sc, (1dec) x2 (66)

Info :

Leave a long yarn for sewing. Pin the top to shape the ear, then pin the ears to the head.

β€” Legs (x2) :

Info :

Grey

Round 1 :

Magic ring 6sc (6)

Round 2 :

1inc at all stitches (12)

Round 3 :

(1sc, 1inc) x6 (18)

Round 4 :

Taking the back chain: 18sc (18)

Round 5 :

(1sc, 1dec) x6 (12). Fill

Round 6 :

(1dec) x6 (6)

Round 7 :

6sc (6)

Info :

Leave a long yarn for sewing. Join the legs to the body from Round NΒΊ25.

β€” Arms (x2) :

Info :

Grey

Round 1 :

Magic ring 6sc (6)

Round 2 :

1inc at all stitches (12)

Round 3 :

(1sc, 1inc) x6 (18)

Round 4 :

Taking the back chain: 18sc (18)

Round 5 :

(1sc, 1dec) x6 (12). Fill

Round 6 :

(2sc, 1dec) x3 (9)

Round 7 :

9sc (9)

Round 8 :

(1sc, 1dec) x3 (6)

Round 9 :

6sc (6)

Info :

Leave a long yarn for sewing. Join the arms to the body from Round NΒΊ21.

β€” Tail :

Info :

Grey

Round 1 :

8ch

Round 2 :

8st

Info :

Attach the tail to the body.

β€” Ribbon :

Info :

Pink

Round 1 :

Ring of 26ch

Round 2 :

26sc (26)

Round 3-5 :

26sc (26)

Round 6 :

8ch

Info :

Shape the ribbon by joining the last chain with the first chain as shown in the images.

β€” Assembly :

Item :

Join the trunk to the face in the opening that we left previously.

Item :

Embroider the eyes and eyebrows as shown in the images.

Item :

Shape the face as shown in the images.

Item :

Apply blush on the cheeks and on the trunk as seen in the images.

Item :

Join the ribbon to the head.

Assembly Instructions

  • Join the trunk to the face by sewing the trunk into the opening left on the head, matching the edges and securing with the long yarn tail.
  • Position and sew the ears to the head after pinning and shaping the top of each ear so they sit symmetrically at the sides of the head.
  • Attach the legs to the body starting at Round NΒΊ25, spacing them evenly to allow the elephant to sit stably.
  • Sew the arms to the body beginning at Round NΒΊ21, angling slightly forward for a natural pose and securing with hidden stitches.
  • Place and sew the tail to the back of the body and secure tightly with a knot and weave in ends.
  • Embroider eyebrows and any facial details, then apply a touch of blush to the cheeks and trunk for a finished look.

Important Notes

  • πŸ’‘Work in continuous spiral (no joining) unless otherwise stated; mark the start of each round to keep track of stitch counts.
  • πŸ’‘Place safety eyes in Round NΒΊ10 on the sides of the opening made to achieve the same facial placement as the photos.
  • πŸ’‘Leave long yarn tails on parts to be sewn so you can use the same yarn to attach the pieces securely without additional thread.
  • πŸ’‘Do not overfill the trunk; Round 8 of the trunk specifies 'Do not fill' to allow sewing and shaping correctly.
  • πŸ’‘Pin parts in place before sewing to check symmetry and position, especially ears and ribbon placement.

You've reached the end β€” your tiny elephant is ready to cherish! 🀎 This pattern brings together simple rounds and thoughtful shaping for a delightful finished toy. 🧢 Share your creation and spread handmade smiles β€” I love seeing your finished projects! ✨

You ask,

we answer.

FAQs

What size will the finished piece be?

The finished amigurumi measures approximately 10 cm tall when using the recommended yarn and a 2.5 mm hook.

Can I use different yarn weights for this pattern?

Yes, you can substitute yarn weights but the final size will change; choose an appropriate hook for your yarn and expect variations in stitch tension and finished dimensions.

Do I need prior crochet experience for this pattern?

This pattern is rated intermediate, so familiarity with single crochet, increases, decreases and working in the round is recommended for best results.

How long does this project typically take to complete?

Most crocheters complete this project in about 5-7 hours, though time may vary with experience and customization choices.

Where should I place the safety eyes?

Place the safety eyes in Round NΒΊ10 on the sides of the opening as noted in the pattern to match the pictured placement and expression.