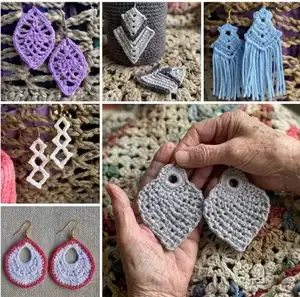
Make a beautiful collection of 25 crochet earring designs using fine cotton thread and small hooks. This pattern bundle walks you through classic motifs like circles, pineapples, stars, leaves and tiny hearts so you can make delicate, wearable art for gifts or your shop. Clear step-by-step instructions and finishing notes help you shape and stiffen each pair for a polished result.
Progress Tracker
0% Complete
— Basic Pattern Information :
Infos :
Difficulty Levels: ●○○○ = Beginner. ●●○○ = Easy. ●●○○ = Intermediate. ●●●● = Advanced.
Infos :
Materials Needed for every design: 25 – 50 yards #10 Cotton Crochet Thread. 1.5mm Crochet Hook. Fishhook Earring Posts. Jewelry Pliers.
Infos :
Materials needed for shaping and stiffening: Fabric Stiffener for medium level of stiffness. Modge Podge for extreme level of stiffness (recommended for loops and thin earring designs). Straight Pins (for shaping/blocking). Foam or cardboard surface you can use the straight pins in during the shaping process.
Infos :
Pattern Notes: Check each pattern for additional materials needed prior to beginning. Weave in loose ends as work progresses. Work should be blocked/shaped and stiffened once completed to maintain the desired appearance. We recommend hand washing, laying flat to dry, and reblocking with all handmade items if necessary. Dimensions are not included for designs measuring less than 2 inches.
Infos :
Stitches used in this book: Magic Ring. Ch(s) – chain(s). Dc - double crochet. Dtr - double treble (see special stitches). Hdc - half double crochet. P - picot (see special stitches). Sc - single crochet. Sl st - slip stitch. Sp(s) - space(s). St(s) - stitch(es). Tr - treble crochet. Ttr – triple treble (see special stitches). Qtr – Quadruple Treble (see special stitches).
Infos :
Special Stitches: Double treble (Dtr): yo 3 times, insert hook in stitch indicated, draw up a loop, (yo, pull through 2 loops) 4 times. Picot: ch 3, sl st in third ch from hook. Quadruple treble (Qtr): yo 5 times, insert hook in stitch indicated, draw up a loop, (yo, pull through 2 loops) 6 times. Triple treble (Ttr): yo 4 times, insert hook in stitch indicated, draw up a loop, (yo, pull through 2 loops) 5 times.
Info :
Finishing: Finish off. Weave in ends. Block: Wet crocheted earring. Shape as desired and pin in place. Allow to dry. Spray/rub on your stiffener and allow to dry completely. Repeat stiffening if desired. Attach Posts: Using pliers, open bottom circle on earring post and attach to topmost stitch of crocheted earring. Make sure to go through two thicknesses of thread for strength. Close bottom circle of earring post securely with pliers.
— Earring Design #1 "Russian Circles":
Difficulty Level :
●●●○ = Intermediate
Info :
Beginning circle: Ch 5, Dtr in first ch, work 9 sc around post of Dtr, work 9 sc around ch5. Join. Ch1, turn. (18 sc)
Row 1 :
Sc in each of next 5 sc, ch 5 (this ch-5-space will be referred to as center-ch-5-space), sc in each of next 4 sc. Leave remaining sts unworked. Turn.
Row 2 :
Ch2, (Ttr in center-ch-5-space, ch 1) 4 times, Ttr in center-ch-5-space, ch 5, Dtr in fifth ch from hook, work 9 sc around post of Dtr, work 9 sc around ch5, (Ttr in center-ch-5-space, ch 1) five times, ch 1, skip four sts, slst in next st. Leave remaining sts unworked. Turn.
Row3 :
2 Sc in ch-sp, {(slst, ch3, slst) in next Ttr, sc in ch-sp,} four times, sc in next Ttr, sc in each of next 9 sc, sc in next Ttr and in next sp, {(slst, ch3, slst) in next Ttr, sc in ch-sp,} four times, sc in same space, sc in next sc, slst in next st. Finish off.
Info :
Finishing: Follow finishing instructions as explained on page 2.
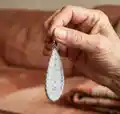
— Earring Design #2 "Tear Drops":
Difficulty Level :
●●○○ = Easy
Info :
Ch 4, join to form ring.
Round 1 :
Ch 3 (counts as dc), 15 dc in ring, join in 3rd chain of beginning ch-3.
Round 2 :
Ch 5 (counts as dc and a ch-2-sp), (dc in next dc, ch2) five times, dc in dc, ch9, skip 4 dc, tr in next dc, ch 9, slst in third ch of beginning ch-5. Finish off.
Info :
Finishing: Follow finishing instructions as explained on page 2.
— Earring Design #3 "Medium Pineapple":
Difficulty Level :
●●○○ = Easy
Info :
Dimensions: 2 Inches (not including earring post). Ch 10, join to form ring.
Round 1 :
Ch 3 (counts as dc), 19 dc in ring, join in 3rd chain of beginning ch-3.
Row 1 :
(Ch3, slst in next st) 9 times.
Row 2 :
Turn, (Ch3, slst in next ch space) 9 times.
Row 7 :
Turn, slst in ch sp, (ch3, slst in next ch sp) 8 times.
Row 8 :
Turn, slst in ch sp, (ch3, slst in next ch sp) 7 times.
Row 9 :
Turn, slst in ch sp, (ch3, slst in next ch sp) 6 times.
Row 10 :
Turn, slst in ch sp, (ch3, slst in next ch sp) 5 times.
Row 11 :
Turn, slst in ch sp, (ch3, slst in next ch sp) 4 times.
Row 12 :
Turn, slst in ch sp, (ch3, slst in next ch sp) 3 times.
Row 13 :
Turn, slst in ch sp, (ch3, slst in next ch sp) 2 times.
Row 14 :
Turn, slst in ch sp, ch4, slst in next ch sp. Finish off.
Info :
Finishing: Follow finishing instructions as explained on page 2.
— Earring Design #4 "Large Pineapple":
Difficulty Level :
●●○○ = Easy
Info :
Dimensions: 2.5 Inches (not including earring post). Ch 12, join to form ring.
Round 1 :
Ch 3 (counts as dc), 23 dc in ring, join in 3rd chain of beginning ch-3.
Row 1 :
(Ch3, slst in next st) 12 times.
Row 2 :
Turn, (Ch3, slst in next ch space) 12 times.
Row 6 :
Turn, slst in ch sp, (ch3, slst in next ch sp) 11 times.
Row 7 :
Turn, slst in ch sp, (ch3, slst in next ch sp) 10 times.
Row 8 :
Turn, slst in ch sp, (ch3, slst in next ch sp) 9 times.
Row 9 :
Turn, slst in ch sp, (ch3, slst in next ch sp) 8 times.
Row 10 :
Turn, slst in ch sp, (ch3, slst in next ch sp) 7 times.
Row 11 :
Turn, slst in ch sp, (ch3, slst in next ch sp) 6 times.
Row 12 :
Turn, slst in ch sp, (ch3, slst in next ch sp) 5 times.
Row 13 :
Turn, slst in ch sp, (ch3, slst in next ch sp) 4 times.
Row 14 :
Turn, slst in ch sp, (ch3, slst in next ch sp) 3 times.
Row 15 :
Turn, slst in ch sp, (ch3, slst in next ch sp) 2 times.
Row 16 :
Turn, slst in ch sp, ch4, slst in next ch sp. Finish off.
Info :
Finishing: Follow finishing instructions as explained on page 2.
— Earring Design #5 "Cubism":
Difficulty Level :
●●○○ = Easy
Info :
Dimensions: 2 Inches (not including earring post). Ch 8, join with slst in first ch to form a ring.
Foundation ring :
Ch 3 (counts as a dc), 19 dc in ring. Join with slst to third ch of beginning ch-3.
Row 1 :
Ch7, 2dtr in same st, 2Dtr in each of next 3 sts, 3 Dtr in next st, ch 13, skip five sts, 3Dtr in next st, 2Dtr in each of next 3 sts, 3 Dtr in next st, ch 13, join with slst in top of beginning ch7. Finish off.
Info :
Finishing: Follow finishing instructions as explained on page 2.
— Earring Design #6 "Tea Cup Diamonds":
Difficulty Level :
●●○○ = Easy
Info :
Beginning Ring: Ch4, join with slst in first ch to form a ring.
Round 1 :
Ch3 in ring, dc, tr, picot, tr, 2dc, picot, 2dc, tr, picot, tr, 2dc, picot, join in top of beginning ch3. Finish off.
Info :
Finishing: Follow finishing instructions as explained on page 2.
— Earring Design #7 "Silver Circles":
Difficulty Level :
●●○○ = Easy
Info :
Make a chain 4 inches long, join with slst to form ring. (Approximately 30 ch)
Info :
Work single crochets in ring until ring is full. (Approximately 2 sc for every 1 chain – approx. 60 sc). Join with slst in first sc. Finish off.
Info :
Finishing: Modge Podge or another strong stiffener is recommended for this design to maintain its circular shape once blocked. For more finishing guidance, follow the finishing instructions as explained on page 2.
— Earring Design #8 "Beginners Loop":
Difficulty Level :
●○○○ = Beginner
Info :
Place bead on thread before beginning to crochet.
Info :
Ch 15, slide bead close to hook, ch 16, join with slst in first ch. Finish off. Weave in ends. (Optional: place a small drop of glue on the thread ends to help secure them)
Info :
Finishing: Modge Podge or another strong stiffener is recommended for this design to maintain its teardrop shape once blocked. For more finishing guidance, follow the finishing instructions as explained on page 2.
— Earring Design #9 "Snowflake Star":
Difficulty Level :
●●○○ = Easy
Round 1 :
Ch6, join to form ring.
Round 2 :
Ch3 (counts as dc), 2dc in ring, (ch 4, 3dc in ring) 5 times, ch 4, join with slst in 3rd ch of beginning ch. (6 ch4-sps)
Round 3 :
Sc in same st as join, skip next st, sc in next st, [(2sc, ch3, 2sc) in ch sp, 1 sc in next st, skip next st, 1 sc in next st] 5 times, (2sc, ch3, 2sc) in next ch sp, join with slst to first st of round. Finish off.
Info :
Finishing: Follow finishing instructions as explained on page 2.
— Earring Design #10 "Granny Square Classic":
Difficulty Level :
●●○○ = Easy
Info :
Ch 6, join to form ring.
Round 1 :
Ch 3 (counts as dc here and throughout), 2dc in ring, ch4, (3dc in ring, ch 4) three times, join with slst to top of beginning-ch-3, turn.
Round 2 :
Ch 3, (2dc, ch 4, 3dc) in next ch sp, ch 2, *(3dc, ch 4, 3dc) in next ch sp, ch 2, repeat from * around. Join with slst to top of beginning-ch-3. Finish off.
Info :
Finishing: Follow finishing instructions as explained on page 2.
— Earring Design #11 "Christmas Star":
Difficulty Level :
●●●○ = Intermediate
Round 1 :
Magic ring, 20 hdc in ring, join with slst to first st. Pull magic ring tight. Weave in beginning tail.
Round 2 :
Small arm: ch 5, slst in second ch from hook, slst in next ch, sc in each of next two chs. Skip one st, slst in next st.
Info :
Longest arm: Ch 10, slst in second ch from hook. Working in each ch back towards ring: slst, sc, sc, sc, hdc, hdc, dc, dc. Skip two sts, slst in next st.
Info :
Repeat small arm and medium length arm as directed to create star points. Finish off.
Info :
Finishing: Follow finishing instructions on page 2.
— Earring Design #12 "Three Leaf Clover":
Difficulty Level :
●●●○ = Intermediate
Info :
Make Magic Ring, leaving an 8" tail.
Round 1 :
[Ch6, slst in 4th ch from hook (first clover ring formed), ch3, slst in magic ring] 3 times, do not turn. Pull magic ring so only a small ring exists but not too tight.
Round 2 :
*(2dc, 3tr, ch2, sc, ch2, 3tr, 2dc) in next clover ring, slst in magic ring; repeat from * until all 3 clover leaves have been worked, ch12. Finish off.
Info :
Pull magic ring tight and secure beginning tail. Weave in ends; weave through stem for extra thickness if desired. (Optional: place a small drop of glue on the thread ends to help secure them)
Info :
Finishing: Follow finishing instructions as explained on page 2.
— Earring Design #13 "Tiny Hearts":
Difficulty Level :
●●○○ = Easy
Round 1 :
(Ch 3, 2dc, 3tr, ch 1, sc, ch 1, 3tr, 3dc) in ring. Pull magic ring tight! Join with slst in top of beginning ch3. Finish Off.
Info :
Secure tail of magic ring.
Info :
Finishing: Follow finishing instructions as explained on page 2.
— Earring Design #14 "Irish Crochet Leaf":
Difficulty Level :
●●●○ = Intermediate
Info :
Foundation rows: Ch15, sc in second ch from hook and in next 12 chains, 3sc in last ch. Rotate. Sc in each ch along opposite side of foundation ch. Hereafter work in back loops only.
Row 1 :
Turn, ch1, sc in same st and in next 10 sts. Leave remaining sts unworked.
Row 2 :
Turn, ch1, sc in same st and in each of next 9 sts, 2sc in next st. Rotate leaf clockwise so you are working on bottom edge of leaf; 3 sc in center st., rotate leaf clockwise so you are working on opposite side of leaf; 2sc in first st. Sc in each of next 10 sts. Leave remaining sts unworked.
Row 3 :
(Hereafter each row will be "U" shaped). Turn, slst in each of next 3 sts, ch 1, sc in each of next 10 sts, 3sc in next st, sc in next 9 sts. Leave remaining sts unworked.
Row 4 :
Turn, slst in each of next 3 sts, ch1, sc in same st and in next 7sts, 3sc in next st, sc in each of next 10 sts.
Row 5 :
Turn, slst in each of next 3 sts, ch1, sc in same st and in next 8 sts, 3sc in next st, sc in each of next 8 sts. Leave remaining sts unworked.
Row 6 :
Turn, slst in each of the next 3 sts, ch1, sc in next 6 sts, 3sc in next st, sc in each of next 9 sts. Leave remaining sts unworked.
Row 7 :
Turn, ch1, slst in next 9 sts, (sc, ch7, sc) in next st, sc in next st, slst in next 6 sts. Leave remaining sts unworked.
Row 8 :
Turn, slst in next 8 sts, 7 sc in ch sp, sc in next st, slst in next 6 sts. Finish off.
Info :
Finishing: Follow finishing instructions as explained on page 2.
— Earring Design #15 "Shortened Pineapple Drops":
Difficulty Level :
●●●○ = Intermediate
Info :
Dimensions: 2.5 Inches.
Row 1 :
Ch 4 (counts as first ch and a hdc), hdc in third ch from hook, ch 2, 2hdc in first ch of row.
Row 2 :
Ch 2 (counts as hdc here and throughout), turn, hdc in next st, ch 2, hdc in ch sp, ch 2, hdc in each of the last two sts.
Row 3 :
Ch 2, turn, hdc in next st, ch 3, skip ch sp, 2 dc in next hdc, ch 3, skip ch sp, hdc in each of the last two sts.
Row 4 :
Ch 2, turn, hdc in next st, ch 3, skip ch sp, hdc in next dc, ch 2, hdc in same st, ch 3, skip ch sp, hdc in each of the last two sts.
Row 5 :
Ch 2, turn, hdc in next st, ch 3, skip ch sp, hdc in next hdc, ch 1, (hdc, ch 1, hdc, ch 1, hdc, ch 1) in center ch sp, hdc in next hdc, ch 3, skip ch sp, hdc in each of the last two sts.
Row 6 :
Ch2, turn, hdc in next st, ch 3, skip ch sp, (sc in next ch-1-sp, ch 3) four times, skip ch sp, hdc in each of the last two sts.
Row 7 :
Ch 2, turn, hdc in next st, ch 3, skip ch sp, (sc in next ch sp, ch 3) three times, skip ch-3-sp, hdc in each of the last two sts.
Row 8 :
Ch 2, turn, hdc in next st, ch 3, skip ch sp, (sc in next ch sp, ch 3) two times, skip ch-3-sp, hdc in each of the last two sts.
Row 9 :
Ch 2, turn, hdc in next st, ch 3, skip ch sp, sc in next ch sp, ch 3, skip ch sp, hdc in each of the last two sts.
Row 10 :
Ch 2, turn, hdc in next st, ch 5, skip two ch spaces, hdc in each of the last two sts.
Row 11 :
Ch 2, turn, hdc in next st, skip ch sp, hdc in each of last two sts.
Row 12 :
Turn, sc in next st, skip next st, sc in last st.
Row 13 :
Turn, slst in next st. Finish off.
Info :
Finishing: Follow finishing instructions as explained on page 2.
— Earring Design #16 "Real Roses":
Difficulty Level :
●●○○ = Easy
Row 1 :
dc in fourth ch from hook, *ch1, skip 2 chains, (dc, ch2, dc) in next ch; repeat from* across. Turn.
Row 2 :
ch3, 3dc in next ch-2-sp, (Sc in next ch-1-sp, 4dc in next ch-2-sp) 3 times, (Sc in next ch-1-sp, 5dc in next ch-2-sp) 4 times, (Sc in next ch-1-sp, 6dc in next ch-2-sp) 4 times, (Sc in next ch-1-sp, 7dc in next ch-2-sp) 5 times, (Sc in next ch-1-sp, 8dc in next ch-2-sp) in remaining spaces. Finish off but leave extra ten" tail to use for sewing the rose together.
Info :
Roll the strip so that the smallest petals are on the inside and the largest petals are on the outside. Using the ten inches of tail, sew thoroughly through all thicknesses until each petal is secured and the rose is unable to unravel. Knot twice. Finish off.
Info :
Finishing: Follow finishing instructions as explained on page 2.
— Earring Design #17 "Diamond Scales":
Difficulty Level :
●●○○ = Easy
Info :
Note: this design uses two colors of thread. With Color A: Begin with a Magic ring.
Row 1 :
Ch2 (counts as first hdc here and throughout), (hdc, ch2, 2hdc) in ring. Pull ring tight and secure.
Row 2 :
Ch2, turn, hdc in next st, (2hdc, ch2, 2 hdc) in ch sp, hdc in last two sts.
Row 3 :
Ch2, turn, hdc in each of next 3 sts, (2 hdc, ch2, 2 hdc) in ch sp, hdc in each remaining st.
Row 4 :
Ch2, turn, hdc in each of next 5 sts, (2 hdc, ch2, 2 hdc) in ch sp, hdc in each remaining st.
Row 5 :
Ch2, turn, hdc in each of next 7 sts, (2 hdc, ch2, 2 hdc) in ch sp, hdc in each remaining st.
Row 6 :
Ch2, turn, hdc in each of next 9 sts, (2 hdc, ch2, 2 hdc) in ch sp, hdc in each remaining st.
Row 7 :
Ch2, turn, hdc in each of next 11 sts, (2 hdc, ch2, 2 hdc) in ch sp, hdc in each remaining st.
Row 8 :
Ch2, turn, hdc in each of next 13 sts, (2 hdc, ch2, 2 hdc) in ch sp, hdc in each remaining st.
Join Color B :
Row 9: Ch2, turn, hdc in each st to corner, 5 hdc in corner ch sp, hdc in each remaining st. Finish off.
Info :
For second scale: Work rows 1-4 as above with color A. Then join color B and work row 9 as above. Finish off. Use the image for placement of scales. Place smaller scale on top. Using matching thread, tie the scales together.
Info :
Finishing: Follow finishing instructions as explained on page 2.
— Earring Design #18 "Hanging Hexagons":
Difficulty Level :
●●○○ = Easy
Info :
Begin with Magic Ring.
Round 1 :
Working in magic ring: Ch2, 2hdc, ch2, (3 hdc, ch2) five times. Join with slst in top of beginning ch2. Pull ring tight.
Row 1 :
Ch 2, hdc in same st and in each of next two stitches and in next ch sp, ch 2, hdc in same ch sp, hdc in each of next 3 sts and in next ch sp. Leave remaining stitches unworked. Ch 3, turn.
Row 2 :
dc in each of next 4 sts, (dc, ch 2, dc) in ch sp, dc in each of the next 4 sts and in top of ch2. Finish off.
Info :
Add tassels: Cut 23 5inch strands. Leave outermost sts without tassels. Insert two strands per st and three strands in center ch-sp. Trim tassels if desired.
Info :
Finishing: Follow finishing instructions as explained on page 2.
— Earring Design #19 "Large Tear Drops":
Difficulty Level :
●●○○ = Easy
Info :
Ch 15, join with slst in first ch to form ring.
Round 1 :
Working in each st around: slst, slst, sc, sc, 2hdc, 2dc, 2tr, 2tr, 2tr, 2dc, 2hdc, sc, sc, slst, slst. Join with slst.
Round 2 :
Slst in next slst, working in each remaining st around: 2sc, 2sc, 2hdc, 2hdc, 2dc, 2dc, 2tr in each of next six sts, 2dc, 2dc, 2hdc, 2hdc, 2sc, 2sc, slst, slst, join. Finish off.
Info :
Finishing: Follow finishing instructions as explained on page 2.
— Earring Design #20 "Large Two Toned Tear Drops":
Difficulty Level :
●●○○ = Easy
Info :
Note: this design requires two colors of thread. With Color A: Ch 15, join with slst in first ch to form ring.
Round 1 :
Working in each st around: slst, slst, sc, sc, 2hdc, 2dc, 2tr, 2tr, 2tr, 2dc, 2hdc, sc, sc, slst, slst. Join with slst.
Round 2 :
Slst in next slst, working in each remaining st around: 2sc, 2sc, 2hdc, 2hdc, 2dc, 2dc, 2tr in each of next six sts, 2dc, 2dc, 2hdc, 2hdc, 2sc, 2sc, slst, slst, join.
Round 3 :
Join color B. Sc in each st around, join. Finish off.
Info :
Finishing: Follow finishing instructions as explained on page 2.
— Earring Design #21 "Silver and Black Bars":
Difficulty Level :
●●○○ = Easy
Info :
Silver Bars: Make two. Chain until you have a 2.5-inch chain. Row 1: Hdc in third chain from hook and in each ch across, turn. Row 2: Ch 2, working in front loops only; hdc in each st across. Finish off.
Info :
Black Bars: Make two. Chain until you have a 1.5-inch chain. Row 1: Hdc in third chain from hook and in each ch across. Finish off.
Info :
When attaching these to your earring post, make sure the silver bars are placed beneath the black bars.
Info :
Finishing: Follow finishing instructions as explained on page 2.
— Earring Design #22 "Holey Circles":
Difficulty Level :
●●○○ = Easy
Info :
Begin with magic ring.
Round 1 :
Ch 2 (counts as dc), 11 dc in ring, join with slst in top of beginning ch-2. Pull magic ring tight and secure tail. (12 dc)
Round 2 :
Ch 4 (counts as dc and ch 2), (dc, ch 2) in each st around, join with slst in 2nd ch of beginning ch4. (12dc and 12 ch2-sps)
Round 3 :
Slst in next ch sp, 2 sc in next ch sp, 3 hdc in next ch sp, 4 dc in next ch sp, 4 tr in next ch sp, (5 DTr in next sp) twice, 4 tr in next sp, 4 dc in next sp, 3 hdc in next sp, 2 sc in next sp, slst in next sp, join with slst in first st of round 3. Finish off.
Info :
Finishing: Follow finishing instructions as explained on page 2.
— Earring Design #23 "Spiral Shells":
Difficulty Level :
●●●○ = Intermediate
Infos :
Special Stitches: Triple Treble (Ttr) – yo 4 times, insert hook in st indicated, draw up a loop, (yo, pull through 2 loops) 5 times. Quadruple Treble (Qtr) – yo 5 times, insert hook in st indicated, draw up a loop, (yo, pull through 2 loops) 6 times. Begin with magic ring.
Round 1 :
Ch 2 (counts as dc), 11 dc in ring, join with slst in top of beginning ch-2. Pull magic ring tight and secure tail. (12 dc)
Round 2 :
Ch 4 (counts as dc and ch 2), (dc, ch 2) in each st around, join with slst in 2nd ch of beginning ch4. (12dc and 12 ch2-sps)
Round 3 :
Slst in next ch sp, 2 sc in next ch sp, 3 hdc in next ch sp, 4 dc in next ch sp, 4 tr in next ch sp, 5 Dtr in next sp, 5 Ttr in next sp, 6 Qtr in next sp, leave remaining sts unworked. (30 sts, including slst)
Row 4 :
Ch 1, turn, working in front loops only sc in same st and in each st around until you reach the next ch-2-sp, (2 sc in next ch sp, sc in next st) 4 times, slst around post of closest QTR. Finish off. (42 sc)
Info :
Finishing: Follow finishing instructions as explained on page 2.
— Earring Design #24 "Stacked Frames":
Difficulty Level :
●●●○ = Intermediate
Info :
Special Stitch – Picot – see special stitches on page 2.
Round 1 :
Ch 34, slst in 20th ch from hook, ch 8, slst in 8th ch from previous slst, ch 6, slst in first ch of row.
Round 2 :
Ch 1, sc in each of next two sts, picot, sc in each of next three sts, skip slst, sc in each of next 4 sts, picot, sc in each of next 3 sts, skip slst, (sc in each of next 5 sts, picot) 3 times, sc in each of next 5 sts, sc in each of next 4 sts, picot, sc in each of next 4 sts, skip slst, sc in each of next 3 sts, picot, sc in remaining sts, Join with slst to first sc. Finish off.
Info :
Finishing: Follow finishing instructions as explained on page 2.
— Earring Design #25 "Two Toned Hexagons":
Difficulty Level :
●●○○ = Easy
Info :
Note: this pattern uses two colors of thread. With first color: Ch 4, join with slst in first ch to form a ring.
Round 1 :
Ch 5, (counts as a dc and ch-2-sp), (3 dc, ch 2) 5 times, 2 dc, join with slst in third ch of beginning ch5.
Round 2 :
Ch 1, sc in same st, ch 2, (sc in each of next three dc, ch 2) 5 times, sc in each of next two dc, join with slst in first st of round. Finish off.
Info :
Finishing: Follow finishing instructions as explained on page 2.
Thank you for choosing this collection of 25 crochet earring designs — a cheerful set of tiny projects to spark your creativity and fill a jewelry box! Each pattern is crafted for delicate detail and wearable results, with finishing tips so your earrings will hold their shape. Happy crocheting and may your hooks always be swift and your stitches even! 🧶✨