🧢 Beautiful ✨ Detailed πŸ’ Adorable

Tulip Model Placemat Pattern

Tulip Model Placemat Pattern
4.2β˜… Rating
2-3 Hours Time Needed
3.5K Made This
βœ‚οΈ

Beginner Friendly Level

Perfect for those just starting their crochet journey, with clear instructions and simple techniques

⏱️

Bite-Sized Project

Finishes in 2-4 hoursβ€”perfect for an afternoon of creative relaxation.

🏑

Cozy Accent

A warm touch for your space that transforms ordinary corners into inviting nooks filled with handmade charm.

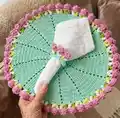
About This Tulip Model Placemat Pattern

This pattern creates a decorative tulip model placemat worked in rounds with double crochet fans, leafy accents and tulip motifs. You will work from a magic ring, build fan rows to the desired size, then add green leaves and tulip flowers for a delicate finish. The design uses cotton yarn for a durable, washable placemat perfect for everyday use or seasonal tablescapes.

Tulip Model Placemat Pattern crochet pattern - detailed view of completed project

Clear step-by-step instructions and stitch diagrams are provided for the main stitches used, including popcorn and picot. The pattern is friendly to beginners familiar with basic crochet stitches and offers creative details for a standout finished piece.

Why You'll Love This Tulip Model Placemat Pattern

I absolutely love this pattern because it transforms simple double crochet rounds into an elegant floral placemat that brightens any table. I enjoy how quickly the circular base grows from a magic ring into a generous placemat β€” it feels satisfying to see progress round by round. The tulip and leaf details let me add playful color and texture, which always draws compliments from guests. Making several in different colorways is one of my favorite ways to personalize my dining decor and create coordinated sets.

Tulip Model Placemat Pattern step 1 - construction progress Tulip Model Placemat Pattern step 2 - assembly progress Tulip Model Placemat Pattern step 3 - details and accessories Tulip Model Placemat Pattern step 4 - final assembly and finishing

Switch Things Up

I love customizing this placemat by changing color palettes; try soft pastels for a spring table or bold contrasts for a modern look.

I often switch the cotton yarn to a slightly thicker N 4 bulky option and use a larger hook to create a chunkier placemat that feels more rustic.

I sometimes make a matching set by repeating the pattern in three different colors, arranging them as a trio down the center of a long table.

I recommend experimenting with the number of rows: add extra repeat rounds to achieve a larger charger-size placemat or reduce rounds for coasters and doilies.

I like to mix in a metallic or speckled cotton for the tulip petals to add a subtle shimmer and visual interest under evening lighting.

I sometimes replace the popcorn stitch with a cluster or bobble stitch to vary texture if I want a softer raised petal.

I also enjoy embroidering a small initial or date in the center after blocking to personalize gifts and make commemorative sets.

If you prefer sturdier edges, finish with a firm slip stitch border in a contrasting color to define the shape and add durability to the rim.

I will occasionally back the placemat with interfacing or felt and a dab of fabric glue for non-slip use on glass or polished tables.

Finally, consider making coordinating napkin rings or coasters using the tulip motif to create a cohesive table collection that showcases the design.

Common Mistakes & How to Fix Them

βœ— Skipping the initial magic ring tightening can leave a hole in the center; pull the tail firmly after closing the ring to close the center hole. βœ— Not counting increases each round leads to an uneven circular shape; count your stitch groups after each round to confirm the correct number of increases. βœ— Using inconsistent tension causes wavy or warped placemat edges; maintain even tension and check your work flat on a table as you progress. βœ— Forgetting to slip stitch into the third chain when closing rounds changes row height; always close with a slip stitch into the third chain to keep a neat edge.

Tulip Model Placemat Pattern

Create a charming tulip-inspired placemat using 100% cotton yarn and simple stitches. This pattern guides you through circular double crochet rounds, decorative leaves and tulip motifs so you can craft a beautiful table accent. Perfect for gifting or brightening your dining space, the design combines texture and a playful border for a fresh handmade look. Follow the step-by-step instructions and diagrams to complete your placemat with confidence.

Beginner Friendly 2-3 Hours

Materials Needed for Tulip Model Placemat Pattern

β€” Main Fabric

  • 01
    100% cotton yarn N 4 (medium/4 weight) - quantity as needed for one placemat (estimate depends on size and color choices)

β€” Tools Required

  • 01
    Crochet hook size 3.5mm
  • 02
    Scissors
  • 03
    Upholstery needle
  • 04
    Fabric glue
  • 05
    Stitch markers (optional)

Progress Tracker

0% Complete

β€” Pattern :

Round 1 :

Start with a magic circle, add two chains and one more chain for separation. Inside the magic circle make 12 double crochets separated by a chain, including the beginning chains. Close the magic ring and close the third starting chain.

Round 2 :

Go up three chains where you closed the magic circle and in the same place make another double crochet (INC) with a separating chain. In each base double crochet make two double crochets in the same place (inc) until the end. Close with a slip stitch in the third chain.

Round 3 :

Go up 3 chains, and in the next stitch make two double crochets in the same place, separate with a chain. On every row, make a double crochet by itself and in the next base stitch, make two double crochets in the same place, separated by a chain. Close with a slip stitch in the third chain.

Round 4 :

Let's work on each fan now. Raise 3 chains symbolizing a double crochet, in the next one, make a double crochet and in the next two double crochets with a separating chain. The sequence of this row is two single crochets and finally an increase separated by a chain.

Info :

Follow this sequence until the size of the placemat is to your liking. I usually do until I reach 12 double crochets alone and finally the increase. We would have 14 rows.

β€” Green Leaves :

Infos :

Start at the next double crochet after the low point of the previous row. Make an initial knot, lacquer once on the needle, start with a double crochet. Let's lacquer, remove 2 stitches and leave 2 loops on the hook, lacquer again, make the double crochet, remove two and leave three loops on the hook. Then remove the three threads from the needle, so they stay together, separate with 3 chains. And at the same point repeat the same process, separate with a chain. Skip 3 base double crochets and in the fourth double crochet repeat the same process. End with a slip stitch.

β€” Tulips :

Tulips (P1) :

In the space where we made 3 chains, let's start the tulips. Lacquer on the needle and start with a double crochet, make 5 more double crochets, totaling 6 double crochets.

Tulips (P2) :

Make a popcorn stitch with these seven double crochets (place the needle in the first double crochet, catch the final loop closing with a slip stitch.

Tulips (P3) :

On the back, make 3 chains, enter the middle of the tulip and make a single crochet, repeat this process twice more, totaling 3 picot stitches, separate with a chain and between the fans make a single crochet to separate the tulips

Assembly Instructions

  • Work the circular base until you reach the desired size (approximately 14 rows as suggested), finishing with a neat slip stitch join.
  • Add the green leaves starting at the low points of the last row: follow the leaf instructions and space them as indicated, skipping base double crochets between leaf placements.
  • Create tulip motifs in the spaces where you made 3 chains: form the tulip fan, close with a popcorn stitch, then secure the back with 3 chains and picot stitches as described.
  • Weave in all ends with the upholstery needle and use fabric glue sparingly on the back for additional stability if desired before blocking the placemat.

Important Notes

  • πŸ’‘Use a 3.5mm hook and the recommended cotton yarn for best gauge and a flat finish on the placemat.
  • πŸ’‘Keep stitch counts consistent when making increases so the circular shape remains even and does not ripple.
  • πŸ’‘Block the placemat gently after finishing to flatten and set the shape; pin it to size and steam or wet-block according to yarn instructions.

This Tulip Model Placemat Pattern brings floral charm to your table with delicate fans, leaves, and tulip motifs. 🌷 Work it in cotton for a washable, durable finish that's perfect for everyday use or special gatherings. 🧢 Enjoy making a set in different colorways to brighten your dining decor and gift with love!

You ask,

we answer.

FAQs

What size will the finished piece be?

The finished size depends on how many rounds you work; following the designer's note to 14 rows will give a medium placemat, but you can adjust rows for larger or smaller sizes.

Can I use different yarn weights for this pattern?

Yes, but changing yarn weight and hook size will change the finished size and drape; use an appropriate hook for your chosen yarn and test gauge before proceeding.

Do I need prior crochet experience for this pattern?

This pattern is beginner friendly for crocheters who know basic stitches like chain, double crochet, slip stitch and can follow increase sequences.

How long does this project typically take to complete?

Most crocheters finish a single placemat in about 2-4 hours depending on speed and how many decorative motifs you add.