🧢 Beautiful ✨ Detailed πŸ’ Adorable

Plush Backpack Dragon Amigurumi Pattern

Plush Backpack Dragon Amigurumi Pattern
4.5β˜… Rating
8-10 Hours Time Needed
1.9K Made This
βœ‚οΈ

Intermediate Level

Ideal for those with basic crochet experience, featuring slightly more advanced stitches and techniques to expand your skills.

⏱️

All-Day Adventure

Requires 8-10 hours, ideal for a full day of immersive crocheting.

🧸

Cute Companion

An adorable friend to cherish, handcrafted with love to bring comfort and joy for years to come.

About This Plush Backpack Dragon Amigurumi Pattern

This pattern teaches you how to crochet a plush backpack shaped like a friendly dragon, complete with a removable flap head, legs, spikes, ears and straps. It uses super bulky velvet yarn for a plush, squishy texture and finishes into a functional small backpack. Detailed photos and step-by-step rounds guide you through shaping and assembly.

Plush Backpack Dragon Amigurumi Pattern crochet pattern - detailed view of completed project

The pattern is written for intermediate crocheters and requires basic amigurumi experience. You will learn how to work in rows and rounds, change colors, and attach pieces securely for a tidy finish.

Why You'll Love This Plush Backpack Dragon Amigurumi Pattern

I absolutely love this pattern because it combines playfulness with practicality β€” a toy that is also a tiny backpack. I enjoyed designing the dragon's sweet face and compact body so it feels cuddly and durable. The use of super bulky velvet yarn gives the finished piece an irresistibly soft texture I want to squish. I also love how the flap-head detail adds personality and makes the project feel like a small stuffed companion and accessory in one.

Plush Backpack Dragon Amigurumi Pattern step 1 - construction progress Plush Backpack Dragon Amigurumi Pattern step 2 - assembly progress Plush Backpack Dragon Amigurumi Pattern step 3 - details and accessories Plush Backpack Dragon Amigurumi Pattern step 4 - final assembly and finishing

Switch Things Up

I love how easy it is to customize this pattern by changing colors to create different dragon personalities; try pastel shades for a gentle look or bright jewel tones for a bold friend.

I sometimes make the backpack smaller by switching to a DK yarn and a smaller hook for a mini keychain version; adjust the chain lengths and piece counts proportionally.

I also enjoy adding embroidered eyebrows or different eye sizes to change the expression; swapping 15 mm safety eyes for smaller ones instantly creates a cuter face.

For a more rugged look, use a boucle or textured yarn for the body while keeping velvet yarn for the details to add contrast.

Try making the straps longer and adding buckles or decorative buttons for a more realistic backpack aesthetic that older kids will love.

I often add tiny accessories like a crocheted scarf, hat, or a mini pocket on the backpack to personalize each dragon as a gift.

If you want a sturdier bag, reinforce the flap and the bottom with a disc of plastic canvas or interfacing inserted between layers before sewing closed.

Use different yarn for spikes β€” a stiffer yarn makes them stand up more, while the velvet will make them look softer and rounder.

I recommend experimenting with placement of the eyes and nostrils on a scrap head first; small shifts drastically alter the dragon's personality.

For a washable toy, consider stitching safety eyes in place with washers removed and embroidering the pupils instead; this makes the piece fully machine-friendly (test before washing).

Common Mistakes & How to Fix Them

βœ— Forgetting to use a stitch marker at the start of rounds leads to lost stitch counts; place a marker at the beginning of each round and move it up as you go. βœ— Overstuffing pieces makes shaping awkward and bulky; stuff gradually, checking the shape often and add small amounts until the surface is smooth. βœ— Changing colors without weaving ends can leave loose tails that show; crochet the yarn ends into the next round's stitches or weave them in as you work. βœ— Not working BLO when instructed will change the appearance of the edge; follow BLO (back loops only) directions exactly for the textured seam and proper fit. βœ— Skipping counting after increases or decreases causes mismatched rounds; count your stitches after each shaping round to ensure correct totals.

Plush Backpack Dragon Amigurumi Pattern

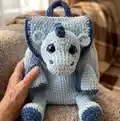
Make a cuddly plush backpack dragon using super bulky velvet yarn β€” a charming wearable toy that doubles as a small backpack. This intermediate-level pattern guides you through crocheting the bag, flap, straps and the adorable dragon character with clear, step-by-step rounds. Perfect as a special handmade gift or a sweet project to level up your amigurumi skills.

Intermediate 8-10 Hours

Materials Needed for Plush Backpack Dragon Amigurumi Pattern

β€” Main Fabric

  • 01
    Super Bulky / Super Chunky / 14ply velvet yarn (HIMALAYA DOLPHIN BABY) - 2 skeins main color (blue)
  • 02
    Complementary color (dark blue) - approximately 1/4 skein for trims, spikes, straps and details
  • 03
    Polyester stuffing - enough to firmly stuff the head and limbs
  • 04
    15 mm safety eyes (2 pieces)
  • 05
    Wooden button (1 piece) for flap closure

β€” Tools Required

  • 01
    Crochet hook size 3.75 mm (Clover)
  • 02
    Sewing needle
  • 03
    Scissors
  • 04
    Yarn needle for sewing and weaving ends
  • 05
    Stitch markers
  • 06
    Safety eyes 15 mm (2 pieces)
  • 07
    Wooden button
  • 08
    Cotton thread matching color (optional for sewing plush velvet yarn)
  • 09
    Pins for assembly

Progress Tracker

0% Complete

β€” Notes :

Info :

Work in continuous rounds, in rows and in a spiral. The size of the backpack - 21 cm wide (8.2 "), 24 cm high (9.4 "). At the beginning of the round, use a marker or thread of a different color so that you can see where the beginning of the round is.

Info :

Tip: If plush yarn is crumble, use cotton thread matching color to sew on pieces.

β€” Flap :

Round 1 :

ch2, crochet 5 sc into the 2nd ch from the hook. Do not pull the ring. Turn. (5)

Round 2 :

t-ch, 1 sc, inc * 4, turn (9)

Round 3 :

t-ch, (sc, inc) * 4, 1 sc, turn (13)

Round 4 :

t-ch, (2 sc, inc) * 4, 1 sc, turn (17)

Round 5 :

t-ch, (3 sc, inc) * 4, 1 sc, turn (21)

Round 6 :

t-ch, (4 sc, inc) * 4, 1 sc, turn (25)

Round 7 :

t-ch, (5 sc, inc) * 4, 1 sc, turn (29)

Round 8 :

t-ch, (7 sc, inc) * 3, 5 sc, turn (32)

Round 9 :

t-ch, (8 sc, inc) * 3, 5 sc (35)

Round 10 :

t-ch, (9 sc, inc) * 3, 5 sc (38)

Info :

Do not turn. Work along the top of the flap.

Round 11 :

t-ch, 21 sc, turn (21)

Round 12-18 :

t-ch, 21 sc, turn (6 rows)

Round 19 :

t-ch, 21 sc (21). Do not turn.

Info :

Change color to dark blue. Cut the blue yarn. Then work in rounds. Crochet the yarn ends after color changing into stitches of the next row.

Round 20 :

t-ch, 26 sc, 3 ch, skip 3 stitches, 25 sc, turn (54)

Round 21 :

t-ch, 53 reverse sc (53), sl st

β€” Backpack :

Info :

Crochet with blue yarn. Ch20. Start on the second chain from the hook.

Round 1 :

18 sc, 3 sc in the last chain, on the other side of the chain: 17 sc, inc, inc into t-ch (42)

Info :

Place a marker.

Round 2 :

inc, 15 sc, (inc, 1 sc) * 2, inc, 17 sc, (inc, 1 sc) * 2 (48)

Round 3 :

inc, 1 sc, inc, 15 sc, (inc, 1 sc) * 4, inc, 15 sc, (inc, 1 sc) * 3 (58)

Round 4 :

inc, 1 sc, inc, 16 sc, (inc, 3 sc) * 3, inc, 18 sc, (inc, 3 sc) * 2 (66)

Round 5 :

inc, 3 sc, inc, 18 sc, (inc, 4 sc) * 3, inc, 17 sc, (inc, 4 sc) * 2 (74)

Round 6 :

74 sc (74)

Round 7 :

BLO 74 sc (74)

Round 8-16 :

74 sc (9 rounds)

Round 17 :

32 sc, dec, 35 sc, dec, 3 sc (72)

Round 18-36 :

72 sc (19 rounds)

Info :

Join the flap in the next round.

Round 37 :

1 sc, 23 sc with the flap, 48 sc (72), sl st.

β€” Straps :

Info :

Crochet with dark blue yarn. Work in rows.

Round 1 :

ch71, start from the second chain on the hook: 70 sc, turn (70)

Round 2-4 :

t-ch, 70 sc (3 rows)

Info :

You can make the straps longer or shorter. Make more or less chains. My straps are 50 cm long.

Info :

Cut the yarn. Leave the end for sewing pieces. Sew the straps at the bottom of the backpack between rounds 7 and 11, at the top of the backpack between rounds 32 and 36. Distance between straps 12 sc.

β€” Handle :

Info :

Crochet with dark blue yarn. Work in rows.

Round 1 :

ch21, start from the second chain on the hook: 20 sc, turn (20)

Round 2-3 :

t-ch, 20 sc (20 rows)

Info :

Cut the yarn. Leave the end for sewing pieces. Sew on the handle.

β€” Cord :

Info :

Crochet with dark blue yarn. Ch150. Step back at the top of the backpack 2 rounds and stretch the cord between the stitches, after folding the backpack, as shown in the photo. Make knots at the ends.

Info :

Sew a button between rounds 23 and 27.

β€” Dragon :

β€” Head :

Info :

Crochet with blue yarn.

Round 1 :

ch6, start in the second chain from the hook: inc, 3 sc, 3 sc in the last chain, on the other side of the chain: 3 sc, inc (13)

Round 2 :

1 sc, inc, 3 sc, inc, 1 sc, inc, 4 sc, inc (17)

Round 3 :

2 inc, 5 sc, 3 inc, 6 sc, inc (23)

Round 4-5 :

23 sc (2 rounds)

Round 6 :

3 sc, 5 inc, 15 sc (28)

Round 7 :

3 sc, (1 sc, inc) * 5, 15 sc (33)

Round 8 :

(10 sc, inc) * 3 (36)

Round 9 :

(5 sc, inc) * 6 (42)

Round 10-13 :

42 sc (4 rounds)

Info :

Insert safety eyes between rounds 7 and 8. Distance between eyes 10 sc.

Round 14 :

(5 sc, dec) * 6 (36)

Round 15 :

2 sc, dec, (4 sc, dec) * 5, 2 sc (30)

Round 16 :

(3 sc, dec) * 6 (24)

Info :

Stuff the head. Leave the end for sewing pieces.

β€” Spikes (make 2) :

Info :

Crochet with dark blue yarn.

Round 1 :

ch2, crochet 4 sc into the 2nd ch from the hook (4)

Round 2 :

(inc, 1 sc) *2 (6)

Round 3 :

6 sc (6), sl st.

Info :

Cut the yarn. Leave the yarn tail to sew pieces.

β€” Ears (make 2) :

Info :

Crochet with blue yarn.

Round 1 :

ch2, crochet 6 sc into the 2nd ch from the hook (6)

Round 2 :

inc * 6 (12), sl st

Info :

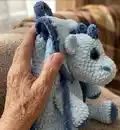
Cut the yarn. Leave the yarn tail to sew pieces. Fold the ear in half and sew the edges, giving it the shape as per the photo.

β€” Forelegs (make 2) :

Info :

Crochet with dark blue yarn.

Round 1 :

ch2, crochet 6 sc into the 2nd ch from the hook (6)

Round 2 :

inc * 6 (12)

Round 3 :

(1 sc, inc) * 6 (18)

Info :

Change color to blue. Cut the dark blue yarn.

Round 4 :

BLO 18 sc (18)

Round 5-7 :

18 sc (3 rounds)

Round 8 :

(4 sc, dec) *3 (15)

Round 9 :

15 sc (15)

Round 10 :

(3 sc, dec) * 3 (12)

Round 11-12 :

12 sc (2 rounds)

Info :

Stuff the lower foreleg. Fold it in half and crochet 5 sc through both sides. Cut the yarn. Leave the yarn tail to sew pieces.

β€” Hind legs (make 2) :

Info :

Begin to crochet with dark blue yarn.

Round 1 :

ch2, crochet 6 sc into the 2nd ch from the hook (6)

Round 2 :

inc * 6 (12)

Round 3 :

(1 sc, inc) * 6 (18)

Round 4 :

1 sc, inc, (2 sc, inc) * 5, 1 sc (24)

Info :

Change color to blue. Cut the dark blue yarn.

Round 5 :

BLO 24 sc (24)

Round 6-7 :

24 (2 rounds)

Round 8 :

6 sc, 6 dec, 6 sc (18)

Round 9 :

6 sc, 3 dec, 6 sc (15)

Round 10 :

15 sc (15)

Round 11 :

(3 sc, dec) * 3 (12)

Round 12-14 :

12 sc (3 rounds)

Info :

Crochet 3 extra sc. Stuff the lower leg. Fold it in half and crochet 5 sc through both sides. Cut the yarn. Leave the yarn tail to sew pieces.

β€” Assembly :

Item 1 (P1) :

Fix with pins and sew on the spikes.

Item 2 (P1) :

Sew the ears between rounds 12 and 15 of the head at a distance of 13 sc.

Item 3 (P1) :

Embroider nostrils and lashes with dark blue chenille thread.

Item 4 (P1) :

Sew the head to the flap of the backpack.

Item 5 (P1) :

Sew on the hind legs between rounds 8 and 11.

Item 6 (P1) :

Sew forelegs between rounds 22 and 27.

Assembly Instructions

  • Fix with pins and sew on the spikes securely using a yarn needle and matching thread, making sure they are evenly positioned along the head ridge.
  • Sew the ears between rounds 12 and 15 of the head at a distance of 13 sc, folding and stitching the ear edges to create the correct shape.
  • Embroider nostrils and lashes with dark blue chenille thread before attaching the head to the flap for easier access and neater stitching.
  • Sew the head to the flap of the backpack aligning the head base with the flap edge, and secure with small whipstitches for a tidy finish.
  • Sew on the hind legs between rounds 8 and 11 of the backpack base, spacing them evenly and securing firmly so the backpack stands correctly.
  • Attach the forelegs between rounds 22 and 27 of the backpack, positioning them symmetrically and sewing through several stitches for strength.

Important Notes

  • πŸ’‘Use stitch markers to mark the beginning of each round, especially when working in continuous spirals or joining the flap to the backpack.
  • πŸ’‘When changing color on plush velvet yarn, crochet the yarn ends into the next row's stitches or use cotton thread to sew pieces to avoid fuzziness.
  • πŸ’‘Stuff parts moderately β€” firm enough to keep shape but not so much that the plush texture stretches or seams distort.
  • πŸ’‘Pin pieces in place before sewing to ensure proper alignment; check photos for recommended placements (head, legs, straps).

This Plush Backpack Dragon pattern creates a lovable, wearable dragon that doubles as a tiny backpack β€” perfect for gifting or play. The soft velvet yarn gives it a luxurious plush feel and the detailed head and leg shaping make it irresistibly characterful. Enjoy stitching this cute companion and watching it come to life! 🧢🧸

You ask,

we answer.

FAQs

What size will the finished piece be?

The finished backpack measures approximately 21 cm wide and 24 cm high when using the recommended super bulky velvet yarn and a 3.75 mm hook.

Can I use different yarn weights for this pattern?

Yes, but changing yarn weight will significantly alter the final size and texture; choose an appropriate hook and expect the backpack to be smaller with thinner yarn or larger with bulkier yarn.

Do I need prior crochet experience for this pattern?

This pattern is rated intermediate and assumes familiarity with single crochet, increases/decreases, working in rounds and back loops only (BLO).

How long does this project typically take to complete?

Most crocheters complete this project in 8-10 hours, though time may vary depending on experience, speed, and whether you add extra finishing details.

What tools do I need for assembly?

You will need a sewing needle, yarn needle, stitch markers, scissors, and optionally cotton thread for sewing on plush pieces for a cleaner finish.