🧢 Beautiful ✨ Detailed πŸ’ Adorable

Ava the Butterfly Amigurumi Pattern

Ava the Butterfly Amigurumi Pattern
4.5β˜… Rating
2-4 Hours Time Needed
2.0K Made This
βœ‚οΈ

Beginner Friendly Level

Perfect for those just starting their crochet journey, with clear instructions and simple techniques

⏱️

Bite-Sized Project

Finishes in 2-4 hoursβ€”perfect for an afternoon of creative relaxation.

🧸

Cute Companion

An adorable friend to cherish, handcrafted with love to bring comfort and joy for years to come.

About This Ava the Butterfly Amigurumi Pattern

This pattern creates Ava, a small crocheted butterfly amigurumi about 7 in. (18 cm) tall. The project is worked in five pieces: a segmented body, two layered wings (made from two panels each), and two antennae. It uses simple single crochet shaping, basic increases and decreases, and easy color changes to create charming stripes and textures.

Ava the Butterfly Amigurumi Pattern crochet pattern - detailed view of completed project

Ideal for beginners looking to practice spiral rounds and small panel joining. The finished butterfly is a sweet toy or nursery decoration that sews together easily.

Why You'll Love This Ava the Butterfly Amigurumi Pattern

I absolutely love this pattern because it combines simple crochet techniques with a lot of personality in a small package. The segmented body and layered wings give Ava a handmade charm that feels special and gift-ready. I enjoy the easy color changes that let you play with palettes without complicated steps. Sewing the pieces together is straightforward and rewarding, and I always enjoy seeing how different yarns change the final look.

Ava the Butterfly Amigurumi Pattern step 1 - construction progress Ava the Butterfly Amigurumi Pattern step 2 - assembly progress Ava the Butterfly Amigurumi Pattern step 3 - details and accessories Ava the Butterfly Amigurumi Pattern step 4 - final assembly and finishing

Switch Things Up

I love how easily this pattern can be personalized by switching colors; try pastel palettes for a nursery or bright contrasting shades for a playful look.

You can change the size by using different yarn weights and hook sizes; a bulkier yarn makes a chunkier, cuddlier butterfly while fingering weight creates a tiny, delicate version.

I often experiment with embroidery detailsβ€”try French knots or small beads for eyes instead of straight stitch embroidery for a different expression.

To make the wings stand out, use a variegated yarn for one panel and a solid for the other, or add a thin crocheted edging in a contrasting color.

If you want more poseability, I sometimes add a short length of wire inside the antennae or wings so they can be gently shaped after stuffing.

Try making a mobile by stitching several mini versions together and suspending them with clear thread for a whimsical nursery accessory.

For gifting, create a matching set of three butterflies in coordinating tones and mount them on a small wooden hoop as wall decor.

I also like to add small crocheted flowers to the body or wings for a garden-themed versionβ€”tiny 6-8 stitch flowers sew on easily.

You can adjust the wing pattern by lengthening or shortening the initial chain to create larger or narrower wing shapes while following the same panel joining method.

Don't be afraid to mix wool and acrylic blends to tweak texture and softness; just check the hook size and tension to keep the final size consistent.

Common Mistakes & How to Fix Them

βœ— Skipping a stitch marker when working in continuous (spiral) rounds can cause you to lose track of the start of the round; place a marker in the last stitch made and move it up each round to stay on track. βœ— Stuffing too much or unevenly makes the body lumpy and hard to shape; stuff gradually and evenly, adding small amounts as you work to maintain a smooth form. βœ— Changing colors incorrectly at the end of a round can leave a loose loop or visible join; work the last stitch of the old color to the last yarn over, yarn over with new color and draw through all loops to complete the joining slip stitch, then fasten off old color. βœ— Failing to match panels before joining wings can cause uneven edges; hold Panel I and Panel II together with stitches and rows matching, then slip stitch through both thicknesses evenly around the outer edge. βœ— Not pulling the magic ring tight enough when starting the head or antennae leaves a large hole; gently but firmly pull the tail to tighten the center before continuing. βœ— Forgetting to change to front loops only where instructed results in loss of the defined ridge pattern; follow the instruction to work in front loops only (FLO) for the specified rounds to create the textured segments.

Ava the Butterfly Amigurumi Pattern

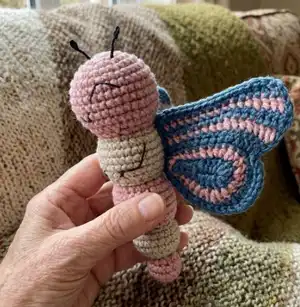
Make a sweet, handmade butterfly toy with this easy-to-follow amigurumi pattern. You will crochet a segmented body, two layered wings, and delicate antennae with simple stitches and clear instructions. Perfect for gifting or decorating nurseries, this pattern uses Wool-Ease yarn for a soft, durable finish. Enjoy a satisfying small project that lets you practice shaping and color changes.

Beginner Friendly 2-4 Hours

Materials Needed for Ava the Butterfly Amigurumi Pattern

β€” Main Fabric

  • 01
    Worsted weight yarn (Wool-Ease, Art. #620), Color A: #140 Rose Heather - 1 ball
  • 02
    Worsted weight yarn (Wool-Ease, Art. #620), Color B: #024 Oatmeal - 1 ball
  • 03
    Worsted weight yarn (Wool-Ease, Art. #620), Color C: #114 Denim - 1 ball

β€” Tools Required

  • 01
    Crochet hook size F-5 (3.75 mm)
  • 02
    Steel crochet hook size 9 (1.25 mm) for antennae
  • 03
    Black embroidery floss or cotton crochet thread size 10 for details
  • 04
    LION BRAND stitch markers
  • 05
    LION BRAND large-eyed blunt needle (yarn needle)
  • 06
    Fiberfill stuffing
  • 07
    Scissors
  • 08
    Pins for assembly (optional)

Progress Tracker

0% Complete

β€” Notes :

Infos :

1. Butterfly is worked in 5 pieces: Body, 2 Wings, and 2 Antennae. Pieces are sewn together. 2. Body is worked in continuous rnds (spiral) from the head downwards in 5 sections. Do not join first st of rnds to last st with a sl st. Do not turn at the beg of rnds. Body sections are worked with different yarn colors. 3. Each Wing is made from 2 panels that are crocheted together. Wing panels are made in 2 sections. The lower section is worked in 3 joined rnds. Do not turn at beg of rnds. Join last st of each rnd to first st with a sl st. Work first st of each rnd into the same (first) st as the joining sl st. The upper section is worked back and forth in rows. 4. To change yarn color and join at end of a rnd, insert hook in first sc, yarn over with new color and draw through all loops on hook to complete joining sl st. Fasten off old color. Proceed with new color. 5. To change yarn color at the end of a row or continuous (spiral) rnd, work last st of old color to last yarn over. Yarn over with new color and draw through all loops on hook to complete st. Fasten off old color. Proceed with new color. 6. Exact gauge is not essential for this project. We worked tightly with a small hook so that stuffing wouldn't show through.

Info :

Safety Note: If Butterfly is intended for a baby or child, be certain that all pieces have been very securely sewn together. Don't leave a baby or child unattended with the Butterfly!

β€” Body :

Info :

First Section (Head): With larger hook and A, make a magic ring.

Round 1 :

(RS) Work 8 sc in ring; do not join, work in continuous rnds (spiral).

Info :

Gently but firmly, pull tail to tighten center of ring. Place a marker in last st made to indicate end of rnd. Move marker up as each rnd is completed.

Round 2 :

Work 2 sc in each st around – you will have 16 sc in this rnd.

Round 3 :

* Sc in next st, 2 sc in next st; rep from * around – 24 sc.

Round 4 :

* Sc in next 2 sts, 2 sc in next st; rep from * around – 32 sc.

Round 5-10 :

Sc in each st around.

Round 11 :

* Sc in next 2 sts, sc2tog; rep from * around – 24 sc.

Round 12 :

* Sc in next st, sc2tog; rep from * around; change to B in last st – 16 sc.

β€” Body Second Section :

Round 13 :

With B, working in front loops only, * sc in next st, 2 sc in next st; rep from * around – 24 sc.

Info :

Begin stuffing piece and continue stuffing until piece is complete.

Round 14 :

* Sc in next 3 sts, 2 sc in next st; rep from * around – 30 sc.

Round 15-18 :

Sc in each st around.

Round 19 :

* Sc in next st, sc2tog; rep from * around – 20 sc.

Round 20 :

* Sc in next 3 sts, sc2tog; rep from * around; change to A in last st – 16 sc.

β€” Body Third Section :

Round 21 :

With A, working in front loops only, * sc in next st, 2 sc in next st; rep from * around – 24 sc.

Round 22 :

* Sc in next 5 sts, 2 sc in next st; rep from * around – 28 sc.

Round 23-25 :

Sc in each st around.

Round 26 :

* Sc in next 2 sts, sc2tog; rep from * around – 21 sc.

Round 27 :

* Sc in next st, sc2tog; rep from * around; change to B in last st – 14 sc.

β€” Body Fourth Section :

Round 28 :

With B, working in front loops only, * sc in next st, 2 sc in next st; rep from * around – 21 sc.

Round 29-31 :

Sc in each st around.

Round 32 :

* Sc in next st, sc2tog; rep from * around – 14 sc.

Round 33 :

* Sc2tog; rep from * around; change to A in last st – 7 sc.

β€” Body Fifth Section :

Round 34 :

With A, working in front loops only, 2 sc in each st around – 14 sc.

Round 35 and 36 :

Sc in each st around.

Round 37 :

* Sc2tog; rep from * around – 7 sc.

Info :

Fasten off, leaving a long yarn tail. Thread tail through top of sts of last rnd. Pull tail to close opening and knot securely.
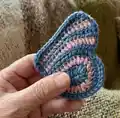
β€” Wings (make 2) :

Info :

Panel I Lower Section: With larger hook and C, ch 8.

Round 1 :

(RS) Sc in 2nd ch from hook, sc in next 2 ch, hdc in next ch, (hdc, dc) in next ch, 2 dc in next ch, 4 dc in next ch; working along opposite side of beg ch-8, 2 dc in next ch, (dc, hdc) in next ch, hdc in next ch, sc in next 3 ch; join with sl st in first sc and change to A – 20 sts.

Round 2 :

With A, do NOT turn, sc in same st as joining sl st, sc in next 3 sts, hdc in next 2 sts, 2 hdc in next st, 2 dc in next st, dc in next st, 2 dc in each of next 2 sts, dc in next st, 2 dc in next st, 2 hdc in next st, hdc in next 2 sts, sc in last 4 sts; join with sl st in first sc and change to C – 26 sts.

Round 3 :

With C, do NOT turn, sc in same st as joining sl st, sc in next 8 sts, 2 sc in next st, hdc in next st, 2 dc in each of next 4 sts, hdc in next st, 2 sc in next st, sc in last 9 sts; join with sl st in first sc – 32 sts.

Info :

Do not fasten off.

Info :

Upper Section: Work back and forth in rows. Do NOT turn before working Row 1. Row 1 of panel I is worked with front (RS) of lower section facing you.

Row 1 :

(RS) With C, do NOT turn, sc in same st as joining sl st, sc in next 4 sts, hdc in next 3 sts, 2 hdc in next st, 2 dc in each of next 3 sts and change to A in last st; leave remaining sts unworked – 16 sts.

Row 2 :

With A, ch 2 (does not count as a st), TURN, 2 dc in first st, dc in next 5 sts, hdc in next 5 sts, sc in next 5 sts and change to C in last st – 17 sts.

Row 3 :

With C, ch 1, TURN, sc in first 10 sts, hdc in next 3 sts, dc in next 3 sts, 2 dc in next st and change to A in last st – 18 sts.

Row 4 :

With A, ch 2 (does not count as a st), TURN, dc2tog, dc in next 3 sts, hdc in next 3 sts, sc in next 10 sts and change to C in last st – 17 sts.

Row 5 :

With C, ch 1, TURN, sc in first 10 sts, hdc in next 3 sts, dc in next 2 sts, dc2tog – 16 sts.

Info :

Fasten off.

Info :

Panel II Lower Section: Work same as lower section of Panel I.

Info :

Panel II Upper Section: Work back and forth in rows. TURN at the beg of Row 1. Row 1 of Panel II is worked with back (WS) of lower section facing you. Rows 1-5: Work same as Rows 1-5 of upper section of Panel I, except beg Row 1 with WS of lower section facing you. Rows 1, 3, and 5 will be worked with WS of lower section facing you and Rows 2 and 4 will be worked with RS of lower section facing you. Do not fasten off.

Info :

Join Panels: Hold panels I and II together with sts and rows matching. Working through both thicknesses, sl st evenly spaced all the way around outer edges of Wing; join with sl st in first sl st. Fasten off. Rep to make second Wing.

β€” Antennae (make 2) :

Info :

With smaller hook and black embroidery floss or cotton crochet thread, make a magic ring.

Round 1 :

Work 6 sc in ring.

Info :

Gently but firmly, pull tail to tighten center of ring and then ch 8. Fasten off, leaving a long tail for sewing Antennae to Body. Rep to make second Antenna.

β€” Finishing :

Info :

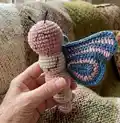
Using photograph as a guide and yarn tails still attached to pieces whenever possible, assemble the Butterfly as follows:

Instruction :

Sew Wings to back of Body, between Rnds 12 and 19, and about 6 sts apart.

Instruction :

With black embroidery floss or cotton crochet thread, embroider straight st eyes between Rnds 5 and 8, about 4 sts apart. Embroider mouth below eyes.

Instruction :

With black embroidery floss or cotton crochet thread, embroider 2 straight st legs between Rnds 14 and 19, and 2 legs between Rnds 21 and 26.

Instruction :

With yarn tails, sew Antennae to top of head between Rnds 1 and 2. Weave in ends.

Assembly Instructions

  • Sew Wings to back of Body, positioning them between rounds 12 and 19 and spacing them about 6 stitches apart so the wings sit symmetrically.
  • With black embroidery floss or cotton crochet thread, embroider straight stitch eyes between rounds 5 and 8, spacing the eyes about 4 stitches apart; embroider the mouth below the eyes.
  • Embroider legs with black floss: two straight stitch legs between rounds 14 and 19, and two legs between rounds 21 and 26 to create the lower body markings.
  • Using the yarn tails from the antennae, sew each antenna to the top of the head between rounds 1 and 2 and secure firmly before weaving in ends.
  • Hold wing panels I and II together with stitches and rows matching, then slip stitch through both thicknesses around outer edges to join panels; repeat to make the second wing.

Important Notes

  • πŸ’‘Use a stitch marker and move it at the end of each round to avoid losing your place while working in spiral rounds.
  • πŸ’‘Stuff the body gradually and evenly while shaping to prevent lumps and maintain a smooth silhouette.
  • πŸ’‘When changing colors, join the new color with a slip stitch into the last stitch of the round and fasten off the old color to secure tidy joins.
  • πŸ’‘Pin and align wing panels before joining to ensure rows and stitches match for a neat finish.

This delightful Ava the Butterfly pattern is a quick, satisfying amigurumi project that makes a perfect handmade gift. The layered wings and striped body add playful detail, while simple stitches keep it accessible. Create a whole family of butterflies by changing colors and sizes. πŸ§΅πŸ¦‹

You ask,

we answer.

FAQs

What size will the finished piece be?

The finished amigurumi measures about 7 in. (18 cm) tall when using the recommended Wool-Ease yarn and hook sizes.

Can I use different yarn weights for this pattern?

Yes, you can substitute yarn weights, but the final size will change; use an appropriate hook size for your chosen yarn and adjust stuffing and stitch tension accordingly.

Do I need prior crochet experience for this pattern?

This pattern is rated Beginner Friendly, so basic knowledge of single crochet, increases, decreases, and working in the round is helpful for best results.

How long does this project typically take to complete?

Most crocheters complete this project in about 2-4 hours depending on experience level and how much time you spend sewing and embroidering details.

How do I join the wing panels together neatly?

Hold panels I and II together with stitches and rows matching, then slip stitch through both thicknesses evenly around the outer edge to join and fasten off securely.