🧢 Beautiful ✨ Detailed πŸ’ Adorable

Pixie pocket Pouch Pattern

Pixie pocket Pouch Pattern
4.3β˜… Rating
2-3 Hours Time Needed
2.1K Made This
βœ‚οΈ

Beginner Friendly Level

Perfect for those just starting their crochet journey, with clear instructions and simple techniques

⏱️

Bite-Sized Project

Finishes in 2-4 hoursβ€”perfect for an afternoon of creative relaxation.

✨

Stylish Touch

An elegant detail to elevate any look, combining traditional techniques with contemporary design sensibilities.

About This Pixie pocket Pouch Pattern

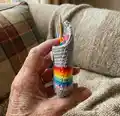
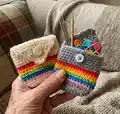
This pattern creates a small knitted-style crochet pouch with colourful stripe accents and a shaped cover flap. You work it from the bottom up in joined rounds, switching colours for rainbow stripes, then finish with a flap in rows. It is compact, practical, and great for using up yarn scraps.

Pixie pocket Pouch Pattern crochet pattern - detailed view of completed project

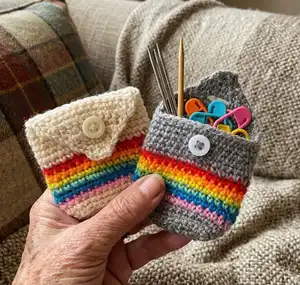
Ideal for storing small tools and accessories, this pouch measures roughly 6.5 cm by 6 cm. The pattern uses simple single crochet stitches and back-loop rounds for texture.

Why You'll Love This Pixie pocket Pouch Pattern

I absolutely love this pattern because it turns tiny scraps of yarn into a useful and cheerful pouch that brightens up your project bag. I love how quick it is to work up, so you get a finished piece in just a short session. The colour stripe sequence makes it playful and satisfying, and it is easy to customise to suit your favourite palette. I also appreciate that the cover flap is worked in rows, giving a neat shaped finish that feels professional.

Pixie pocket Pouch Pattern step 1 - construction progress Pixie pocket Pouch Pattern step 2 - assembly progress Pixie pocket Pouch Pattern step 3 - details and accessories Pixie pocket Pouch Pattern step 4 - final assembly and finishing

Switch Things Up

I love customizing the stripe sequence to match seasons or mood, swapping bright rainbow colours for pastels or autumn tones.

I often change the main colour to a darker shade for a more subtle pouch with contrasting bright stripes.

To make a larger pouch I use a thicker yarn and larger hook; conversely use thinner yarn for a miniature keychain pouch.

I sometimes add a small lining fabric for extra durability and a neater interior β€” it hides ends and prevents small items falling through.

I also experiment with different closures like snaps, toggles, or elastic loops instead of a button for a modern look.

I like embroidering initials or tiny motifs on the front stripe to personalise gifts for friends and family.

Try alternating stripe widths by working two rounds of the same scrap colour for a bolder band instead of single-round stripes.

I occasionally add a little loop on the back to attach the pouch to a bag or keyring so it is easy to carry around.

If you want a softer flap, block the flap piece gently after stitching to help it sit flat and neat across the front.

I sometimes use variegated yarn for one of the stripe rounds to add a surprise of blended colours without extra sewing.

For a more textured effect, swap some rounds for HDC or change the BLO round into a front-loop round to play with ridges and depth.

Don't be afraid to mix materials β€” a tiny bit of metallic or textured yarn in one stripe adds a special handcrafted touch.

Common Mistakes & How to Fix Them

βœ— Skipping the chain one at the beginning of rounds or rows can throw off your stitch count; remember the pattern note that the chain one does not count as a stitch and adjust counting accordingly. βœ— Joining rounds incorrectly before round 10 can create a visible seam or misalignment; join exactly as written until round 10, then switch to a continuous spiral as instructed. βœ— Forgetting to work Round 3 in the back loops only will change the texture and row count; be sure to work Round 3 in the BLO to get the correct look and stitch height. βœ— Ending the body on the wrong corner will put the flap on the front instead of the back; follow the note and end on the corner before the side you want to be the front so the flap is on the back.

Pixie pocket Pouch Pattern

Make a charming Pixie Pocket Pouch to store small notions, stitch markers, or coins. This compact crochet pouch uses fingering weight yarn and bright stripe accents for a playful finish. The pattern is worked bottom-up in rounds with a final flap worked in rows, so you can customize colours easily. Perfect for quick makes and lovely handmade gifts.

Beginner Friendly 2-3 Hours

Materials Needed for Pixie pocket Pouch Pattern

β€” Main Fabric

  • 01
    Approximately 23 yards (21 m) of fingering weight yarn in your main colour (Cream or Grey used in sample)
  • 02
    Scraps of Red, Orange, Yellow, Green, Blue and Pink for stripe rounds (small amounts each)

β€” Tools Required

  • 01
    A 2.5 mm hook
  • 02
    1 small button
  • 03
    Darning needle
  • 04
    Measuring tape

Progress Tracker

0% Complete

β€” Pattern notes :

Infos :

This pattern is written in US terms. This pouch is worked from the bottom up, and worked in joined rounds until round 10, after which you begin working in a continuous spiral. The cover flap is then worked last, in rows. The chain one at the beginning of each row / round does not count as a stitch.

β€” Abbreviations :

Infos :

Ch - chain. Sc - single crochet. Sc dec - Single crochet decrease. St - stitch. Sl st - slip stitch. Blo - Back loop only. Sk - skip.

β€” Pattern :

Info :

Beginning with your main colour, ch 8

β€” Base :

Round 1 :

3 sc in second chain from hook, 1 sc in next 5 chains, 5 sc in last chain. Continuing to work on the other side of the chains, sc in the next 5 chains. 2 sc in last chain. Sl st to first sc to join. (20 sc)

Round 2 :

Ch 1 (does not count as a stitch). 2 sc in each of the first 3 sts. Sc 5. 2 sc in each of the next 5 sts. Sc 5. 2 sc in each of the last 2 sts. sl st to join. (30 sc)

β€” Body :

Round 3 :

Ch 1 (does not count as a stitch). Working in the BLO, sc around. (30 sc in blo)

Round 4 :

Ch 1 (does not count as a stitch). Sc in each st around. Fasten off. (30 sc)

Round 5 - 10 :

Repeat round 4, using a new colour on each round. I worked in the sequence - pink, blue, green, yellow, orange, red, but feel free to get as creative with your colours as you wish.

Info :

Reattach your main colour and begin to sc around in a continuous spiral without joining, until your pouch measures 6 cm (2.4 in). End on a stitch at the CORNER of your pouch.

Info :

(Note: The side of the pouch that the flap is worked on will become the back, so I suggest ending on the corner right BEFORE the side you would like to be the front)

β€” Cover Flap :

Info :

Ch 1 and turn

Row 1 :

sc in the next 15 sts. Ch 1 and turn (15 sc)

Row 2 - 3 :

Repeat Row 1

Row 4 :

Sc dec, 11 sc, sc dec. Ch 1 and turn (13 sts)

Assembly Instructions

  • End on a stitch at the CORNER of your pouch; this determines which side becomes the front and which becomes the back for the flap placement.
  • The side of the pouch that the flap is worked on will become the back, so plan your final corner accordingly before starting the flap.
  • Work the cover flap last in rows as written (Ch 1 and turn; Row 1–4) to shape the flap so it folds neatly over the pouch opening.
  • Sew a small button to the flap and mark the matching position on the pouch body so the flap closes securely when fastened.
  • Weave in all ends and fasten off after completing the flap and button placement to finish the pouch neatly.

Important Notes

  • πŸ’‘This pattern is written in US terms and the chain one at the beginning of rounds/rows does not count as a stitch.
  • πŸ’‘Work round 3 in the back loop only (BLO) to achieve the textured ridge shown in the sample pouch.
  • πŸ’‘When switching to a continuous spiral after round 10, do not join rounds; instead keep counting and place a marker if needed.
  • πŸ’‘Measure your pouch to 6 cm (2.4 in) before stopping the spiral so the flap will land in the desired position.

This Pixie Pocket Pouch is a joyful, tiny project that uses small scrap colours to create a bright striped finish. It is quick to make and perfect for storing stitch markers, coins, or small accessories. Happy crocheting and enjoy making something colourful and useful! 🧢✨

You ask,

we answer.

FAQs

What size will the finished piece be?

The finished pouch measures approximately 6.5 cm (2.6 in) long by 6 cm (2.4 in) wide when using the recommended fingering weight yarn and 2.5 mm hook.

Can I use different yarn weights for this pattern?

Yes, you can use different yarn weights, but this will affect the final size; use an appropriate hook for your chosen yarn and adjust measurements accordingly.

Do I need prior crochet experience for this pattern?

This pattern is beginner friendly; basic knowledge of single crochet, decreasing, and working in the back loop only will be helpful.

How long does this project typically take to complete?

Most crocheters can finish this small pouch in about 2-3 hours, though time may vary with experience and colour changes.