🧢 Beautiful ✨ Detailed πŸ’ Adorable

Pineapple Bag Pattern

Pineapple Bag Pattern
4.7β˜… Rating
5-7 Hours Time Needed
2.4K Made This
βœ‚οΈ

Intermediate Level

Ideal for those with basic crochet experience, featuring slightly more advanced stitches and techniques to expand your skills.

⏱️

Weekend Treat

Takes 5-7 hours, making it an enjoyable project to finish over a couple of days.

✨

Stylish Touch

An elegant detail to elevate any look, combining traditional techniques with contemporary design sensibilities.

About This Pineapple Bag Pattern

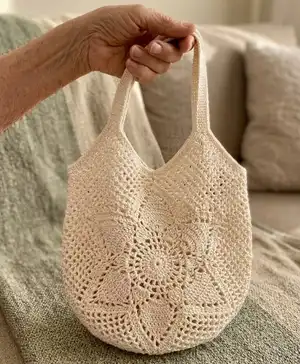
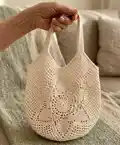
This pattern creates a woven-style Pineapple Bag with a round bottom and pineapple lace panels along the sides. It uses cotton yarn and a 3mm hook to produce a durable, market-ready tote with clean shaping. Charts and step-by-step written rounds are included to help you follow both visual and written instructions. The finished bag measures approximately 25cm wide and 22cm tall in the middle, with handles reaching a 50cm total length.

Pineapple Bag Pattern crochet pattern - detailed view of completed project

The pattern is written in US crochet terms and includes abbreviated stitch key and charted diagrams. You can make it with Scheepjes Catona, Catania Originals, or any similar 3mm cotton yarn.

Why You'll Love This Pineapple Bag Pattern

I absolutely love this pattern because it combines a classic pineapple lace motif with practical construction, giving you a bag that is both pretty and useful. I enjoy how the round bottom gives great structure while the pineapple panels add delicate texture. I also love that it is adaptable β€” you can use different cotton yarns or add a fabric lining for durability. Sharing charts and clear step-by-step rounds felt essential to help makers of different learning styles succeed.

Pineapple Bag Pattern step 1 - construction progress Pineapple Bag Pattern step 2 - assembly progress Pineapple Bag Pattern step 3 - details and accessories Pineapple Bag Pattern step 4 - final assembly and finishing

Switch Things Up

I love how easy it is to customize this bag with color β€” try alternating two colors for the pineapple rows to make the motif pop.

You can make a smaller or larger bag simply by changing your yarn weight and hook size; a thicker cotton and larger hook will give you a chunkier market tote.

I sometimes add a fabric lining and a zipper to turn it into a more secure everyday bag; cut the lining to match the inner dimensions and sew it before attaching handles.

If you prefer longer straps, extend the handle rows beyond 120 rows or use a single long strap worked in continuous rounds for a crossbody style.

For extra durability, reinforce the handle attachment by sewing through several loops and adding a small patch of interfacing on the inside before finishing.

You can also embellish the bag with a fringe, tassels, or a small crocheted flower stitched near the top edge for a playful detail.

I like to experiment with variegated cotton for a soft, tonal result that hides minor tension differences and adds visual interest.

Try working the edge with a contrasting color (2 sc in each loop) to create a neat framed finish that highlights the shape of the bag.

Consider adding a small inner pocket by crocheting a rectangle and sewing it into the lining for keys or a phone β€” it makes the bag much more practical.

If you enjoy charts, use the included diagram to keep track of motif repeats and mark the center of each pineapple section for precise shaping.

Common Mistakes & How to Fix Them

βœ— Skipping the initial ch2 as the first double crochet can change stitch counts and distort your rounds; always make the ch2 and count it as the first dc when instructed. βœ— Failing to slip into the first dc at the end of rounds when required causes misaligned joins; finish each round by slipping into the first dc as written unless the pattern instructs to work in a spiral. βœ— Not marking the 8 designated loops for the top can shift the pineapple panels; place the markers exactly as listed so you have four equal sides and 13 loops per side. βœ— Cutting the yarn before finishing the top section will interrupt the continuous shaping; do not cut the yarn until instructed after completing the top rows and handles. βœ— Working without stitch markers while shaping the pineapple sections can make counting complex repeats difficult; use markers to keep track of repeats and section ends.

Pineapple Bag Pattern

Create a charming Pineapple Bag with this detailed crochet pattern designed for cotton yarn. You will enjoy the pineapple lace panels, sturdy bottom, and neat finishing instructions that make this bag both beautiful and functional. The pattern includes charts, photos, and step-by-step written rounds so you can follow along easily. Perfect for gifting or everyday summer market use.

Intermediate 5-7 Hours

Materials Needed for Pineapple Bag Pattern

β€” Main Fabric

  • 01
    Scheepjes Catona (3 x balls) OR Catania Originals or any cotton yarn designed for 3mm hook
  • 02
    Off white (approx. 150g) - main color (example quantity shown)

β€” Tools Required

  • 01
    Crochet hook size 3.0mm
  • 02
    Tapestry needle for weaving in ends and sewing
  • 03
    Stitch markers (at least 8)
  • 04
    Scissors

Progress Tracker

0% Complete

β€” Bottom of bag :

Info :

Use pink yarn with 3mm crochet hook.

Info :

Crochet in rounds, using dc technique. The first dc is a ch2.

Info :

The first inc in each round is a ch2 then dc into same st.

Info :

At the end of each round, sl into first dc. See chart below.

Round 1 :

12dc into magic ring (12sts)

Round 2 :

inc (24sts)

Round 3 :

(inc, dc) (36sts)

Round 4 :

(inc, dc2) (48sts)

Round 5 :

(inc, dc3) (60sts)

Round 6 :

(inc, dc4) (72sts)

Round 7 :

(inc, dc5) (84sts)

Round 8 :

(inc, dc6) (96sts)

Round 9 :

(inc, dc7) (108sts)

β€” Side of bag (pineapple design) :

Info :

At the beginning of each round ch2 for first dc. This counts as a st.

Info :

At the end of each round, slip into the first dc, then slip into ch1.

Info :

See chart on page 5.

Round 10 :

*(2dc, ch1, 2dc) into 1st st, ch3, sk 3sts, sc into 4th st, ch3, sk 4sts, 9tr into 5th st, ch3, sk 4sts, sc into 5th st, ch3, sk 3sts, * repeat 6 times total.

Round 11 :

*(2dc, ch1, 2dc) into ch1, ch3, (dc1, ch1) into each 9tr, ch2, * repeat 6 times total.

Round 12 :

*(2dc, ch1, 2dc) into ch1, (ch3, sc into ch1) repeat 8 times total, ch3, * repeat 6 times total.

Round 13 :

*(2dc, ch1, 2dc) into ch1, (ch3, sc into ch3 loop) repeat 7 times total, ch3, * repeat 6 times total.

Round 14 :

*(2dc, ch1, 2dc, ch1, 2dc) into ch1, (ch3, sc into ch3 loop) repeat 6 times total, ch3, * repeat 6 times total.

Round 15 :

*(2dc, ch1, 2dc,) into ch1, ch3, (2dc, ch1, 2dc) into next ch1, (ch3, sc into ch3 loop) repeat 5 times total, ch3, * repeat 6 times total.

Round 16 :

*(2dc, ch1, 2dc,) into ch1, ch3, sc into ch3 loop, ch3 (2dc, ch1, 2dc) into next ch1, (ch3, sc into ch3 loop) repeat 4 times total, ch3, * repeat 6 times total.

Round 17 :

*(2dc, ch1, 2dc,) into ch1, ch3, (sc into ch3 loop, ch3) repeat 2 times total, (2dc, ch1, 2dc) into next ch1, (ch3, sc into ch3 loop) repeat 3 times total, ch3, * repeat 6 times total.

Round 18 :

*(2dc, ch1, 2dc,) into ch1, ch3, (sc into ch3 loop, ch3) repeat 3 times total, (2dc, ch1, 2dc) into next ch1, (ch3, sc into ch3 loop) repeat 2 times total, ch3, * repeat 6 times total.

Round 19 :

*(2dc, ch1, 2dc,) into ch1, ch3, (sc into ch3 loop, ch3) repeat 4 times total, (2dc, ch1, 2dc) into next ch1, ch3, sc into ch3 loop, ch3, * repeat 6 times total.

Round 20 :

*(2dc, ch1, 2dc,) into ch1, ch3, (sc into ch3 loop, ch3) repeat 5 times total, (2dc, ch1, 2dc) into next ch1, ch3 * repeat 6 times total.

Round 21 :

*(2dc, ch1, 2dc,) into ch1, ch3, (sc into ch3 loop, ch3) repeat 6 times total, (2dc, ch1, 2dc) into next ch1, ch1 * repeat 6 times total.

Round 22 :

*2dc into ch1, ch3, (sc into ch3 loop, ch3) repeat 7 times total, 2dc into next ch1, ch1 * repeat 6 times total.

β€” Spiral rounds / Transition to top :

Info :

From here you will crochet in a spiral. At the end of the round do not slip into previous rounds loop, but continue crocheting into the top of the loop.

Round 23-41 :

Ch3, sc into ch3 loop, all around (19 rounds in a spiral)

Info :

You should have 54 loops.

β€” Top of bag :

Info :

Using 8 stitch markers mark the beginning and end of each 4 sides. First, your last loop must be right above the tip of the pineapple. If it shifted, add more loops to be exactly above the pineapple. (I added 2 more loops.) Do not cut yarn. We will start here with marking.

Info :

Place 1st marker in the next loop. Place 2nd marker into 13th loop. Place 3rd marker into 14th loop. Place 4th marker into 26th loop. Place 5th marker into 27th loop. Place 6th marker into 40th loop. Place 7th marker into 42nd loop. Place 8th marker into 54th loop.

Info :

Continue where you left off. You will work between the markers. You should have 13 loops at each 4 sides marked. Do not cut yarn but continue with top of the bag.

Row 1 :

ch3, sc into ch3 loop 12 times. Turn at marker. Sl into 1st loop.

Row 2 :

ch3, sc into ch3 loop 11 times. Turn. Sl into 1st loop.

Row 3 :

ch3, sc into ch3 loop 10 times. Turn. Sl into 1st loop.

Row 4 :

ch3, sc into ch3 loop 9 times. Turn. Sl into 1st loop.

Row 5 :

ch3, sc into ch3 loop 8 times. Turn. Sl into 1st loop.

Row 6 :

ch3, sc into ch3 loop 7 times. Turn. Sl into 1st loop.

Row 7 :

ch3, sc into ch3 loop 6 times. Turn. Sl into 1st loop.

Row 8 :

ch3, sc into ch3 loop 5 times. Turn. Sl into 1st loop.

Row 9 :

ch3, sc into ch3 loop 4 times. Turn. Sl into 1st loop.

Row 10 :

ch3, sc into ch3 loop 3 times. Turn. Sl into 1st loop.

Row 11 :

ch3, sc into ch3 loop 2 times. Turn. Sl into 1st loop.

Row 12 :

ch3, sc into ch3 loop. Cut yarn, leave tail for sewing.

Info :

Repeat Row1-12 between each marker 3 more times.

β€” Handles :

Info :

Pick up yarn at the top loop. Work in rows.

Row 1 :

ch1, 4sc into loop. Turn.

Row 2-120 :

(ch1, sc4, turn) (total 120 rows)

Info :

Place the bag in front of you. You will slip into the top loop of the back side, from the inside.

Row 121 :

sl through each sc, then back of top loop.

Info :

Repeat handle on the other side.

β€” Edge of bag :

Info :

1sc into each sc on the side of the handles, and 2sc into each loop of the edge of the bag.

Info :

There are 3 sections on the bag, where you need to sc around. At the end, seamless st into 1st sc.

Info :

Weave in all ends.

β€” Abbreviations :

Infos :

ch - chain. sc - single crochet. dc - double crochet. tr - treble crochet. inc - double crochet increase. mr - magic ring. sk - skip. sl - slip. st(s) - stitch(es). * - repeat around.

Assembly Instructions

  • Mark the top loops with 8 stitch markers as instructed: place markers into the specified loops (next loop, 13th, 14th, 26th, 27th, 40th, 42nd, 54th) to create four equal sides for the top shaping.
  • After completing the top rows, repeat the Row1-12 panel between each marker and sew the panel tops together using the tails left for sewing to create neat seams.
  • Work the handles in rows picking up at the top loop; after finishing handle rows, slip through each sc into the top loop of the back side from the inside and secure, then repeat on the opposite side.
  • Sc around the edge to finish: 1 sc into each sc on the handle sides and 2 sc into each loop along the bag edge, working around the three sections and finishing with a seamless stitch into the first sc.
  • Weave in all ends securely with a tapestry needle and press lightly if desired; add a fabric lining if you want extra strength and to protect contents.

Important Notes

  • πŸ’‘Use stitch markers to mark section boundaries and the top loops to keep your pineapple panels aligned and symmetrical.
  • πŸ’‘Do not cut the working yarn after the spiral rounds; continue to the top shaping and only cut when instructed to leave a tail for sewing.
  • πŸ’‘Work the spiral rounds without slipping into previous rounds' loops β€” crochet into the top of the loop to maintain the mesh and loop counts.
  • πŸ’‘Count loops after the spiral section to ensure you have 54 loops before marking and starting the top.
  • πŸ’‘Weave in ends as you go where possible to maintain a tidy finish and reduce bulk when seaming the top.

This Pineapple Bag Pattern brings a touch of handmade elegance to your everyday routine with its lacy pineapple panels and sturdy round base. The step-by-step rounds, charts, and photos make the technique approachable while keeping the design timeless and stylish. I hope it inspires you to make more seasonal market bags and unique handmade gifts. 🧢✨

You ask,

we answer.

FAQs

What size will the finished piece be?

The finished bag with handles measures approximately 50cm total (handles included); the bag is about 25cm wide and 22cm tall in the middle when made with the recommended yarn and hook.

Can I use different yarn weights for this pattern?

Yes, you can use different yarn weights but this will change the final size; choose a hook appropriate for your yarn and expect variations in dimensions and drape.

Do I need prior crochet experience for this pattern?

This pattern is rated intermediate because it uses double crochet rounds, lace pineapple motifs, working in spiral, and marking sections; familiarity with dc, ch, sc and reading repeats is recommended.

How long does this project typically take to complete?

Most crocheters complete this project in 5-7 hours, though actual time varies based on experience and whether you add a lining or extra finishing.