🧢 Beautiful ✨ Detailed πŸ’ Adorable

Crochet Landscape Rings Pattern

Crochet Landscape Rings Pattern
4.5β˜… Rating
1-2 Hours Time Needed
1.8K Made This
βœ‚οΈ

Beginner Friendly Level

Perfect for those just starting their crochet journey, with clear instructions and simple techniques

⏱️

Quick Make

Complete in under 2 hoursβ€”lightning fast fun for instant gratification and quick gifts.

✨

Stylish Touch

An elegant detail to elevate any look, combining traditional techniques with contemporary design sensibilities.

About This Crochet Landscape Rings Pattern

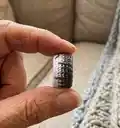
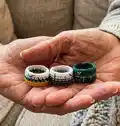
This pattern teaches you how to crochet small landscape-inspired rings approximately 20mm in diameter using simple double crochet rounds and colour changes. The rings are worked flat in rounds from a chain ring, then fastened off and embroidered to add birds, trunks or buildings. Ideal for using up scraps, they make lovely stackable accessories or tiny handmade gifts.

Crochet Landscape Rings Pattern crochet pattern - detailed view of completed project

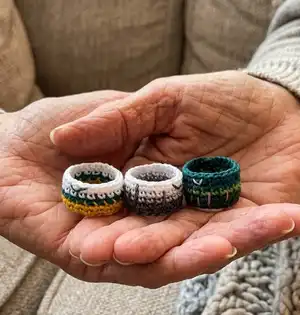
You will work three short rounds in different colours to create layered 'landscape' bands, then embroider details with contrasting threads. No advanced stitches are required, making this a joyful and accessible project.

Why You'll Love This Crochet Landscape Rings Pattern

I absolutely love this pattern because it turns tiny yarn leftovers into wearable little artworks that feel special and personal. I enjoy how quickly a ring comes togetherβ€”each one is satisfying to finish in a single sitting. The embroidery step is my favourite part because it adds charming, unique details and lets me personalise each design. Making sets of mixed beach, city and woodland rings is a lovely way to experiment with colour and texture.

Crochet Landscape Rings Pattern step 1 - construction progress Crochet Landscape Rings Pattern step 2 - assembly progress Crochet Landscape Rings Pattern step 3 - details and accessories Crochet Landscape Rings Pattern step 4 - final assembly and finishing

Switch Things Up

I love experimenting with different yarns to change the look of these rings; try a fuzzy mohair for a soft halo or a linen blend for a rustic finish.

I often adjust the starting chain to make larger or smaller rings β€” reducing or increasing the chain by a few stitches changes the diameter quickly.

I like to mix unexpected colours for a modern look, for example pairing a bright saffron with charcoal for high contrast landscapes.

You can add tiny beads or metallic thread during embroidery to suggest lights in a cityscape or dew on trees.

I sometimes work more than three rounds of colour for a taller band and more embroidered space β€” just add extra rounds repeating the same dc pattern.

If you want a chunkier ring, I use a bulkier yarn and a larger hook and then increase the starting chain to keep the circumference comfortable.

For a delicate stackable set, I use finer yarn and embroider with a single strand of contrasting yarn for subtle details.

I recommend trying embroidered motifs in different positions β€” birds in the top band or trunks crossing both middle and top bands β€” it changes the story the ring tells.

When gifting, I pair rings with tiny crocheted pouches or a simple card; I find presentation makes these little pieces feel extra special.

Don't be afraid to mix palettes in one set β€” a beach ring stacked with a woodland ring creates a playful contrast both in colour and texture.

Common Mistakes & How to Fix Them

βœ— Making the initial chain too tight can make it hard to join into a ring; keep a loose, relaxed tension when chaining so the ring sits flat when joined. βœ— Forgetting to check that the chain is not twisted before joining will create a twisted band; always lay the chain flat and confirm orientation before you slip stitch to join. βœ— Changing colours without securing tails can result in loose ends showing later; fasten off cleanly or carry the yarn and weave in ends as you go to keep the edges tidy. βœ— Skipping the weave-in step leaves tails that can work loose over time; weave in all ends securely with your yarn needle before wearing the rings.

Crochet Landscape Rings Pattern

Make tiny, textured crochet landscape rings with simple color changes and embroidery to create beach, city, or woodland scenes. You can whip up a set in one sitting using small amounts of Scheepjes Sugar Rush yarn. This pattern is warm, playful, and perfect for gifting or wearing as stackable, handmade jewelry.

Beginner Friendly 1-2 Hours

Materials Needed for Crochet Landscape Rings Pattern

β€” Main Fabric

  • 01
    Scheepjes Sugar Rush - main yarn for rings (use small amounts per ring)
  • 02
    Beach palette: Saffron, Dark Teal, Snow White
  • 03
    City palette: Charcoal, Mercury, Snow White
  • 04
    Woodland palette: Spruce, Sage Green, Teal
  • 05
    Small amounts of Charcoal, Snow White & Moon Rock for embroidery details

β€” Tools Required

  • 01
    Crochet hook size 1.5 mm
  • 02
    Yarn needle

Progress Tracker

0% Complete

β€” Materials :

Info :

1.5 mm crochet hook. Scheepjes Sugar Rush. For beach – saffron, dark teal then snow white. For city – charcoal, mercury then snow white. For woodland – spruce, sage green then teal. Small amounts of charcoal, snow white & moon rock for embroidery. Yarn needle. Approx. size – 20mm in diameter.

β€” Abbreviations :

Infos :

ch = chain. dc = double crochet (sc in US). st = stitch. sl st = slip stitch.

β€” Ring :

Info :

Starting from the bottom:

Row 1 :

Make a slip knot in first colour. Ch 20 (20ch makes a ring about 20mm in diameter – increase or decrease as required) & join with a slip stitch

Info :

*Make sure the chain isn't twisted

Row 2 :

ch 1 (does not count as a stitch), 1 dc in each st & join with a sl st

Row 3 :

ch 1 (does not count as a stitch), 1 dc in each st & join with a sl st

Info :

*Change to middle colour

Row 4 :

ch 1 (does not count as a stitch), 1 dc in each st & join with a sl st

Info :

*Change to top colour

Row 5 :

ch 1 (does not count as a stitch), 1 dc in each st & join with a sl st

Row 6 :

ch 1 (does not count as a stitch), 1 dc in each st, join with a sl st & fasten off

Info :

Weave in your ends

Info :

Embroider small v shapes for birds in charcoal or snow white and lines for tree trunks or buildings in moon rock and charcoal.

Assembly Instructions

  • Weave in all yarn tails neatly on the wrong side of the ring using the yarn needle so the right side remains tidy and wearable.
  • Embroider small 'v' shapes for birds using charcoal or snow white between the colour bands to add detail and foreground interest.
  • Add lines for tree trunks or building details using moon rock and charcoal yarn, stitching vertically across the middle and top bands as desired.
  • Ensure the embroidered details are secured with knots or backstitches on the wrong side and trim excess threads before wearing.
  • If making a set, arrange rings by palette (beach, city, woodland) and photograph them together to compare embroidery placements before finalising.
  • Try the ring on a finger to check fit after weaving in ends; if too loose, create a new chain with fewer stitches or tighten by making a smaller starting chain.

Important Notes

  • πŸ’‘Use a loose tension when making the initial chain so the joined ring sits flat and the subsequent rounds are easy to work into.
  • πŸ’‘Change colours at the start of a round and weave in ends as you go or leave tails to weave in after finishing for a neater finish.
  • πŸ’‘Weave in ends securely and trim close to the work to prevent snagging when wearing the rings.
  • πŸ’‘Pin and check embroidery placement before stitching to avoid misplaced details and to keep designs balanced.

These tiny Crochet Landscape Rings are a playful way to turn scraps into wearable art with layered color and simple embroidery. Perfect as gifts or a personal stack, they take minutes to make and a little longer to embellish. Try the beach, city, and woodland palettes to build a small collection full of charm. 🧢✨

You ask,

we answer.

FAQs

What size will the finished piece be?

The finished ring measures approximately 20 mm in diameter when using a 1.5 mm hook and the recommended chain length (Ch 20). Adjust the chain length to change size.

Can I use different yarn weights for this pattern?

Yes, you can use different yarn weights but the finished ring size and texture will change; choose an appropriate hook for your yarn and adjust the starting chain to reach the desired diameter.

Do I need prior crochet experience for this pattern?

This pattern is beginner friendly and uses basic stitches (chain, double crochet, slip stitch), so beginners with basic stitch knowledge will be comfortable following it.

How long does this project typically take to complete?

Most crocheters complete a single ring in under 2 hours, depending on embroidery detail and weaving in ends; making multiple rings will increase total time.