🧢 Beautiful ✨ Detailed πŸ’ Adorable

Pillow- unicorn Amigurumi Pattern

Pillow- unicorn Amigurumi Pattern
4.0β˜… Rating
5-7 Hours Time Needed
3.2K Made This
βœ‚οΈ

Intermediate Level

Ideal for those with basic crochet experience, featuring slightly more advanced stitches and techniques to expand your skills.

⏱️

Weekend Treat

Takes 5-7 hours, making it an enjoyable project to finish over a couple of days.

🧸

Cute Companion

An adorable friend to cherish, handcrafted with love to bring comfort and joy for years to come.

About This Pillow- unicorn Amigurumi Pattern

This pattern creates a soft plush unicorn pillow approximately 31x31 cm (with horn) using plush baby yarn. You will crochet a square pillow and small amigurumi parts: ears, horn, nose, nostrils, mane, arms and legs. The instructions use simple rounds and small motifs for assembly into a charming unicorn pillow.

Pillow- unicorn Amigurumi Pattern crochet pattern - detailed view of completed project

Worked in continuous rounds with clear round counts and sewing instructions for easy assembly. Ideal for gifting or adding a playful handmade accent to any room.

Why You'll Love This Pillow- unicorn Amigurumi Pattern

I absolutely love this pattern because it turns simple stitches into a whimsical decor piece that makes people smile. I enjoyed designing the curly mane and the big round nose which give the pillow personality. I love that it uses plush yarn for a cuddly texture and finishes at a size that is both decorative and functional. I find the step-by-step parts are satisfying to make and great for practicing small amigurumi shapes.

Pillow- unicorn Amigurumi Pattern step 1 - construction progress Pillow- unicorn Amigurumi Pattern step 2 - assembly progress Pillow- unicorn Amigurumi Pattern step 3 - details and accessories Pillow- unicorn Amigurumi Pattern step 4 - final assembly and finishing

Switch Things Up

I love to change the color palette to match a nursery or room decor; try pastel tones for a softer look or bright neons for a playful statement.

I often switch yarn weight and hook size to create mini or jumbo versions; a thinner yarn will give you a small keychain-sized pillow while bulky yarn makes a chunky cuddle pillow.

I like to swap the mane colors and add sequined or sparkly yarn strands for a glittery mane that catches the light.

If you want a more realistic horn, try crocheting it in a metallic or gold yarn or embroidering spiral ridges with contrasting thread.

I sometimes replace bead eyes with safety eyes for durability, or embroider larger expressive eyes with black yarn for a softer finish.

For a washable pillow, use cotton-based plush yarn alternatives and secure all parts with extra strong sewing to withstand laundering.

To make the pillow more secure for kids, sew the nose and other parts tightly and avoid small loose beads; you can embroider eyelids instead of using buttons.

I also enjoy creating themed variations β€” for example, make a unicorn-cat hybrid by changing ear shape and adding whiskers.

You can lengthen or shorten the mane by varying the chain length when making each spiral strip; longer chains produce longer curls.

Consider adding a small pocket inside the pillow or attaching a loop to hang it as a decorative wall piece; small practical tweaks make the pattern more versatile.

Common Mistakes & How to Fix Them

βœ— Skipping stitch markers when working continuous rounds leads to losing your start position; always mark the first stitch of each round to keep counts accurate. βœ— Stuffing too loosely creates a floppy pillow that wont hold shape; stuff firmly and evenly, especially at the corners, to maintain the square form. βœ— Not counting stitches after increases or decreases causes uneven shaping; count after each round change to ensure your stitch totals match the pattern. βœ— Sewing parts without pinning first can result in misaligned features; pin or baste parts in place, check symmetry, then sew securely for best placement.

Pillow- unicorn Amigurumi Pattern

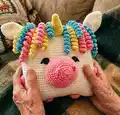
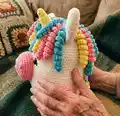
Make a cuddly unicorn pillow that's both playful and practical. This pattern guides you through crocheting a soft plush pillow with ears, horn, mane, and cute facial details. Youll work with plush baby yarn and simple amigurumi techniques to create a 31x31 cm finished piece. Perfect as a unique gift or a decorative accent for a childs room.

Intermediate 5-7 Hours

Materials Needed for Pillow- unicorn Amigurumi Pattern

β€” Main Fabric

  • 01
    Himalaya Dolphin Baby plush yarn (120 m / 100 g) - White - 2 skeins (approximate)
  • 02
    Himalaya Dolphin Baby plush yarn - Pink - small amount for nose, nostrils, feet (approx 50g)
  • 03
    Himalaya Dolphin Baby plush yarn - Yellow - small amount for horn and mane (approx 20-40g)
  • 04
    Himalaya Dolphin Baby plush yarn - Blue - small amount for mane and arms (approx 20-40g)
  • 05
    Black yarn or black plush for eyes/eyelids - small amount
  • 06
    Polyester stuffing (hollowfiber / hollofayber) - enough to firmly fill a 31x31 cm pillow

β€” Tools Required

  • 01
    Crochet hook size 3.5 mm (I used No 3.5; yarn recommended hook 3.5-4.5 mm)
  • 02
    Scissors
  • 03
    Yarn needle for sewing parts and weaving in ends
  • 04
    Stitch markers or pins
  • 05
    Black beads or buttons for eyes (22 mm) or black yarn for embroidered eyelids
  • 06
    Polyester stuffing (hollofayber)
  • 07
    Pins for assembly

Progress Tracker

0% Complete

β€” Pillow :

Info :

Use white yarn

Round 1 :

90 ch, connect with the first loop

Round 2 – 39 (38 rounds) :

90 sc

Info :

Leave a long thread and sew the top of the pillow. We fasten the thread and hide inside the pillow.

Info :

Fill tightly and evenly. Fill the angle of the pillow well. Sew and fasten the thread and hide inside the pillow.

β€” Ear (2 details) :

Info :

Use white plush yarn

Round 1 :

6 sc in magic Ring {6}

Round 2 :

(inc) – repeat 6 times {12}

Round 3 :

12 sc

Round 4 :

(1 sc, inc) – repeat 6 times {18}

Round 5 :

18 sc

Round 6 :

(2 sc, inc) – repeat 6 times {24}

Round 7 :

24 sc

Round 8 :

(2 sc, dec) – repeat 6 times {18}

Round 9 – 11 (3 rounds) :

18 sc

Round 12 :

(1 sc, dec) – repeat 6 times {12}

Info :

Leave a long thread for sewing

β€” Nose :

Info :

Use pink yarn

Round 1 :

6 sc in magic Ring {6}

Round 2 :

(inc) – repeat 6 times {12}

Round 3 :

(1 sc, inc) – repeat 6 times {18}

Round 4 :

(2 sc, inc) – repeat 6 times {24}

Round 5 :

(3 sc, inc) – repeat 6 times {30}

Round 6 :

(4 sc, inc) – repeat 6 times {36}

Round 7 :

(5 sc, inc) – repeat 6 times {42}

Round 8 :

(6 sc, inc) – repeat 6 times {48}

Round 9 – 11 (3 rounds) :

48 sc

Info :

Leave a long thread for sewing

β€” Nostrils (2 details) :

Info :

Use pink yarn

Row 1 :

make 5 ch

Row 2 :

we begin to work from the second loop from the hook: sc, hdc, hdc, sl st

Info :

Leave a long thread for sewing

β€” Horn :

Info :

Use yellow yarn

Round 1 :

6 sc in magic Ring {6}

Round 2 :

(inc) – repeat 6 times {12}

Round 3 :

(dec) – repeat 6 times {6}

Round 4 :

work through front loop: (inc) – repeat 6 times {12}

Round 5 :

12 sc

Round 6 :

(1 sc, inc) – repeat 6 times {18}

Round 7 :

(1 sc, dec) – repeat 6 times {12}

Round 8 :

work through front loop: (1 sc, inc) – repeat 6 times {18}

Round 9 – 10 (2 rounds) :

18 sc

Round 11 :

(1 sc, dec) – repeat 6 times {12}

Info :

Leave a long thread for sewing

β€” Mane :

Info :

I made 5 yellow, 5 pink 5 blue manes. You can do more. If you want to make the mane longer, then make more chain.

Row 1 :

make 25 ch

Row 2 :

we begin to work from the second loop from the hook: make 3 sc in 1 loop, repeat with all loops (in each loop we do 3 sc)

β€” Leg (2 details) :

Info :

Use pink yarn

Round 1 :

6 sc in magic Ring {6}

Round 2 :

(inc) – repeat 6 times {12}

Round 3 :

(1 sc, inc) – repeat 6 times {18}

Round 4 :

18 sc

Info :

Leave a long thread for sewing

β€” Arm (2 details) :

Info :

Use blue yarn

Round 1 :

6 sc in magic Ring {6}

Round 2 :

(inc) – repeat 6 times {12}

Round 3 :

12 sc

Info :

Leave a long thread for sewing

β€” Assembly :

Item Name (Nose Placement) :

Sew nose between 10 and 22 rounds

Item Name (Ears) :

Sew ears. We put ears on the angles of the pillow and sew (the angle of the pillow should be inside the ear). Fasten the thread and hide it inside the pillow

Item Name (Horn) :

Sew horn between 2 and 6 rounds (we count on top of the pillow)

Item Name (Eyes) :

Sew eyes between 21 and 22 rounds (distance between eyes 12 sc)

Item Name (Nostrils) :

Sew nostrils. Distance between nostrils 4 rounds. We hide the ends of the threads inside the nose.

Item Name (Eyelids) :

Use black yarn and make eyelid. We hide the ends of the threads inside the nose.

Item Name (Arms & Legs) :

Sew arms between 11 and 15 rounds and sew legs (distance between legs 12 sc)

Item Name (Mane) :

Sew mane onto top of pillow as desired, arranging colored curls evenly across the top and hiding thread ends inside the pillow.

Assembly Instructions

  • Sew nose between 10 and 22 rounds, centering it on the front face and securing with small invisible stitches so it sits flat against the pillow.
  • Attach each ear to the corner angles of the pillow so that the pillow corner is inside the ear, then sew securely and hide ends inside the pillow.
  • Sew the horn centered on top between rounds 2 and 6 (counting on top), securing firmly and hiding the tail inside the pillow.
  • Position and sew eyes between rounds 21 and 22 with a distance of 12 sc between centers; use beads or sew black yarn eyelids as preferred.
  • Sew nostrils onto the nose with a distance of 4 rounds between them and hide the ends of the threads inside the nose.
  • Sew arms between rounds 11 and 15 and sew legs at the bottom with a 12 sc distance between the legs to ensure balance and symmetry.

Important Notes

  • πŸ’‘Do not forget to fix the beginning of each new circle with a pin or thread to keep your rounds aligned and even.
  • πŸ’‘Leave long threads when finishing small motifs so you have enough length to sew pieces securely and hide ends inside the pillow.
  • πŸ’‘Use consistent tension and stuff the pillow firmly and evenly, paying special attention to corners to keep the square shape.

This unicorn pillow pattern is a delightful project that turns plush baby yarn into a cuddly, smile-inducing companion. Its curly mane, chubby nose, and tiny details make it perfect for nurseries and kids rooms. Make one for yourself or as a handmade gift and enjoy the process! 🧢✨😊

You ask,

we answer.

FAQs

What size will the finished piece be?

The finished pillow measures approximately 31x31 cm including the horn when using the recommended plush baby yarn and 3.5 mm hook.

Can I use different yarn weights for this pattern?

Yes, you can use other plush or regular yarns, but the final size and texture will change; adjust your hook size and stuffing accordingly.

Do I need prior crochet experience for this pattern?

This pattern is rated intermediate, so familiarity with basic amigurumi techniques such as magic ring, increases and decreases is recommended.

How long does this project typically take to complete?

Most crocheters complete this project in 5-7 hours, though time may vary based on experience level and how many mane pieces you make.