About This Ninja Turtle Amigurumi Pattern
This pattern creates a soft, plush Ninja Turtle amigurumi with a separate shell, belly, and waist strap. It uses blanket chenille yarn for a cuddly texture and includes mask color options to create each turtle personality. Detailed stitch counts and assembly instructions make construction straightforward for experienced beginners and intermediate crocheters.
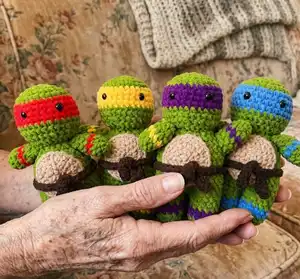
You will make head, body, arms, legs, shell, belly, and a waist strap, then sew everything together. Clear notes and photos help with positioning and finishing for a professional look.
Why You'll Love This Ninja Turtle Amigurumi Pattern
I absolutely love this pattern because it turns simple stitches into a charming collection of four distinct characters. I enjoy how the chenille yarn creates an irresistibly squishy texture that is perfect for toys. Sewing the shell and belly onto the body makes each turtle feel handcrafted and unique, and I love offering mask color options so you can personalize each one. Making a set is so rewarding and always brings a smile when I see them lined up together.
Switch Things Up
I love adjusting colors to make unique turtle personalities; try pastel masks for a softer look or neon shades for a playful set.
I sometimes change yarn weight and hook size to make mini or jumbo versions; using thinner yarn with a smaller hook gives a tiny keychain friend, while bulky yarn creates a chunky cuddle toy.
I often add embroidered mouths or felt cheeks for extra expression; these small details can completely change the character.
For posability I add a short length of wire inside the arms before closing; this helps pose the arms for display.
You can make outfits or tiny accessories like hats, scarves, or weapons for playful storytelling and creative play.
If you want a firmer shell, use a small circle of felt inside before sewing to help it hold shape and sit neatly on the body.
For safety eyes alternatives, embroider eyes or use smaller safety eyes for little ones; always consider safety when making toys for children.
I recommend experimenting with the belly texture by alternating FLO or BLO rows to create subtle ridges or smooth surfaces.
Try making matching accessories like a tiny bandana or a crocheted pizza slice to create a themed gift set that tells a story.
Mix and match yarn brands and textures to find what you enjoy working with most—some yarns create a fluffier look while others give crisp stitch definition.
Common Mistakes & How to Fix Them
✗ Skipping stitch markers during continuous rounds leads to lost counts and uneven shaping; place a marker at the start of every round to keep track and recount often.
✗ Overstuffing parts like the head and body will distort the shape and make sewing difficult; stuff gradually and evenly, checking shape as you go for a smooth finish.
✗ Closing rounds too tightly or finishing the last row without leaving a long tail makes sewing attachments awkward; leave long tails and use a yarn needle to weave in and secure pieces properly.
✗ Not attaching safety eyes before stuffing or counting rounds may misplace the eyes; attach safety eyes between the recommended rounds and check spacing (5 stitches apart) before securing.
✗ Crocheting with inconsistent tension produces uneven shell and belly pieces that do not lay flat; maintain consistent tension and, if needed, gently stretch the belly to help it sit flat when sewing.


