🧢 Beautiful ✨ Detailed πŸ’ Adorable

Big Houses Amigurumi Pattern

Big Houses Amigurumi Pattern
4.8β˜… Rating
5-7 Hours Time Needed
2.7K Made This
βœ‚οΈ

Intermediate Level

IοΏ½οΏ½deal for those with basic crochet experience, featuring slightly more advanced stitches and techniques to expand your skills.

⏱️

Weekend Treat

Takes 5-7 hours, making it an enjoyable project to finish over a couple of days.

🏑

Cozy Accent

A warm touch for your space that transforms ordinary corners into inviting nooks filled with handmade charm.

About This Big Houses Amigurumi Pattern

This pattern creates tall, decorative crochet houses with removable inner supports for a neat finish and sturdy shape. It includes full round-by-round instructions for both the outer and inner parts, plus step-by-step roof and joining instructions. The design uses DK cotton blend yarn and finished details are made with felt and embroidery threads for realistic windows and doors.

Big Houses Amigurumi Pattern crochet pattern - detailed view of completed project

Follow clear photo steps for cardboard templates and exact stitch counts to make assembly straightforward. Perfect as shelf decor, gifts, or a set of mini houses to brighten any room.

Why You'll Love This Big Houses Amigurumi Pattern

I absolutely love this pattern because it turns simple single crochet into a charming architectural toy with personality and structure. I enjoy the precision of making inner and outer parts that nest together neatly, giving a professional finish that really satisfies. The felt and embroidery details let me add my own creative touches, so every house feels unique. I'm excited to share a pattern that balances technical shaping with delightful decorative finishing.

Big Houses Amigurumi Pattern step 1 - construction progress Big Houses Amigurumi Pattern step 2 - assembly progress Big Houses Amigurumi Pattern step 3 - details and accessories Big Houses Amigurumi Pattern step 4 - final assembly and finishing

Switch Things Up

I love how easy it is to customize these houses by swapping colors; try pastel shades for a soft nursery set or bold jewel tones for a modern shelf display.

I often change the yarn weight and hook size to make minibuildings for garlands β€” a finer yarn makes cute tiny houses perfect for ornaments.

I sometimes add tiny buttons, beads or small crocheted wreaths to the door for seasonal variations and they look great for holidays.

I recommend experimenting with different felt colors and embroidery threads for window and door accents to change the character of each house.

For a more rustic look, use natural or tweed DK yarn and muted embroidery shades; for a playful look use bright yarns and contrasting trim.

If you want a more structured roof, layer two cardboard pieces for extra rigidity or add a thin interfacing under felt for a crisp finish.

I like to make a set of three houses in graduated sizes β€” change yarn weight or add extra rounds to the base to alter height and proportions.

Consider adding a loop at the top and stuffing the inner part less for a soft hanging ornament version of the house.

To make the house interactive, sew a small pocket inside before joining both parts so you can store a tiny note or treat.

I often embroider different flower arrangements around windows using French knots and lazy daisy stitches to personalize each home.

Common Mistakes & How to Fix Them

βœ— Skipping the cardboard bottom or using flimsy cardboard can make the house wobble; use firm cardboard traced to the square bottom and glue it securely before inserting. βœ— Crocheting too loosely will show stuffing and distort corners; maintain tight consistent tension and check your gauge frequently while working in rounds. βœ— Forgetting to mark the corners leads to misaligned sides when joining; mark the four corners with stitch markers and count 22 stitches between corner markers as instructed. βœ— Not working the post-round correctly will create uneven edges; follow the instruction to crochet between the posts for the next round and keep stitch placement consistent. βœ— Ignoring the inner part height will cause mismatch at assembly; insert the inner part into the outer and adjust by adding or unraveling rows until both heights match before joining.

Big Houses Amigurumi Pattern

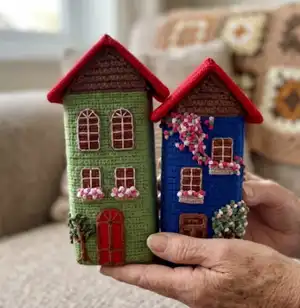
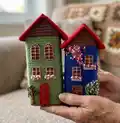
Create charming tall crochet houses with this detailed pattern that guides you through crocheting, shaping, and decorating each piece. You will learn how to make both inner and outer housings, sturdy cardboard inserts, and pretty felt windows and doors. With clear photos and step-by-step rounds, this pattern is perfect for adding handmade decor to your home or gifting to someone special.

Intermediate 5-7 Hours

Materials Needed for Big Houses Amigurumi Pattern

β€” Main Fabric

  • 01
    DK weight yarn - Alize Cotton Gold (55% cotton/45% acrylic; 100 g/330 m)
  • 02
    Alize Cotton Gold No. 485 (green) - main body yarn, approx one skein per house
  • 03
    Alize Cotton Gold No. 493 (brown) - roof and trim, small amount
  • 04
    Alize Cotton Gold No. 56 (red) - door felt color (felt, not yarn)
  • 05
    Alize Cotton Gold No. 141 (blue) - alternate house color option, small amount
  • 06
    Embroidery thread 100% cotton - brown, light brown, white, several shades of pink, two to three shades of green (for flowers and details)
  • 07
    Thin and firm felt - brown, light brown, red, white (templates for windows, doors, flowerpots)
  • 08
    Cardboard for the bottom of the houses (firm square)
  • 09
    Cardboard for the roofs and for the wool templates

β€” Tools Required

  • 01
    Crochet hook size 2.25 mm
  • 02
    Tapestry needle
  • 03
    Scissors
  • 04
    Stitch markers (use contrast yarn or markers)
  • 05
    Cardboard for bottom and roofs
  • 06
    Glue for gluing the cardboard
  • 07
    White permanent marker (for drawing details on felt)
  • 08
    Pencil for tracing templates
  • 09
    Pins for assembly

Progress Tracker

0% Complete

β€” HOUSE No.1 (the outer part) :

Round 1 :

8 into MR

Info :

Place a stitch marker in the 2nd stitch (3 sc) in order not to lose the corner.

Round 2 :

1 sc, (3 sc in 1 stitch), 1 sc, (3 sc in 1 stitch), 1 sc, (3 sc in 1 stitch), 1 sc, (3 sc in 1 stitch) (16)

Round 3 :

2 sc, (3 sc in 1 stitch), 3 sc, (3 sc in 1 stitch), 3 sc, (3 sc in 1 stitch), 3 sc, (3 sc in 1 stitch) (24)

Round 4 :

4 sc, (3 sc in 1 stitch), 5 sc, (3 sc in 1 stitch), 5 sc, (3 sc in 1 stitch), 5 sc, (3 sc in 1 stitch) (32)

Round 5 :

6 sc, (3 sc in 1 stitch), 7 sc, (3 sc in 1 stitch), 7 sc, (3 sc in 1 stitch), 7 sc, (3 sc in 1 stitch) (40)

Round 6 :

8 sc, (3 sc in 1 stitch), 9 sc, (3 sc in 1 stitch), 9 sc, (3 sc in 1 stitch), 9 sc, (3 sc in 1 stitch) (48)

Round 7 :

10 sc, (3 sc in 1 stitch), 11 sc, (3 sc in 1 stitch), 11 sc, (3 sc in 1 stitch), 11 sc, (3 sc in 1 stitch) (56)

Round 8 :

12 sc, (3 sc in 1 stitch), 13 sc, (3 sc in 1 stitch), 13 sc, (3 sc in 1 stitch), 13 sc, (3 sc in 1 stitch) (64)

Round 9 :

14 sc, (3 sc in 1 stitch), 15 sc, (3 sc in 1 stitch), 15 sc, (3 sc in 1 stitch), 15 sc, (3 sc in 1 stitch) (72)

Round 10 :

16 sc, (3 sc in 1 stitch), 17 sc, (3 sc in 1 stitch), 17 sc, (3 sc in 1 stitch), 17 sc, (3 sc in 1 stitch) (80)

Round 11 :

18 sc, (3 sc in 1 stitch), 19 sc, (3 sc in 1 stitch), 19 sc, (3 sc in 1 stitch), 19 sc, (3 sc in 1 stitch) (88)

Info :

* Crochet the next round through the posts between stitches. To do this, insert the hook in the first stitch and draw it out in the second stitch, grabbing the working yarn and making sc.

Round 12 :

88 sc (between the posts)

Round 13-15 :

88 sc (3 rounds)

Info :

Trace the bottom of the square on the cardboard and cut it out. If you use thin cardboard then cut two squares.

Round 16-60 :

88 sc (45 rounds)

Info :

Insert the cardboard template into the bottom of the house. Do not cut yarn. Prepare the cardboard for the wools of the house. The density of cardboard from a large box of Greenfield tea will suffice. Measure one side of the house with a ruler in order to cut off the required amount of cardboard. Glue the cardboard and insert the template into the crocheted part.

Info :

Complete crocheting the required number of sc to the corner of the house – 4 sc. (guide on your part).

Info :

Mark the corners of the house with markers. Count 22 stitches from four sides.

Info :

Attach brown yarn (Alize cotton Gold No. 493). Cut green yarn. Work in back and forth rows.

Row 1 :

22 sc, turn

Row 2 :

21 sc, turn

Info :

* From the next row, incomplete 1 sc to decrease the row.

Row 3 :

19 sc, turn

Row 4 :

17 sc, turn

Row 5 :

15 sc, turn

Row 6 :

13 sc, turn

Row 7 :

11 sc, turn

Row 8 :

9 sc, turn

Row 9 :

7 sc, turn

Row 10 :

5 sc, turn

Row 11 :

3 sc, turn

Row 12 :

1 sc, turn

Info :

Break yarn. Attach brown yarn to the marked point on the opposite side of the house. Work in back and forth rows similarly.

β€” HOUSE No.1 (the inner part) :

Info :

The bottom of the inner part will be smaller than the outer part by one row.

Round 1 :

8 into MR

Round 2 :

1 sc, (3 sc in 1 stitch), 1 sc, (3 sc in 1 stitch), 1 sc, (3 sc in 1 stitch), 1 sc, (3 sc in 1 stitch) (16)

Round 3 :

2 sc, (3 sc in 1 stitch), 3 sc, (3 sc in 1 stitch), 3 sc, (3 sc in 1 stitch), 3 sc, (3 sc in 1 stitch) (24)

Round 4 :

4 sc, (3 sc in 1 stitch), 5 sc, (3 sc in 1 stitch), 5 sc, (3 sc in 1 stitch), 5 sc, (3 sc in 1 stitch) (32)

Round 5 :

6 sc, (3 sc in 1 stitch), 7 sc, (3 sc in 1 stitch), 7 sc, (3 sc in 1 stitch), 7 sc, (3 sc in 1 stitch) (40)

Round 6 :

8 sc, (3 sc in 1 stitch), 9 sc, (3 sc in 1 stitch), 9 sc, (3 sc in 1 stitch), 9 sc, (3 sc in 1 stitch) (48)

Round 7 :

10 sc, (3 sc in 1 stitch), 11 sc, (3 sc in 1 stitch), 11 sc, (3 sc in 1 stitch), 11 sc, (3 sc in 1 stitch) (56)

Round 8 :

12 sc, (3 sc in 1 stitch), 13 sc, (3 sc in 1 stitch), 13 sc, (3 sc in 1 stitch), 13 sc, (3 sc in 1 stitch) (64)

Round 9 :

14 sc, (3 sc in 1 stitch), 15 sc, (3 sc in 1 stitch), 15 sc, (3 sc in 1 stitch), 15 sc, (3 sc in 1 stitch) (72)

Round 10 :

16 sc, (3 sc in 1 stitch), 17 sc, (3 sc in 1 stitch), 17 sc, (3 sc in 1 stitch), 17 sc, (3 sc in 1 stitch) (80)

Info :

* Crochet the next round through the posts between stitches. To do this, insert the hook in the first stitch and draw it out in the second stitch, grabbing the working yarn and making sc.

Round 11 :

80 sc (between the posts)

Info :

* Crochet all the next rounds through both loops. Draw the yarn tail to the right side.

Round 12-56 :

80 sc (45 rounds)

Info :

Insert the inner part into the outer part. Check if the height of both parts matches. Adjust the height, completing or unraveling the row if needed. Complete crocheting the required stitches to the corner of the house. Break yarn.

Info :

Insert the inner part of the house into the outer part. Divide the top round into 22 and 18 stitches using the pins. The 18 stitches are the left and right sides of the house, and 22 stitches are the front and back sides of the house.

Info :

Take off the inner part of the house.

Info :

Attach brown yarn (Alize cotton Gold No.493). Work in back and forth rows.

Row 1 :

22 sc, turn

Row 2 :

21 sc, turn

Info :

* From the next row, incomplete 1 sc to decrease the row.

Row 3 :

19 sc, turn

Row 4 :

17 sc, turn

Row 5 :

15 sc, turn

Row 6 :

13 sc, turn

Row 7 :

11 sc, turn

Row 8 :

9 sc, turn

Row 9 :

7 sc, turn

Row 10 :

5 sc, turn

Row 11 :

3 sc, turn

Row 12 :

1 sc, turn

Info :

Break yarn. Attach yarn to the opposite side of the house. Work in back and forth rows similarly. Draw the yarn tails out to the outer side. Insert the inner part into the outer part. Hide all yarn tails between the parts.

β€” Join both parts of the house :

Info :

Crochet 15 sc, (chain 1 on the top of the house) through both parts along the edge of the top of the house with brown yarn. Move downward, crocheting 15 sc through both parts. Hide the yarn tail inside the part and cut the excess yarn.

β€” Join both parts of the house on the opposite side :

Info :

Crochet 15 sc, (chain 1 on the top of the house) through both parts to the top. Move downward, crocheting 15 sc through both parts. Hide the yarn tail inside the part and cut the excess yarn.

β€” Join the left and right parts of the house :

Info :

Sew the left and right parts of the house with the yarn tail 50 cm (20 inches) long. Sew the last stitches on the outer part of the house into one stitch of the inner part. Since the outer side of the house has 22 stitches, and the inner side has 18. Hide the yarn tail inside the house. Cut the excess yarn.
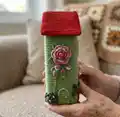
β€” HOUSE DESIGN (felt templates and finishing) :

Info :

1. Make the templates from a sheet of paper for four windows, a front door, and two trapeziums for flowerpots. 2. Prepare felt in three colors: brown, light brown, red. Prepare scissors, pencil, tapestry needle and muline embroidery threads (brown, white, several shades of pink, two shades of green). Muline threads of green shades should not be matched with the color of the house.

Info :

3. Put the template of the front door on the red felt and trace around it. Cut it out. 4. Draw all vertical and horizontal lines on red felt with a pencil. 5. Put all templates of four windows on brown felt and trace around them. Also, trace small trapeziums on the light brown felt.

Info :

6. Embroider the front door with brown thread as guided in the photos, then glue or sew the felt windows, doors and flowerpots in their positions on the house as shown in the photos and templates.

Assembly Instructions

  • Insert the firm cardboard square into the crocheted bottom of the outer part and glue together before closing the base to ensure a flat, stable foundation.
  • Align the inner part inside the outer part and adjust height by adding or unraveling rows until both parts match exactly before joining the top edges.
  • Join both parts at the top by crocheting through both layers (15 sc, chain 1 on the top) along the top edges, then hide the yarn tail inside and trim.
  • Sew the left and right sides together using a 50 cm (20 in) yarn tail, matching outer 22-stitch sides to inner 18-stitch sides as described and hiding tails inside the house.
  • Trace and cut felt templates for four windows, a door and two trapeziums, then embroider details on felt before gluing or sewing pieces onto the house front for a polished look.

Important Notes

  • πŸ’‘Yarn consumption, size, and appearance of the toy depend on crochet density and how you hold the yarn; always check gauge and adjust hook if needed.
  • πŸ’‘Make sure you crochet tight enough; otherwise the stuffing or inner parts may show through the stitches.
  • πŸ’‘Use stitch markers to mark corners and key stitch counts (for example mark the 22-stitch intervals) to ensure accurate shaping and joining.
  • πŸ’‘Insert cardboard templates carefully and glue before placing inside the crocheted part to ensure a neat and stable interior support.

These tall Big Houses are a delightful mix of crochet and crafting, combining DK cotton yarn with felt details and embroidery to create cheerful decor. They sit perfectly on a shelf or windowsill and make thoughtful handmade gifts for friends and family. Enjoy assembling, customizing colors, and adding tiny floral or window details to make each house uniquely yours. 🧢🏠🌸

You ask,

we answer.

FAQs

What size will the finished piece be?

The finished house using the materials stated in this pattern is approximately 19.5 and 17.5 cm (7.7 and 6.9 inches) in height depending on which house size you make.

Can I use different yarn weights for this pattern?

Yes, you can use different yarn weights, but this will affect the final size; if you change yarn weight, choose an appropriate hook and expect the finished dimensions to change.

Do I need prior crochet experience for this pattern?

This pattern is rated intermediate, so basic knowledge of single crochet, magic ring, increases and decreases, and working in rounds is recommended.

How long does this project typically take to complete?

Most crocheters complete one house in approximately 5-7 hours, though time may vary based on experience level and how many decorative details you add.

What materials do I need for the windows and doors?

You need thin firm felt in brown, light brown, red and white plus embroidery thread to draw and stitch window and door details; templates are traced onto felt and cut out.