🧢 Beautiful ✨ Detailed πŸ’ Adorable

Pillow "Bunny" Amigurumi Pattern

Pillow
4.7β˜… Rating
5-7 Hours Time Needed
3.0K Made This
βœ‚οΈ

Intermediate Level

Ideal for those with basic crochet experience, featuring slightly more advanced stitches and techniques to expand your skills.

⏱️

Weekend Treat

Takes 5-7 hours, making it an enjoyable project to finish over a couple of days.

🧸

Cute Companion

An adorable friend to cherish, handcrafted with love to bring comfort and joy for years to come.

About This Pillow "Bunny" Amigurumi Pattern

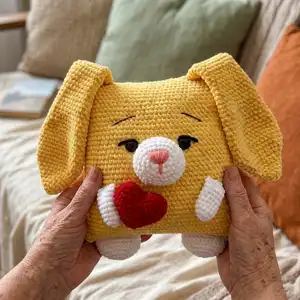
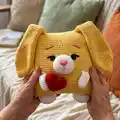
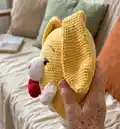
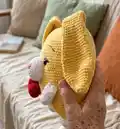
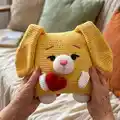
This pattern creates a soft plush 'Bunny' pillow with long floppy ears and little arms and legs for a playful personality. You will crochet a square pillow front, attach a rounded nose detail, ears, arms, legs and an optional tail. The design uses plush yarn to create a cuddly velvet texture that is perfect for nurseries and cozy corners.

Pillow

Detailed row-by-row instructions are included for each piece with clear assembly placement notes. The pattern is great for using plush yarn leftovers and makes a lovely handmade gift.

Why You'll Love This Pillow "Bunny" Amigurumi Pattern

I absolutely love this pattern because it turns a simple pillow into a lovable character with minimal sewing. I enjoyed using plush yarn to create a soft, tactile surface that children will want to hug. The shape is versatile so you can tweak ears, eyes, and colors for different personalities. I also love that the pillow combines home decor with toy-like charm, making it both practical and whimsical.

Pillow Pillow Pillow Pillow

Switch Things Up

I love experimenting with color palettes when I make this pillow; I often swap the yellow for pastel mint or blush pink to match nursery decor.

I sometimes change the plush yarn to a standard worsted yarn and a larger hook to create a firmer, more structured cushion β€” it changes the size and feel nicely.

I like to make miniature versions for keychains by using thinner yarn and a smaller hook; it creates tiny pocket pals perfect for gifts.

I often replace safety eyes with embroidered eyes for baby-safe versions, using contrasting yarn for a stylized look.

I sometimes add a tiny crocheted accessory like a bow, scarf or heart to the front to personalize each bunny.

I recommend trying different ear lengths and shapes β€” longer floppy ears create a sweeter look, while shorter rounded ears are more classic.

For a posable look, I occasionally add thin wire into the ears or limbs before finishing but I mention this only for adult-made items due to safety considerations.

I also enjoy adding subtle facial expression changes: moving the eyelid embroidery slightly up or down can make the bunny look sleepy or cheerful.

If you prefer a firmer pillow, use denser stuffing and a slightly smaller hook to tighten the fabric and hold shape better.

I often mix yarn textures for contrast β€” plush yarn for the body and smooth cotton for details gives a lovely tactile difference.

Common Mistakes & How to Fix Them

βœ— Not counting the initial chain correctly causes the pillow edges to be uneven; recount your chains before joining and check you have 90 chains for Row 1. βœ— Skipping the extra 10-11 single crochets at the end of the last pillow row will make the edge too short; crochet the additional 10-11 sc to reach the pillow edge as instructed. βœ— Stuffing too little or too unevenly results in flattened corners and poor shape; fill the pillow slowly, building corners carefully and adjusting stuffing for an even shape. βœ— Placing the nose or eyes in the wrong rows will disturb facial balance; position the nose between rows 16 and 26 and insert safety eyes between rows 24 and 25 with 9 sc between them.

Pillow "Bunny" Amigurumi Pattern

Make a cuddly bunny pillow that doubles as a decorative cushion and a soft toy. This pattern guides you through crocheting a plush square pillow, a sweet snout, ears, arms, legs and optional tail using plush yarn. Clear step-by-step rows and assembly notes help you stitch, stuff and finish a charming bunny pillow to gift or keep.

Intermediate 5-7 Hours

Materials Needed for Pillow "Bunny" Amigurumi Pattern

β€” Main Fabric

  • 01
    Himalaya Dolphin Baby plush yarn (or YarnArt Dolce) - Yellow, approximately 3 skeins
  • 02
    Himalaya Dolphin Baby plush yarn - White, less than half a skein for nose, arms and legs
  • 03
    Pink yarn (plush or semi-cotton) - small amount for nose embroidery
  • 04
    Black yarn or semi-cotton thread - small amount for eyelids and eyebrow embroidery
  • 05
    Holofiber (polyester stuffing) - enough to fill pillow

β€” Tools Required

  • 01
    Crochet hook size 3.5mm (you can use 4mm)
  • 02
    Needle with a large eye for sewing
  • 03
    Safety eyes 22-24mm (2 pieces)
  • 04
    Transparent glue
  • 05
    Scissors
  • 06
    Stitch markers (optional)
  • 07
    Yarn needle for weaving and sewing
  • 08
    Holofiber filler (polyester stuffing)

Progress Tracker

0% Complete

β€” Pillow :

Info :

Crochet with yellow yarn.

Row 1 :

90 ch

Row 2 :

connect with the first loop crocheting 1 sc (it will be the first sc of the second row) and crochet 89 sc {90}

Rows 3 - 40 :

(38 rows) 90 sc {90}

Info :

In the end of the last row crochet 10-11 sc more to the edge of the pillow.

Info :

Tighten the thread, leave the long end for sewing. Sew the top of the pillow using a needle.

β€” Nose :

Info :

Crochet with white yarn.

Row 1 :

4 ch

Row 2 :

from the second loop from the hook: 2 sc, 3 sc in one loop. On the other side of the chain: 2 sc, 3 sc in one loop {10}

Row 3 :

2 sc, inc, inc, inc, 2 sc, inc, inc, inc {16}

Row 4 :

(3 sc, inc) - repeat 4 times {20}

Row 5 :

(4 sc, inc) - repeat 4 times {24}

Row 6 :

(4 sc, inc) - repeat 5 times {30}

Row 7 :

(5 sc, inc) - repeat 5 times {35}

Row 8 :

35 sc

Info :

Tighten the loop, leave the long thread for sewing. Embroider the nose with pink plush (or semi-cotton) thread. Tie a knot and hide the thread inside.

Info :

Fill the detail and sew on it between the rows 16 and 26, counting from the bottom of the pillow. Secure the thread, hide it inside the pillow.

Info :

Insert the safety eyes (or sew on them if you have buttons) between the rows 24 and 25. The distance between the eyes is 9 sc.

Info :

Embroider the eyelids with black plush yarn. Secure the thread inside the pillow. Optional you can glue the eyelids to the pillow.

β€” Ears (2 details) :

Info :

Crochet with yellow yarn.

Row 1 :

6 sc in magic ring {6}

Row 2 :

(inc) - repeat 6 times {12}

Row 3 :

(5 sc, inc) - repeat 2 times {14}

Row 4 :

(6 sc, inc) - repeat 2 times {16}

Row 5 :

(7 sc, inc) - repeat 2 times {18}

Row 6 :

(8 sc, inc) - repeat 3 times {20}

Row 7 :

inc, 8 sc, inc, inc, 8 sc, inc {24}

Row 8 :

inc, 9 sc, inc, inc, 10 sc, inc, inc {29}

Row 9 :

12 sc, inc, inc, 15 sc {31}

Rows 10 - 15 :

(6 rows) 31 sc

Row 16 :

14 sc, dec, 13 sc, dec {29}

Row 17 :

29 sc

Row 18 :

13 sc, dec, 12 sc, dec {27}

Rows 19 - 20 :

(2 rows) 27 sc

Row 21 :

12 sc, dec, 11 sc, dec {25}

Row 22 :

25 sc

Row 23 :

1 sc, dec, 11 sc, dec, 9 sc {23}

Row 24 :

23 sc

Row 25 :

1 sc, dec, 10 sc, dec, 8 sc {21}

Row 26 :

21 sc

Row 27 :

2 sc, dec, 8 sc, dec, 7 sc {19}

Rows 28 - 38 :

(11 rows) 19 sc

Info :

Tighten the thread, leave the long thread for sewing.

β€” Arms (2 details) :

Info :

Crochet with white yarn.

Row 1 :

6 sc in magic ring {6}

Row 2 :

(inc) - repeat 6 times {12}

Rows 3 - 9 :

(7 rows) 12 sc {14}

Info :

Do not fill the arms. Sew two halves, crocheting 6 sc. Leave the long thread for sewing.

β€” Legs (2 details) :

Info :

Crochet with white yarn.

Row 1 :

6 sc in magic ring {6}

Row 2 :

(inc) - repeat 6 times {12}

Row 3 :

(1 sc, inc) - repeat 6 times {18}

Row 4 :

(2 sc, inc) - repeat 6 times {24}

Row 5 :

(11 sc, inc) - repeat 2 times {26}

Row 6 :

26 sc

Row 7 :

(11 sc, dec) - repeat 2 times {24}

Row 8 :

24 sc

Info :

Fill the leg a little, not tightly. Sew two halves crocheting 12 sc. Leave the long thread for sewing.

β€” Tail :

Info :

Optional you can crochet the tail.

Row 1 :

6 sc in magic ring {6}

Row 2 :

(inc) - repeat 6 times {12}

Row 3 :

(1 sc, inc) - repeat 6 times {18}

Row 4 :

(2 sc, inc) - repeat 6 times {24}

Row 5 :

(3 sc, inc) - repeat 6 times {30}

Row 6 :

30 sc

Row 7 :

(3 sc, dec) - repeat 6 times {24}

Info :

Leave the long thread for sewing. Fill the tail and sew on it to the pillow from behind. Secure the thread, hide it inside.

β€” Assembling :

Info :

Fill the pillow evenly (slowly, fill the corners especially well) and sew the bottom of the pillow using the needle. Give an even shape.

Info :

Sew on the ears to the top of the pillow (count 3-4 sc from the edge of the pillow).

Info :

Sew on the arms a little diagonally between rows 14 and 17. The distance between the arms is about 18-19 sc.

Info :

Sew on the legs to the bottom of the pillow, counting 2-3 sc from the edge of the pillow.

Info :

Take the black semi-cotton thread and embroider the eyebrows. Secure and hide the thread inside the pillow.

Info :

Optional: glue eyelids or secure them by embroidery. Make final adjustments and weave in all ends.

Assembly Instructions

  • Fill the pillow evenly, paying special attention to the corners; sew the bottom closed with a needle and give the pillow an even shape.
  • Attach the nose between rows 16 and 26 (counting from the bottom of the pillow) and sew securely, hiding and securing the thread inside the pillow.
  • Sew the ears to the top of the pillow about 3-4 sc from the edge, positioning them symmetrically for balance.
  • Sew the arms diagonally between rows 14 and 17 on the front of the pillow, spacing them about 18-19 sc apart.
  • Sew the legs to the bottom of the pillow, positioning them 2-3 sc from the edge so the pillow sits evenly.
  • Insert safety eyes between rows 24 and 25 with a distance of 9 sc between centers; embroider eyelids and eyebrows and secure threads inside.

Important Notes

  • πŸ’‘Work in spiral where indicated and use stitch markers if you prefer to mark the beginning of rounds for counting.
  • πŸ’‘Use the recommended hook sizes and yarn weight for similar final size; tension and yarn choice will change dimensions.
  • πŸ’‘Leave long tails for sewing on details and hide all ends inside the pillow when securing to keep a neat finish.
  • πŸ’‘Fill the corners gradually to avoid lumps and to maintain the square pillow shape during finishing.

This sweet Bunny Pillow is designed to brighten a nursery, playroom or couch with handmade charm. Make yours in sunny yellow or swap colors to match your home and personality. Each pieceβ€”nose, ears, arms and legsβ€”adds lovable detail and lots of heart. 🧢🐰✨

You ask,

we answer.

FAQs

What size will the finished piece be?

The pillow measures approximately 34 cm in height and 42 cm in width (not counting the full length of the ears) when using the recommended plush yarn and hook size.

Can I use different yarn weights for this pattern?

Yes, you can change yarn weight but this will affect final size and texture; adjust hook size accordingly and expect a different finished measurement.

Do I need prior crochet experience for this pattern?

This pattern is rated intermediate, so basic knowledge of single crochet, increases, decreases and working in rounds is recommended.

How long does this project typically take to complete?

Most crocheters complete this project in 5-7 hours, though time may vary depending on experience level, yarn choice and detailing.